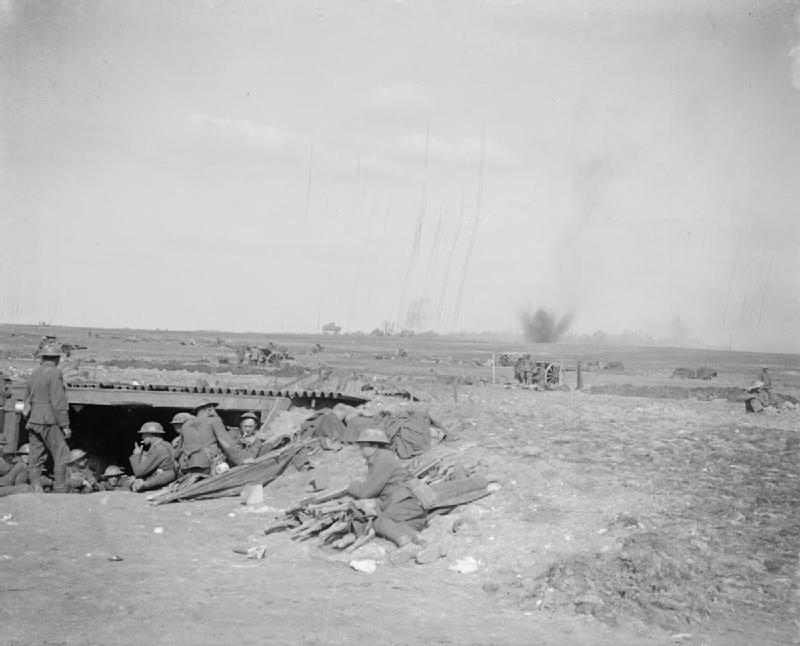
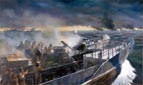
Australian gunners manhandle 18 Pdr Guns inland from ANZAC Cove
25 April was the anniversary of the landings on the Gallipoli peninsular. It has become synonymous with the Australian and New Zealand forces, the ANZACs. This was the day when the forces of these dominions first played a significant role in military operations. Gallipoli; in particular ANZAC Cove has become a place of pilgrimage for antipodeans commemorating the endeavours and sacrifices of the antipodean dominions.
ANZAC Corps Artillery Positions 8th May 1915. The broken hilly ground has forced the guns to be deployed forward in ones and twos. The guns marked “M” are mountain guns. (HQ ANZAC CORPS GS WD May 1915)
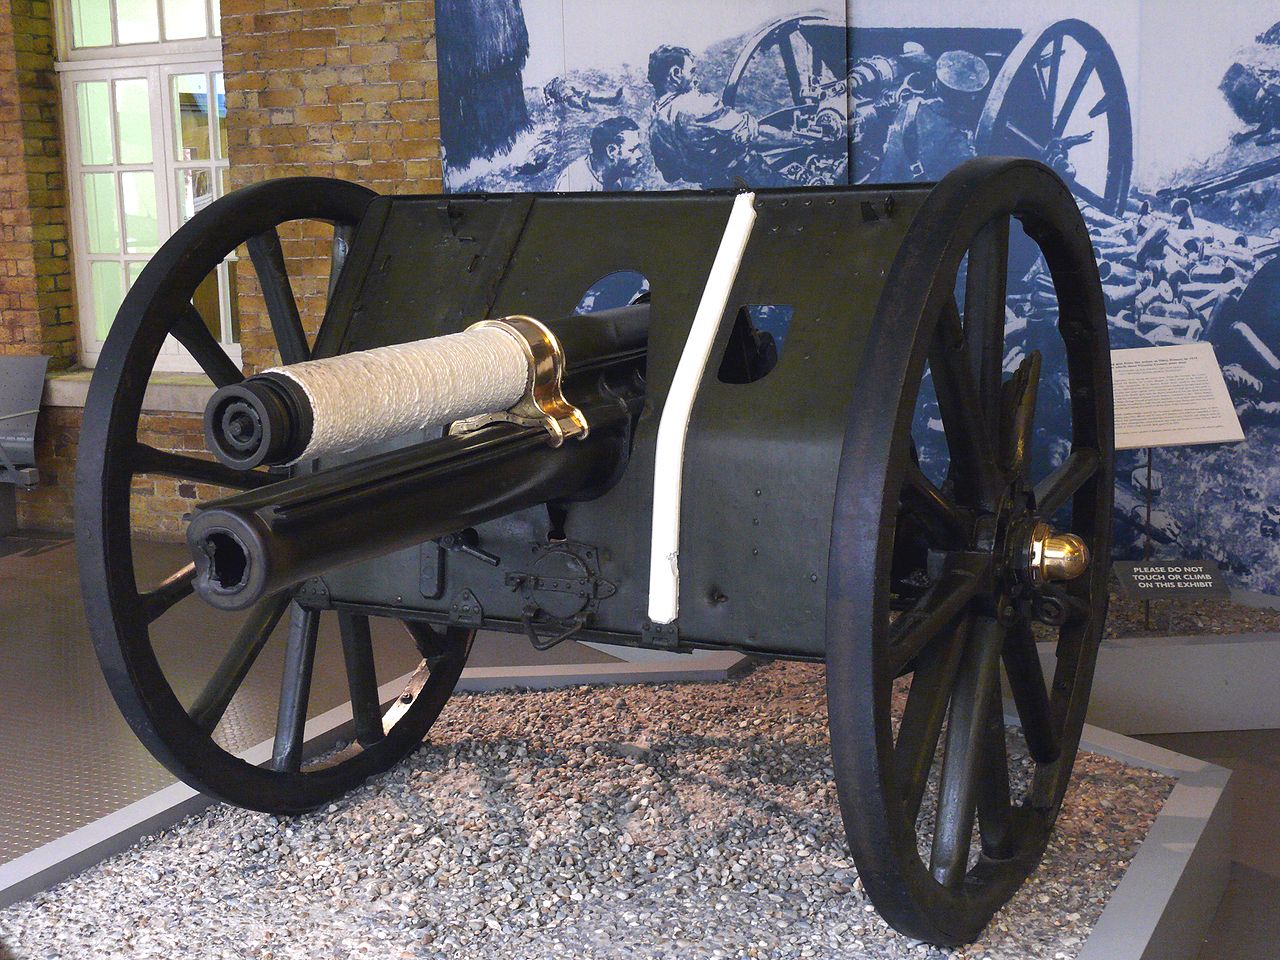
But the ANZAC corps which fought in Gallipoli was not just made up of Aussies and Kiwis. British and Indian gunners also served in it. The Corps comprised the 1st Australian Division and the Australian and New Zealand Division. Neither included as much artillery as a British infantry Division. The 1st Australian Division included three artillery brigades, each of three four gun batteries equipped with 18 Pdr field guns, a total of 36 x 18 Pdr guns. The Australian and New Zealand Division’s artillery support was the 1st New Zealand Artillery Brigade with twelve 18 Pdr guns and a howitzer battery of four 4.5” Howitzers. By comparison a British infantry division was supported by fifty four 18 Pdr guns, eighteen 4.52 Howitzers and four 60 Pdr guns. The ANZAC Corps had less than half of the artillery that supported comparable British formations.
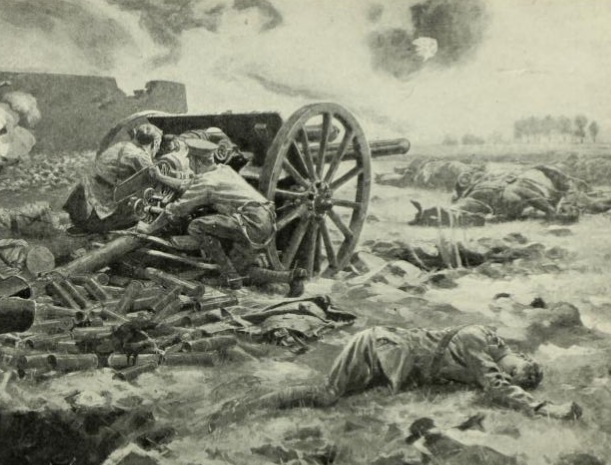
It was particularly short of howitzers capable of lobbing high explosive shells over hills and into trenches. Almost all of its guns were 18 Pdr guns with a flat trajectory and very difficult to deploy in the hills inland from Anzac Cove. Often the way to enable the guns to engage was to run them forwards with the infantry in the direct role. These guns were supplied solely with shrapnel shells which was almost useless against troops in trenches. Although the Allies could call on the support of the naval guns of the fleet, these too had a flat trajectory and could not be easily brought to bear onto Turkish positions among the hills.
At least three other Imperial gunner units were brought in to support the ANZAC Corps to redress this deficiency. Even so, the expeditionary force as a whole was never supplied with the level of artillery support, either in the number of guns or ammunition that was found necessary to support a successful attack.
Gunners from 24 Mountain Battery and their 10 Pdr BL Mountain Gun
The 7th Mountain artillery brigades of the Indian Army was attached to the ANZAC Corps.The mountain artillery were the only artillery part of the Indian army manned by Indian rather than European gunners. Ever since the Indian Mutiny Indians were not entrusted with artillery, with the exception of the relatively small mountain artillery, a kind of elite which supported operations on the North West frontier, between British India and Afghanistan.
The two batteries which formed the brigade: 1st (Kohat) Mountain Battery and 6th(Jacobs) Battery are still in existence in the Pakistani Army. These were equipped with the BL 10-pounder Mountain Gun. This was a 2.75 inches (69.8 mm) calibre gun, which lacked a recuperator or recoil system. It could be dismantled into 4 loads of approximately 200 pounds (90.7 kg) for transport, typically by mule. It could fire a shrapnel round or common shell. This was a shell filled with a low explosive such as gun powder. As a whole this was a weapon better suited to colonial warfare than a C20th battlefield. It was deployed in sections of two guns, as can be seen in the sketch map.
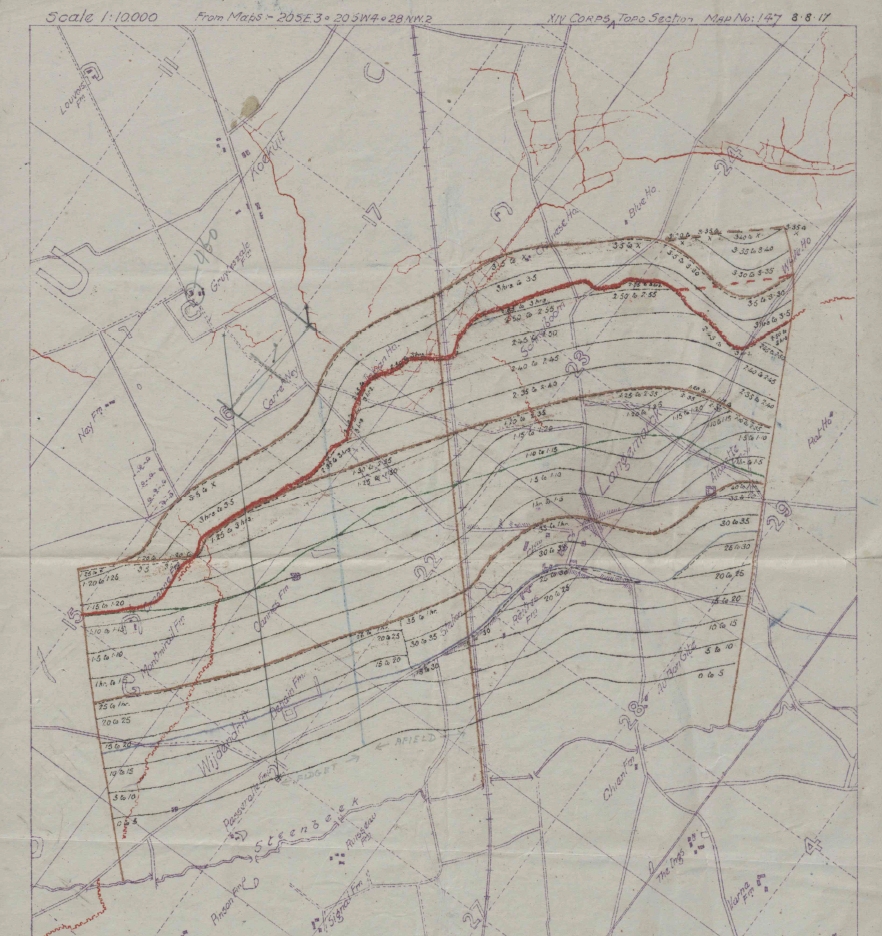
Sketch map showing artillery positions on 11th May 1915. (ANZAC Corps GS WD May 1915)
Major Ferguson, (known to the Australians as “Percussion Sahib”) commanded the 21st Mountain Battery. He met Colonel Sinclair-Maclagan, commander of the 3rd Infantry Brigade on the morning of the 26th April . ‘I found him at last, plumb in the middle of the firing line and asked where he wanted artillery support…. He waved his arm through a semi circle and said everywhere around there. I selected a gun position pretty high up and ordered up the battery. After a long interval a very heated subaltern arrived with a couple of gunners carrying wheels and said that all the loads would have to be carried up as the ground was very steep and sodden with rain, and the mules weak, and that we could not possibly have four guns in action in under an hour… We got into action at last and began shelling movement on the chessboard, while two guns began shelling us… The Australians were very polite about our assistance that day, as always.” Within three weeks the 7th Mountain Brigade unit needed 75 replacement soldiers.
5″ Bkl Howitzers firing Gallipoli 1915
The 1/4 Lowland Brigade RFA, (4th City of Glasgow) equipped with 5“ Howitzers was transferred from Cape Helles to support the ANZAC Corps at the end of July 1915. This was a territorial unit whose heritage and traditions are maintained by 207 (City of Glasgow) battery RA, who hold what is believed to be the breech of the gun which fired the last rounds on the Gallipoli campaign.
6 Pdr Howitzer landed at ANZAC Ciove
A lone 6” howitzer, under the the command of Regimental Sergeant Major David Hepburn with a Royal Marine Artillery detachment was deployed ashore in mid May and attached to the New Zealand Artillery Brigade. His gun had been deployed on the battleship HMS Prince George, which was damaged below the waterline by a shell on 3rd May. “We had to fire over two successive ridges each 400 feet high at a target only 1,300 yards away. We could not see the target. We had the sea at our backs, and that was the only direction in which we did not fire. On one occasion we fired in one direction, then turned the gun round completely and fired in the other direction. One afternoon we received a message “engage enemy heavy gun!” Out came the map and from the map we laid our gun. It pointed bang over our won headquarters! It is ticklish work when the shells only just slither over the crests and when the target is only 30-100 yards from our own trenches. I never did get over the idea of firing so close to our own men.(2)
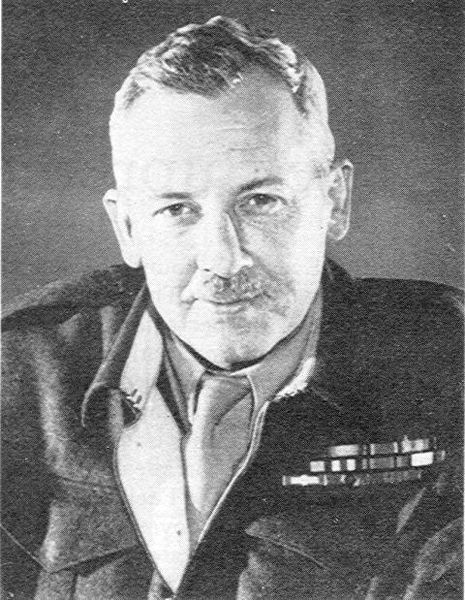
Brigadier C Cunliffe Owen CBR DSO (National Portrait Gallery)
Several of the artillery commanders in the ANZAC units were Royal Artillery Officers. Brigadier Charles Cunliffe Owen CBE was Brigadier General RA of the ANZAC Corps. A South African War veteran he had commanded 26 Brigade RFA in 1914 in the Retreat from Mons and the battles of the Marne and the Aisne and the 2nd Infantry Brigade in Ypres.
The CRA of the Australian and Zealand Division was Lieutenant Colonel G N Johnston RA. He was born in Canada but schooled in Scotland and commissioned through Woolwich. Johnson served
Brigadier G N Johnston DSO
throughout the war as CRA of the New Zealand Division receiving the CMG and DSO and mentioned in dispatches eight times.
The CRA of the 1st Australian Division was Brigadier Talbot Hobbs, an Australian architect and militiaman who ended the war succeeding Monash as the GOC of the Australian Corps. His senior staff officer, Brigade Major Royal Artillery (BMRA) was Major Stuart Anderson, a British Regular Officer. Educated at Westminster and Clare College Cambridge. Major Anderson was appointed as the Instructor in Gunnery for the Australian Commonwealth forces artillery in 1912, and in 1917 he became CRA of 1st Australian Division.(3)
Gunner Tours is happy to provide subject matter expertise for any group seeking to understand the Gunner side of the Gallipoli Campaign.
REFERENCES
1. AWM War diary HQ ANZAC CORPS GS May 1915
2. IWM Docs manuscript quoted in Hart Gallipoli
2. Venn, J, Alumni Cantabrigienses: A Biographical List of All Known Students, Volume 2
One of the first Allied soldiers to land, and be killed on Omaha beach was a Royal Artillery Officer, spy and pirate, whose story is closely linked to the James Biond story.
Omaha Beach is one of the most visited battlefields in Europe if not the world. Tens of thousands of people visit the coast between Vierville and St Laurent usually in conjunction with a visit to the Normandy American Cemetery at Colleville-sur-Mer. Some may notice the plaque on the sea wall on Dog Red beach west of the demarcation memorial at les Molins. This commemorates Operation Aquatint a commando raid which landed on the beach on 12-13 September 1942.
This raid was led by a remarkable Gunner officer who deserves to be much better known, especially by the Gunners themselves. Henry Gustavus March-Phillips(1) was a Royal Artillery Officer Reservist who served in the BEF in the 1940 battles for France and Belgium, with sufficient distinction to be awarded the MBE. Frustrated by the experience, disliking the restrictions of conventional military life and determined to make a personal contribution to winning the war, he joined the Special Operations Executive (SOE) and founded what seems to have been his own force of commandos, the Small Scale Raiding Force, also known as No 62 Commando.
This was an organisation which owed little to the usual principles behind British army organisations. About half of the 55 man unit were British Officers, with the other ranks mainly volunteers from occupied countries, and a handful of British NCOs.
According to Marcus Binney, whose father served in SOE and whose mother knew him before the War, “March-Phillips had the guts and the daring-do to carry off great coups, as well as an engaging ability to admit his own fears to others. But while courage was his greatest attribute it was also to be his undoing, for at times it veered into foolhardiness. On occasion, impetuosity clouded his judgements and prevented him from weighing risks as a commander should. His success was due above all to his ability to motivate his men, and to forge a team in which rank played little part. All worked together with total commitment, pitching their physical strength, stamina, quick wits and resourcefulness into a series of pioneer commando raids intended to show in the desperate days after Dunkirk, that Britain was still on the attack.…’ In operations that depended on careful preparation and rehearsal, intense fitness, superb morale and swift execution , March-Phillips was a brilliant leader, able to delegate tasks to others and giving all the sense of playing a vital role. Some found him exasperating, and could never have served with him, but those who did gave him their complete loyalty and trust.
Marjorie March-Phillips nee Stewart Actress and SOE Operative
March-Phillips was an archetypal English Hero, a good looking all rounder, keen on sport, a countryman but literary minded and above all , incredibly brave. He was also described by one of his NCOs as “impatient with anybody who was slow or dithery, and valued the importance of getting on with something quickly, doing whatever you did well, and a kind of built -in dislike of any sort of slackness … And a great scorn of anyone who was carrying an ounce too much weight’.
In January 1942 he met, and then married the actress Marjorie Stewart, who was working in SOE as the lift operator in Baker Street, but rose to serve in a “Miss Moneypenny” role as secretary to Patrick Howarth an SOE Controller. More about her career More about her acting career on the IMDB Database
March-Phillipps cut out SS Duchess d’Aosta from a neutral Spanish port in an operation that could have been a plot for a Bond film.
In early 1942 the SSRF carried out Operation Postmaster,, a raid to sink and seize German and Italian ships in the Neutral Spanish port of Fernando Po. The operation was a great success and March-Phillips and his men towed the Italian liner Duchess d’Aosta to Lagos in an exploit that could have appeared in a James Bond story. It has been argued that the story WAS the inspiration for some of the Bond stories, as Ian Fleming was the Press officer for the operation. Afterwards March-Phillips was awarded the DSO for the operation which also resulted in prize money from the Duchess d’Aosta. More about Operation Postmaster here.
During the Summer of 1942 the SSRF started raiding the French coast using a modified MTB, named “The Little Pisser” on account of its turn of speed. Operation Barricade was a raid to the radar site at Pointe de Saire south of Barfleur, which inflicted nine casualties on a German patrol. Operation Dryad was the abduction of the seven man garrison of the Casquets Light house on the night 1-2 September.
Operation Aquatint (c) Frank Baldwin 2015
Operation Aquatint was intended to seize a German guard from the small garrison Sainte-Honorine-des-Pertes, an isolated coastal town on the cliffs between what would be known as Omaha beach and Port-en-Bessin. The raid was scheduled for the night of 11-12th September. But as one of the survivors recalled ‘We couldn’t find this ruddy kink in the cliff, so we went back the next night and still couldn’t find it. Then Gus said “What do you think chaps, shall we have a bash?”’ Sadly they had made a navigation error and were 6 km West of where they had planned. They had navigated to Cap Barfleur on the Eastern extremity of the Cotentin peninsular and plotted a course from there, but were 3.5 degrees off course. Instead of landing near the Sainte-Honorine-des-Pertes, they had landed near the village of St Laurent, in what had already been identified as a likely invasion beach. Instead of stalking a guard, they were discovered by a patrol with a dog. They attempted to seize one of the patrol, but the numerous defenders from Infantry Regiment 726 garrison, under the command of Sergeant Major Pieh (2) opened fire. No one got back to the MTB. March-Phillips and two others were killed on the night of the raid. The remainder were captured evading through France. Of these one was executed by the Germans and two others, disappeared without trace in German camps. More on Operation Aquatint here
March-Phillips, reported missing, was recommended for a bar to the DSO for his leadership, approved by Lord Mountbatten. After his death had been confirmed he was awarded a mention in dispatches, in place of the DSO which was not awarded posthumously.
Operation Aquatint was a heavy blow for SSRF and in 1943 it was disbanded and the survivors became the nucleus of the 2nd Regiment SAS. One of the SSRF members, Anders Larsen would be the recipient of the sole VC awarded to the SAS during the War.
March-Phillips was also an author and a poet. His novels include an intriguing spy novel “Ace High” featuring John Sprake as its hero. It is possible that , had he survived, Gus March-Phillips might have beaten Ian Fleming to publishing spy novels based on SOE. Perhaps the name John Sprake would be as well known as James Bond. More here about James Bond and John Sprake
The Grave of Major G H March-Phillips DSO, MBE. (c) Frank Baldwin 2014
Major Henry Gustavus March-Phillips DSO MBE, Mentioned in Dispatches was buried in the churchyard of the village of St Laurent-sur-Mer alongside Sergeant Williams of the Queens Regiment and Private Leonard of the Pioneer Corps, whose real name was Richard Lehniger, a Jewish communist, WW1 veteran from the Sudetenland.
March Phillips’ grave is covered with a stone slab inscribed with what seems to be a poem of his own composition. “If I must die” which you mcan see in the photograph.
Gus March-Phillips deserves to be remembered by the Royal Artillery. Much of the contribution of the Royal artillery in the Second World War is a story of collective success as an integral part of the British war machine, epitomised by the motto “Ubique”. He was a hero, an inspirational leader and a larger than life character. Not without flaws, but a man whose actions could easily be case studies in leadership. His legacy includes the antecedents of the modern SAS. His style lives on in the world Ian Fleming created.
Gunner Tours is the only battlefield tour business to include the story of Gus March Phillips, and we tell his story and that of other Gunners in our tours to the battlefields of Normandy. Operation Aquatint wasn’t the most important historic event to take place on Omaha beach, but its story should be known to Gunners.
Gunner Tours have launched the 2015 public tour programme. They tell the story of the key battles with a focus on the role that the artillery played, and the stories of those who served the guns. Around 25% of the British Army of the First World War served in the Royal Field, Garrison or Horse Artillery, and a similar proportion in the Second World War.
First World War
The First World War was an artillery war. Success and failure was largely determined by how artillery was used and how well the guns were served.
Somme and Arras 19-22 June 2015 A long weekend of four days
and three nights to two of the largest battles of the First World War. The 1916 battle of the Somme was the largest and most costly battle fought by the British Army. The Arras battles of April-May 1917 were the most intense of the war. This area was also where the war on the western front was decided in the open warfare of 1918. £319
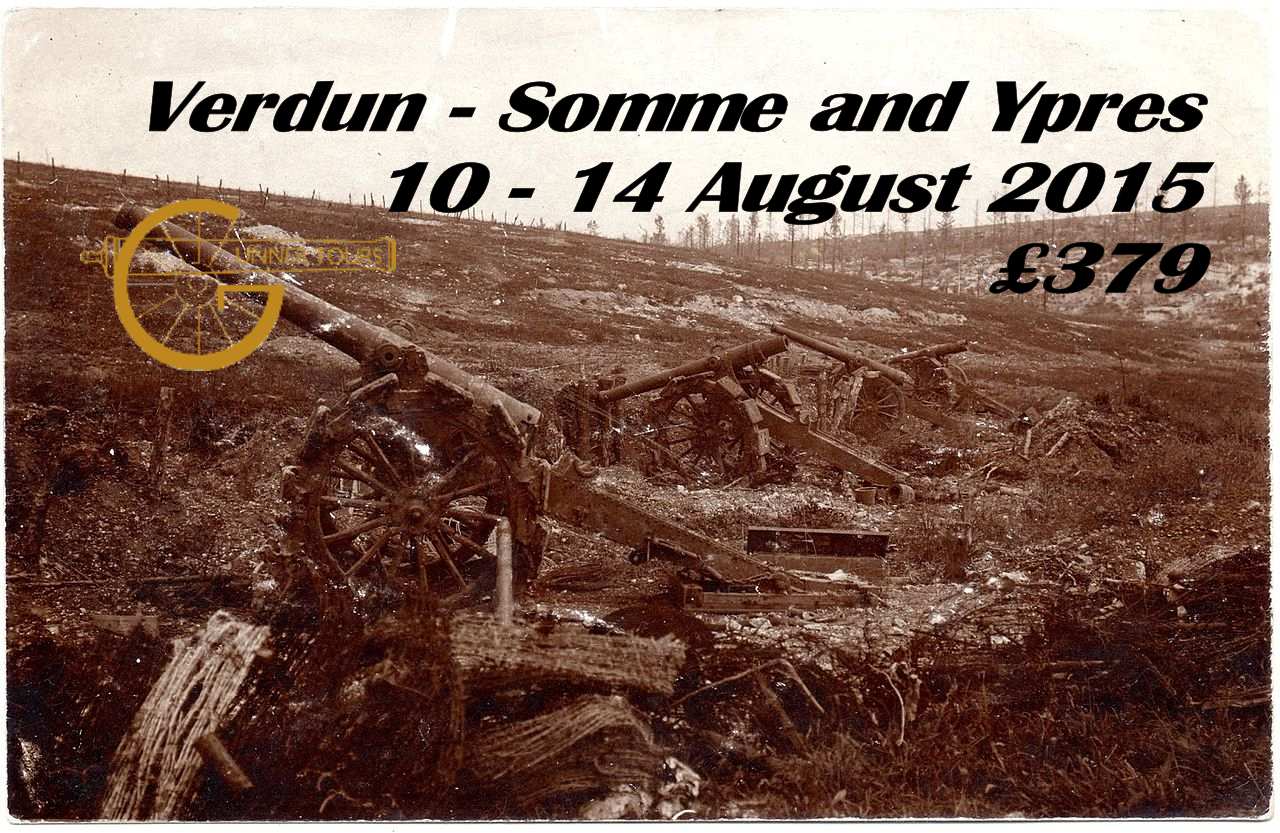
Verdun, Somme and Ypres 10-14 August 2015. Five days and four nights. We will visit three of the most important battlefields on the Western Front, and look at the British French and German gunners. The battle for Verdun in 1916 was the first of the huge battles of attrition. The Somme offensive of 1916 was designed to relieve the pressure on the French army at Verdun. The battles for the Ypres salient were the longest and bloodiest battles fought in Belgium. £379
“Wipers” 11-14 September 2015 Four days and three nights. The Belgium city known as Ieper in Flemish and Ypres in French was known to British soldiers as “Wipers.” It was the main seat of British Army’s operations in Belgium from October 1914 to the end of the First World War, and a focus for Remembrance since then. Our tour will look at the artillery side of the story and of the gunners who served and suffered there. £319
BEF Western Front 9-13 November 2015 Five days and four nights, covering the sites of the major battles of the British Expeditionary Force from Mons in 1914 to victory in 1918. £349
Second World War
Gunner Tours is offering two tours to Normandy, based on the specialist knowledge and expertise of our chief guide Frank Baldwin who has written about the role of artillery on D Day and in the Normandy campaign as well as providing the written guide to the D Day Beaches for the Royal Artillery for the 70th Anniversary of D Day.
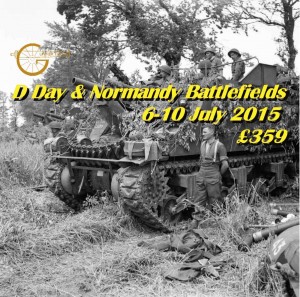
D Day and the Battle for Normandy 6-10 July 2015 This is five
days and four nights expedition to the D Day sites and some of the battles inland. £359
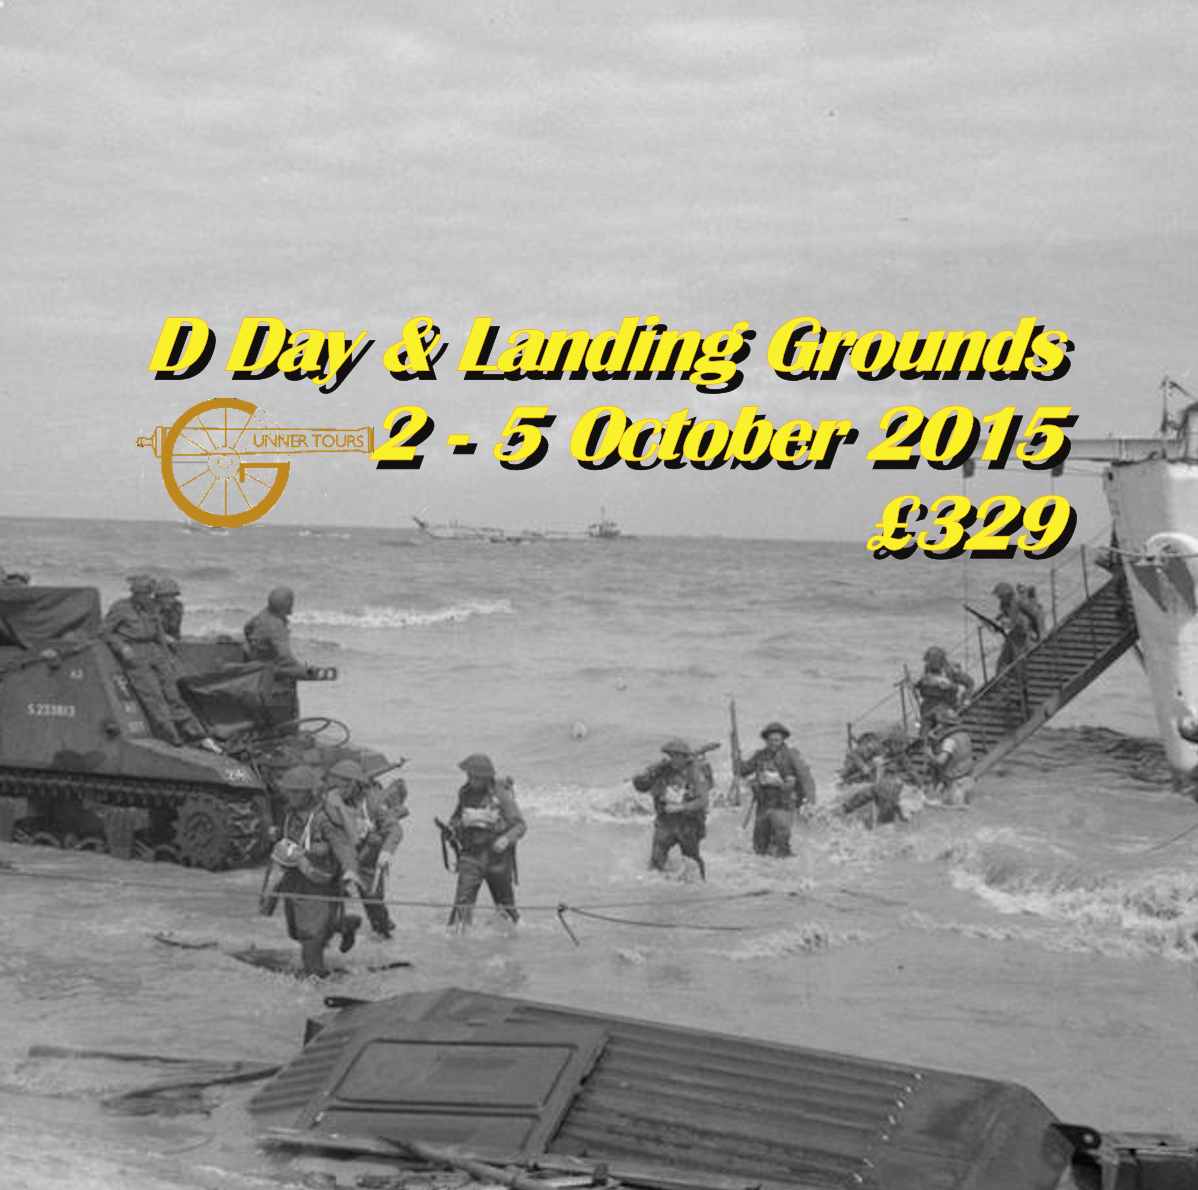
D Day Beaches and Landing Sites 2-5 October 2015, A visit over a long weekend to the D Day beaches and Landing sites. There is a gunner story on each beach and landing site. £329
For details on each tour click the link in the date or check the details on the Gunner Tours website
Two dramatic episodes from 1914 have been the centre of commemorations for the Royal Artillery. E Battery were supporting the cavalry screen ahead of the BEF when they fired the famous first shot on 22nd August 1914. The role of L battery in the “Affair at Néry” on 1st September 1914 has caught media and public attention ever since 1914. The German surprise attack on the 2nd British Cavalry brigade was beaten off with heroic acts rewarded by three Vcs and two MMs to the men of L Battery, and led to the award of the Honour Title of “Néry”. These events have tended to overshadow the other actions undertaken by E and L battery during the First World War, and by other batteries of the current 1st Regiment RHA.(1)
The current batteries are A Battery (The Chestnut Troop), B, E, L (Nery) and O Battery (The Rocket Troop) . Their 1914 home stations and wartime deployment are summarised in the following table.
Battery
Station in 1914
Deployment
A
Ambala India
Indian Bde RHA then XVIth Bde RHA 4 Cav Div/Army troops
B
Ambala India
XVth Bde RHA 29 Div
E
Newbridge, UK
1 Cav Div then 3 Bde RHA – 2 Cav Div.
L
Aldershot, UK
1 Cav Div then XVth Bde RHA
O
Ipswich,UK
Vth Brigade RHA 8 Div then Army troops
Each Battery was commanded by a Major with a battery captain, and three subaltern section commanders. Two Subsections formed a Section and in a six gun battery these would be designated as Left, Centre and Right Sections. A Subsection consisted of a single gun and limber drawn by six horses (with three drivers), eight gunners (riding on the limber or mounted on their own horses), and an ammunition wagon also drawn by six horses (with three drivers).
The 13 Pdr Nery gun on display in the Imperial War Museum london
RHA batteries were armed with the 13 Pdr Gun. The 13 Pdr fired a 13 lb shrapnel shell to a range of 5,900 yd (5,400 m). The 18 Pdr, which equipped the Field Artillery fired a projectile weighing nearly 50% heavier and for which an HE shell was in service by October 1914. It also out-ranged the 13 Pdr and had a range of 6,525 yd (5,966 m) and 7,800 yd (7,100m) with the trail dug in. During the course of the war all but E Battery were re-equipped with 18 Pdr.
The introduction of the dial sight had made it possible to operate in an indirect role. However the flat trajectory of the 13 Pdr and the limited signal equipment tended to restrict indirect fire to situations where the battery commander could position the guns behind cover and act as the observer from a position where he could see the guns and the target. There were no established forward observer parties, but as trench warfare developed and telephones and wire became more widely available, an observation post might be deployed at some distance from the battery or a liaison team sent to the infantry.
Although indirect fire techniques were known and practised, the RHA went to war with equipment better suited to operating in the direct role. The 13 Pdr had a flat trajectory and it would be difficult to find good indirect gun positions in broken country such as the industrial landscape of Mons. The only ammunition provided for the 13 Pdr was shrapnel, which is very effective against troops in the open, but almost useless against troops behind cover.
The part the Horse Artillery played in the opening months was not far removed from pre war expectations. British Cavalrymen were equipped with the same SMLE rifle as the infantry and marksmanship training, which gave them an edge of the carbine equipped Germans in dismounted action. However, it was the battery of 13 Pounders supporting each brigade which contained the major part of its fire power, and guns which would inflict the majority of casualties in the Fist World War..
Positioning a 18 Pdr Gun The Battle of Arras April 1917
The Commonwealth War Graves Commission (CWGC) records 233 men as serving in one of the batteries.(2) Given WW1 norms of two wounded for each dead, this would imply around 700 casualties during the war. The establishment of a 1914 RHA Battery was five officers and 200 other ranks, giving 1,025 for the five current batteries. This gives a conservative estimate of a fatality rate of just under 23% of the establishment across all batteries. The casualties were not evenly distributed. L Battery’s 78 fatalities implies a figure of killed and wounded well in excess of the battery establishment of 205. Nor was 1914 the year in which L Battery suffered its highest casualties.
Current 1 RHA Batteries Fatalities 1914-1921
A
B
E
L
O
All Batteries
1914
0
0
4
26
0
30
1915
1
12
1
9
3
26
1916
2
8
0
1
5
16
1917
3
30
9
30
17
89
1918
23
6
2
11
12
54
1919
0
2
3
0
1
6
1920
0
4
1
1
0
6
1921
3
3
0
0
0
6
Total
32
65
20
78
38
233
(Note that these figures are an indicative minimum. The CWGC database does not always identify the unit in which a soldier served. . )
Even before Néry, the fortunes of war placed L Battery in a position to play a significant role in the battles of Elouges on the 24th and Le Cateau on the 26th. On each occasion they brought down fire on German troops attempting to outflank the army. Even without Néry curtailing their participation in the campaign, L Battery were one of the most actively engaged RHA Batteries.
The fighting in the early months of the First World War was very different to other campaigns on the Western Front, or even other campaigns of the war. The pattern of warfare was closer in some ways to that of the previous century. The battles were of short duration with one side disengaging. Mons, Le Cateau, Elouges and Néry can be identified by a single day. At Le Cateau the British Army even deployed anachronistically on an open plain with the guns drawn up in the front line as if it were 1815. It was not until the battle of the Aisne that both sides became aware of the power that C20th weapons gave to the defence. After the trench lines developed between September and November 1914 the character of the war changed to become one continuous engagement. There would be no more individual battle days as bloody as Nery, but a trickle of casualties throughout the four years of the war, with some days bloodier than others.
1915
In November 1914 O Battery arrived on the Western Front as part of the Vth Brigade RHA in the 8th Infantry Division’s artillery. . In 1915 The Chestnut Troop joined them on the Western Front as part of I Indian Brigade, Royal Horse Artillery. They both took part in the battles in the Neuve Chapelle area 1914-15.
The rebuilt L Battery joined B battery in the XVth RHA Brigade as part of the divisional artillery of the 29th Division in 1915. This division was formed from regular army garrisons around the world and first deployed in the Gallipoli campaign. It would become known as the “Indomitable” 29th and would take part in more attacks than any other formation. There is no specific monument in Gallipoli for the artillery of the 29th Division. However, one of the first fatalities suffered by the reconstituted L battery was Bombardier Darbyshire, who only relinquished the layers seat of F Sub at Néry after his ears and nose bled from concussion. He was killed on 12th July 1915 and is buried in Lancashire Landing Cemetery at Cape Helles, along with nine other horse gunners from B and L Battery. A further seventeen are buried or commemorated elsewhere in Turkey, Egypt and Malta.
1916
After the evacuation from Gallipoli the 29th Division was brought back to the Western front, in time for the big push on the Somme. The Divisional symbol of the red triangle can be seen at Newfoundland Park, and tin triangles can be seen on the packs of the soldiers from the divisions filmed on the First Day of the Somme. At 07.30 on the 1st July the 2nd Royal Fusiliers and 16th Battalion the Middlesex Regiment stormed the crater formed by the detonation of the Hawthorn mine. 2 Lt Grant-Suttie and a party of telephonists from B Battery advanced with the CO of 16th Middlesex into the mine crater, but were forced to withdraw, with Bdr Port wounded, and Bdr Brockett and Driver Indge missing. Brockett’s body was found and he lies in Hawthorn Ridge Cemetery No.1, Auchonvillers. Indge’s was never identified but might be one of the 68 unidentified graves in this cemetery. He is commemorated on the Thiepval Memorial to the Missing.
O battery also took part in the battle of the Somme supporting the operations of the 8th Division on its disastrous first day, and in October in the battle of Le Transloy. Three O battery soldiers are buried on the Somme. The lower number of fatalities in 1916 than in 1917 and 1918 might be attributed to the weakness of the German counter battery artillery in the Somme. Nor were any of the batteries placed in situations were they were exposed to small arms or direct fire. There were very few occasions in 1916 where sufficient ground had been gained to justify moving the guns forward. No German counter attacks threatened the guns.
1917
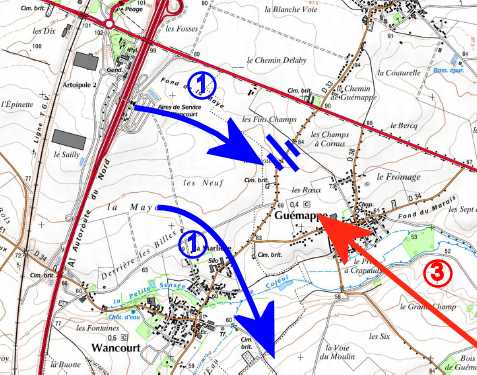
Second Battle of the Scarpe: 24 Apr 1917 15 Brigade RHA action. (1) 50 Div Captures Wancourt Ridge. (2) 15 Bdee deploys forwards. (3) German Counterattack recaptures Guemappe
1917 was the bloodiest year for the 1st RHA Batteries, and can be attributed to the three major British offensives in that year. The 29th Division (B & L ) and V Brigade RHA (O Bty) took part in all three offensives. E Battery in two and Chestnut Troop in one.
18 Pdr guns under fire at the Battle of Arras 24 Apr 1917
The five week long Arras offensive 9 April – 16th May 1917 was one of the most intense the BEF endured. The daily casualty rate over the course of the battle was higher than any other BEF offensive. The initial attack was very successful, largely due to improvements in artillery technology and tactics,. German batteries were located by sound ranging and flash spotting, improved fuses increased lethality and enabled wire to be cut more easily. Aerial observation techniques and creeping barrages made it easier for the infantry to assault. In 1917 O Battery’s Vth RHA Brigade became an army artillery brigade and used to support whatever part of the line needed additional artillery support. On 9th April they supported the attack on Vimy Ridge by the Canadian Corps.
When attacks were successful artillery would need to be redeployed forwards if the infantry were not to advance beyond artillery range. On 24 April B and L Batteries followed up an infantry advance into a valley just North of the Wancourt Tower. As soon as the success signal was given the guns galloped forwards. According to the infantry the advance of the guns was a magnificent and inspiring sight, carried out with great dash and skill.(3) Unfortunately a German counter attack drove the infantry off the ridge, leaving L and B Battery in the open within rifle and machine gun range of German troops. The operations on the Arras front between April and June 1917 cost the XVth Bde RHA 49 killed, (including the BC and another officer from B Battery and six other officers) 74 wounded (including officers from each of B and L officers) and a further 13 men evacuated with shell shock.
There is a memorial outside Langemarck to Harry Patch, the last survivor of the Great War whose and his comrades, took part in the the attack Langemarck on 16 August 1917. B and L Batteries supported fired on the fireplan Barrage map supporting the attack on .
The 29th Division was used as an assault division twice in the 3rd Battle of Ypres, fought in a muddy artillery landscape. The artillery destroyed the drainage along with the buildings and vegetation. On 16th August the 29th division assaulted the Langemark area alongside the 20th Division which included the late Harry Patch and his pals. Seven weeks later 29 Division attacked again on 4th October towards Poelcappelle. The main memorial to this attack is the memorial to Private Fred Dancocks of the 4th Worcesters who was awarded the VC for his gallantry capturing a bunker near Namur crossing on the old Ypres-Staden railway line, which is now a footpath.
The 3rd Battle of Ypres was an artillery battle. The Germans held the ring of low hills around Ypres. As the allies advanced it was hard to find solid ground for gun positions around the muddy shell holes. Solid platforms might be constructed from wood or even boxes of rations. These made it easier for the German counter battery fire. During the campaign B, L and O battery would have spent a lot of time in their gas masks. The Germans unleashed a new horror on the battlefield during this battle, drenching gun positions with persistent blister agent – Mustard Gas.
Part of the predicted fire plan supporting the attack at Cambrai
After the 3rd Battle of Ypres petered out in the muddy ruins of Passchendaele the 29th Division was picked to reinforce the 3rd Army’s attack at Cambrai. This battle was a test for new technology and tactics. Instead of a lengthy preliminary bombardment, the battle of Cambrai would use 400 tanks and a short intense fire plan based on predicted targets. The fire plan was as innovative as the massed use of tanks. All of the batteries of the current 1 RHA took part in this battle. The initial attack, on 20th November created a breach in one of the stronger sector of the Hindenberg line, capturing as much ground in fifteen hours as in five months in the Ypres Salient. The Germans too had a tactical surprise in store. On 30th November they too launched an attack under a heavy predicted barrage, in their case led by storm troops which infiltrated into and then broke through British infantry on the salient caused by the British success. This advance threatened the army artillery massed behind the British infantry, with some Germans within 40 yards of the guns. L Battery was order to act the rearguard to allow the army artillery to escape. They and a mixed force of infantry and artillerymen inflicted around 150 casualties on the Germans before withdrawing. The eight L Battery soldiers commemorated on the Cambrai memorial are evidence of the cost of this operation. The official history includes praise for L Battery, a rare mention of an individual battery.(4)
Cambrai would be a good battle for a 1st RHA commemoration. This the one battle in the war in which each battery served. It allows for a focus on the tactical and technical innovation which has characterised the professional ethos of the Royal Regiment.
1918
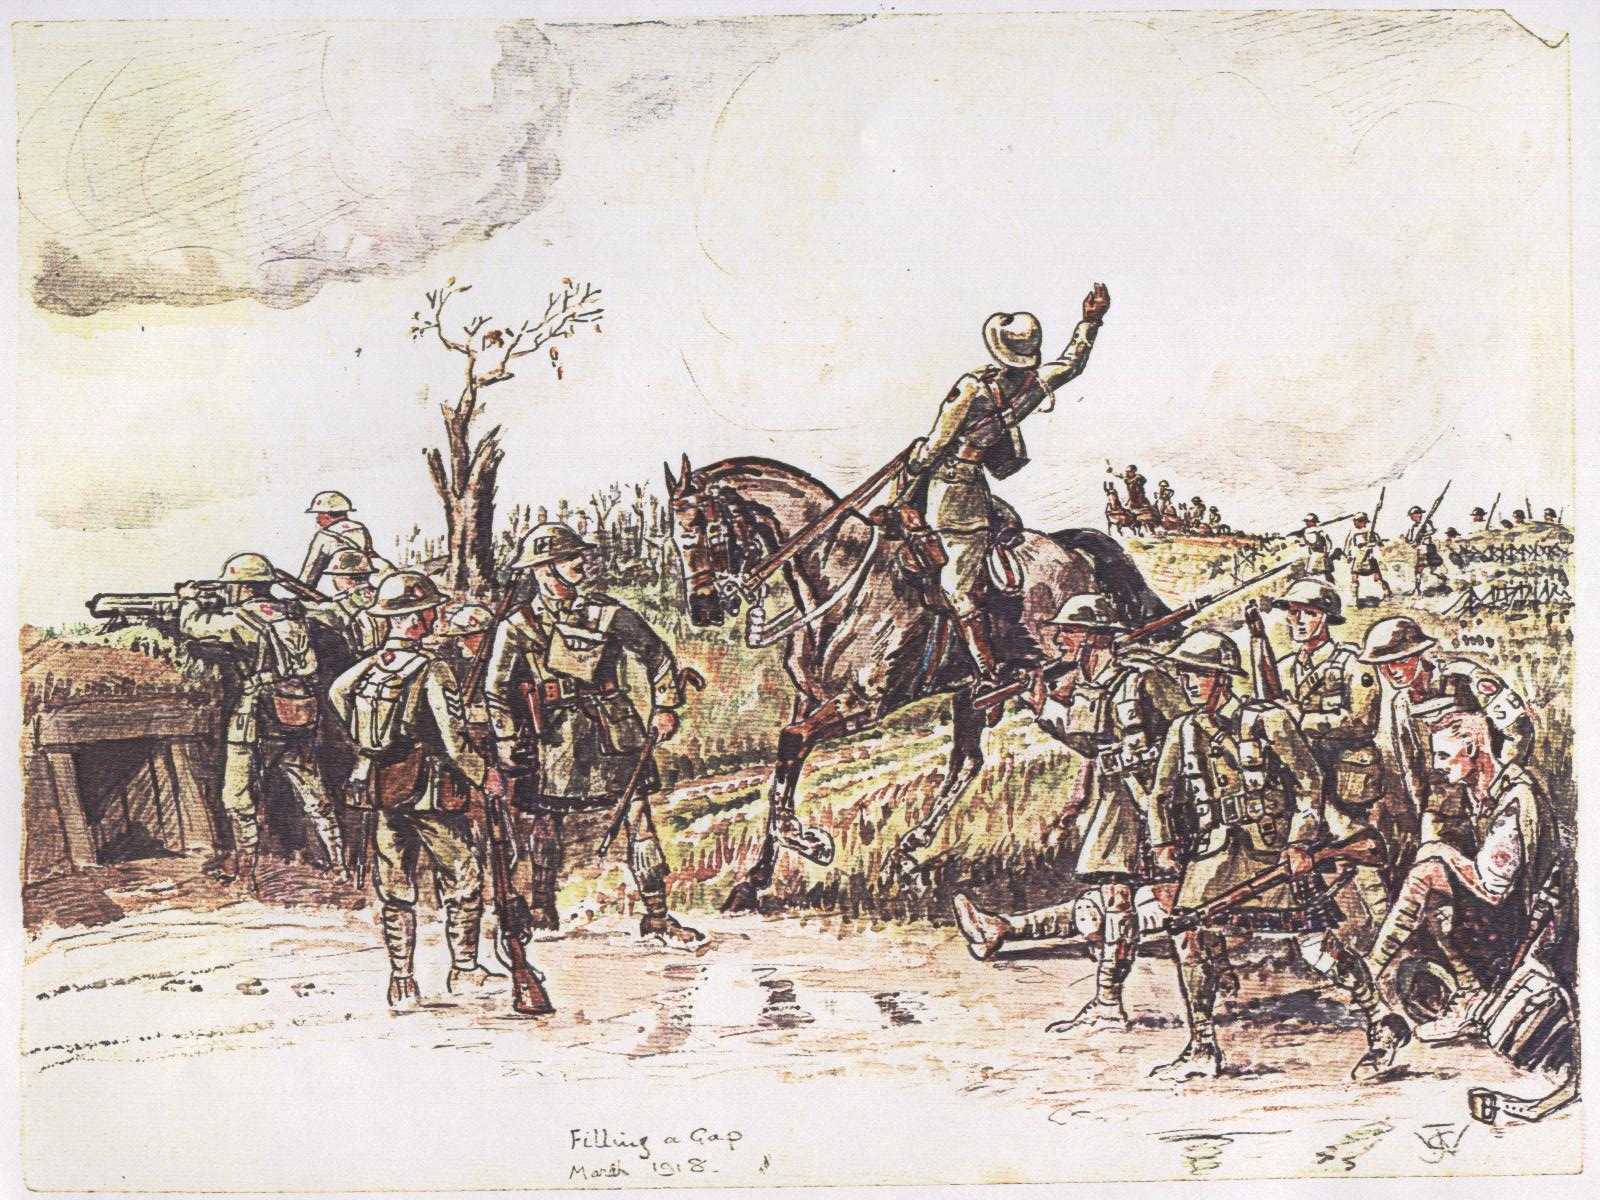
This Walford watercolour captures the spirit of the actions by Chestnuts, D and O Batteries in March 1918
At the beginning of 1918, the Germans had a chance to win the First World War before the American Army took the field in strength. The Germans redeployed troops released from the Eastern Front by the collapse of Imperial Russia. After three years of allied attempts to break the stalemate of the Western Front, the German offensives from 21th March initiated a eight months of mobile warfare. Between March and June the Germans achieved a series of breakthroughs and forced the allies back.
All of the Batteries were involved in these battles. The Cavalry divisions were deployed to plug gaps in the line. The majority of Chestnut Troop’s war dead are buried or commemorated on the Somme battlefields of 1918. There is an account in the History of the Royal Artillery on the Western Front of how the observed fire from E and two other RHA Batteries held a German advance on the 22nd March for a whole day. (5) The BC of O Battery was given 600 infantrymen back from leave, eight lewis guns from No3 Kite Balloon Company to fill a gap in the line. (6)
These battles are rarely the subject of battlefield studies. They are as significant as defensive battles as Mons or Le Cateau, but much larger. These are the only major defensive battles fought by the British Army that approach the scale of the operations on the Eastern Front in WW2.
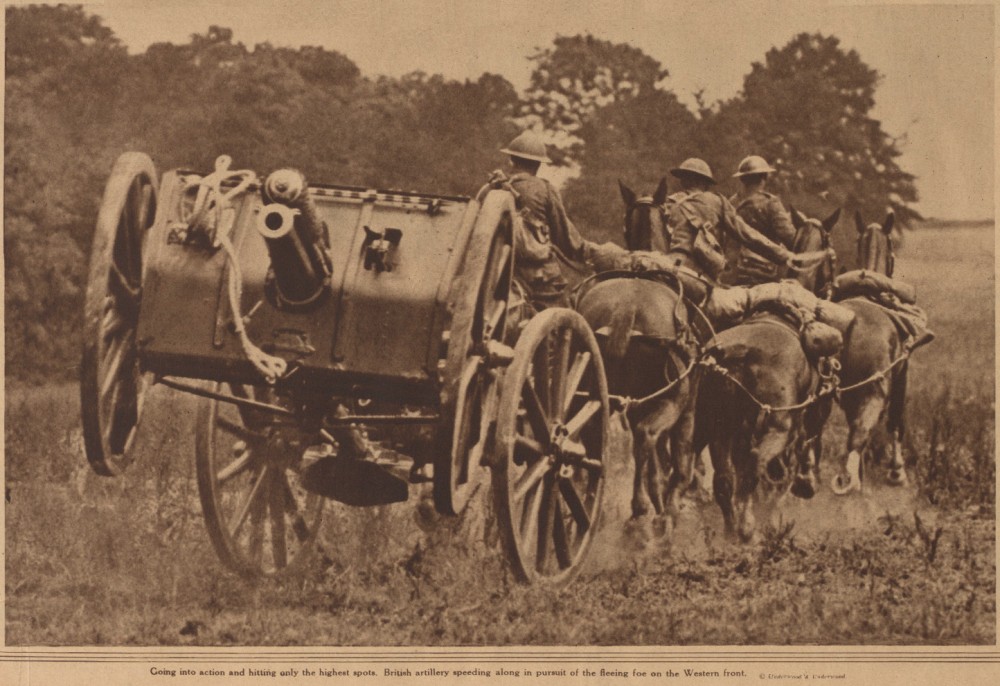
“British Artillery speeding along in pursuit of the fleeing foe.” Did the NY Tribune publish a picture of E Battery in October 1918?
The tide turned in August with the dramatic breakthrough at Amiens which repeated the techniques demonstrated at Cambrai, but on a larger scale. 450 tanks supported by a surprise predicted barrage by just under 1,500 guns and 800 aircraft broke through and destroyed a German army in what was the “Black day” for the German army. Chestnut Troop, E and O Battery took part in these operations.
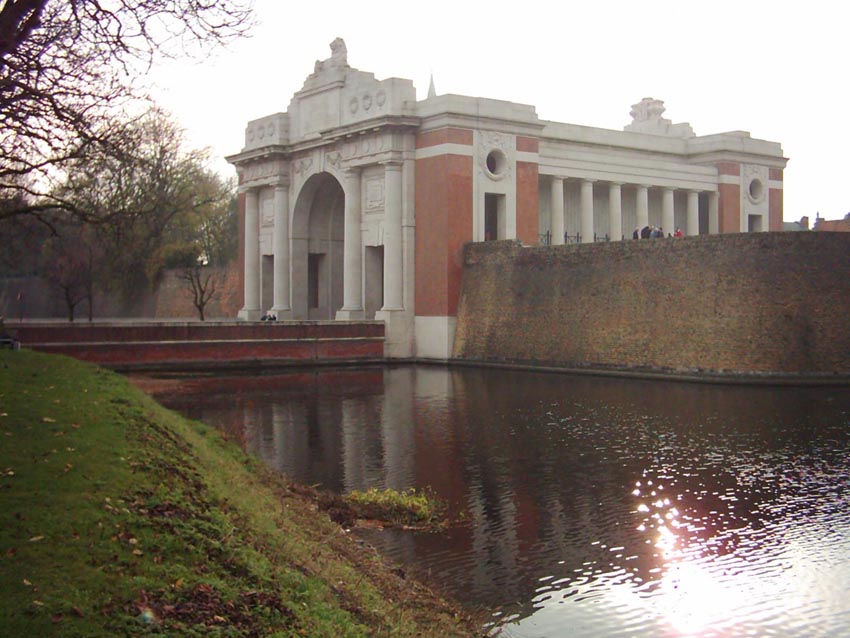
Menin Gate 1918. From positions on the Left of this view, B and L batteries fired the barrage behind which the infantry cleared the Germans from Ypres ay the end of the war.The Menin Gate today
After Cambrai the 29th Division was redeployed to the Ypres sector and fought in the defensive battle of the Lys and in the counter attacks in the summer On the 27th September 1918 B & L batteries, with the other batteries of 15 Bde RHA came into action outside the Menin Gate in Ypres.(7) The following morning they fired a creeping barrage in support of the 29th Division attack which recaptured the ground ceded in April capturing the village of Gheluveldt by the end of the day. L and B Batteries were deployed forwards to Gheluveldt on the 30th September, and supported the attacks over the River Lys in October.
1919 and Afterwards
The Armistice did not mean demobilisation. The CWGC records war dead until 1921 as the regular army was deployed to respond to the messy aftermath of the War. The CWGC records the deaths of Lance Naik Batu Khan of Chestnut Troop in St. Sever Cemetery Extension, Rouen (23 Dec 1918) and Driver Noor Mohammed of B Battery in Haidar Pasha Cemetery in Turkey (30 Jan 1920), and serve as a reminder of the British Army as an Imperial force and the Regular Army’s relationship with the Indian Sub continent.
The history of 1st RHA’s batteries on the First World War is that of the Western Front, its batteries were ubiquitous, “quo fas et gloria decunt”. Their actions took place among some of the familiar land marks of the Western front. Their battles tell the story of the development of technology and tactics during the wear and the part that the Gunners. Anyone taking a professional interest in the develo-pment of artillery on the battlefield would be remiss if they restricted their interest to the 1914 battles.
These were also actions in which at least 233 men lost their lives and perhaps 500 wounded. One of the key themes of commemoration is Remembrance, which should include understanding what these men did and why. The Centenary is an opportunity to visit the graves, memorials and the places where these men fought and fell. Of course, we celebrate the achievements of the Bradbury, Dorrell and Nelson at Nery, worthy of the highest award for gallantry that Britain can bestow. It is proper that L Battery remembers these men and the others that were lost at Nery. But the Centerary ought to be the time to find out about some of the other men who served the guns and remember them. Were the eight members of L Battery who fell on 30th November at Cambrai necessarily less brave? Were any of the men who fell any less mourned?
While many people are familiar with the battles and battlefields of the Western Front, far fewer have explored them from the Gunner’s point of view. The actions by the 1 RHA batteries are ideal topics for battlefield studies, conveniently located from the UK. The Centenary of the First World War is an ideal opportunity to undertake low level battlefield studies.
For more information on planning battlefield studies ands staff rides contact Gunner Tours www.gunnertours.com
NOTES
[1] This article is based on a talk given to the Officers of the 1st Regiment Royal Horse Artillery on 8th April 2014.
[2] www.CWGC.org These are minimum numbers. The CWGC also lists RHA as “15 Brigade RHA,” which may include soldiers who might or might not be members of B or L Battery. They might have been members of Y Battery, the Warwickshire TA RHA Battery or the Brigade Ammunition Train.
[3] Farndale The Royal Regiment of Artillery on the Western Front
[4] Esmond, J E. Military Operations France and Belgium 1917, The Battle of Cambrai CH XV HMSO 1934
[5] War Diary D Battery RHA quoted in Farndale The Royal Regiment of Artillery on nthe Western Front
[6] Esmond, J E. Military Operations France and Belgium 1918, the German March Offensive and its preliminaries, CH XV HMSO 1934
[7] WO/95-2291 15 Bde RHA War Diary Entry September 1918
Ex Hussar Hindsight was the final exercise for 307 (South Nottinghamshire Hussars) Battery Royal Artillery before the battery was disbanded, and took place in Normandy in May 2014. It’s an example of how a battlefield study focusing on the story of a specific unit can cover many aspects of the Normandy battles than might be expected, while focusing on the ethos and heritage of the unit itself.
The exercise aims included the following:-
Practice decision making, planning and carrying out battlefield procedures in a simulated all arms environment, etc”
Practice in the estimate and orders process, etc.
Extract the lessons from operations in Normandy relevent to sustained operations, the “realities of war” and the significance of the core values of the British Army.
Appreciation of the SNH Ethos and an the human dimension to the battery’s military heritage.
The study started with a long drive from Nottingham on Friday returning on Sunday which allowed a day and a morning for visits to the battlefields. What follows is a sample of battles and incidents in the Normandy campaign in which the South Notts Hussars took part.
The 107th (South Nottinghamshire Hussars) Field Regiment Royal Artillery a territorial artillery unit from Nottinghamshire, best known for the desperate battle fought at “Knightsbridge” the nickname for a desolate piece of desert in Libya. On the 6th June 1942 the battery, unsupported by infantry or armour fought to the last gun and man against the Afrika Korps. The story of the gallantry of these men in their doomed action has been captured in books and on canvas. However, that was not the end of the story. The title and cap badge of the “South Notts Hussars”(SNH) was adopted by the 107th Medium Regiment (107 Med Regt) and 150th Field Regiment RA,(150 Fd Regt) which also received a trickle of survivors from the battle and some escapees from prisoner of war cages.
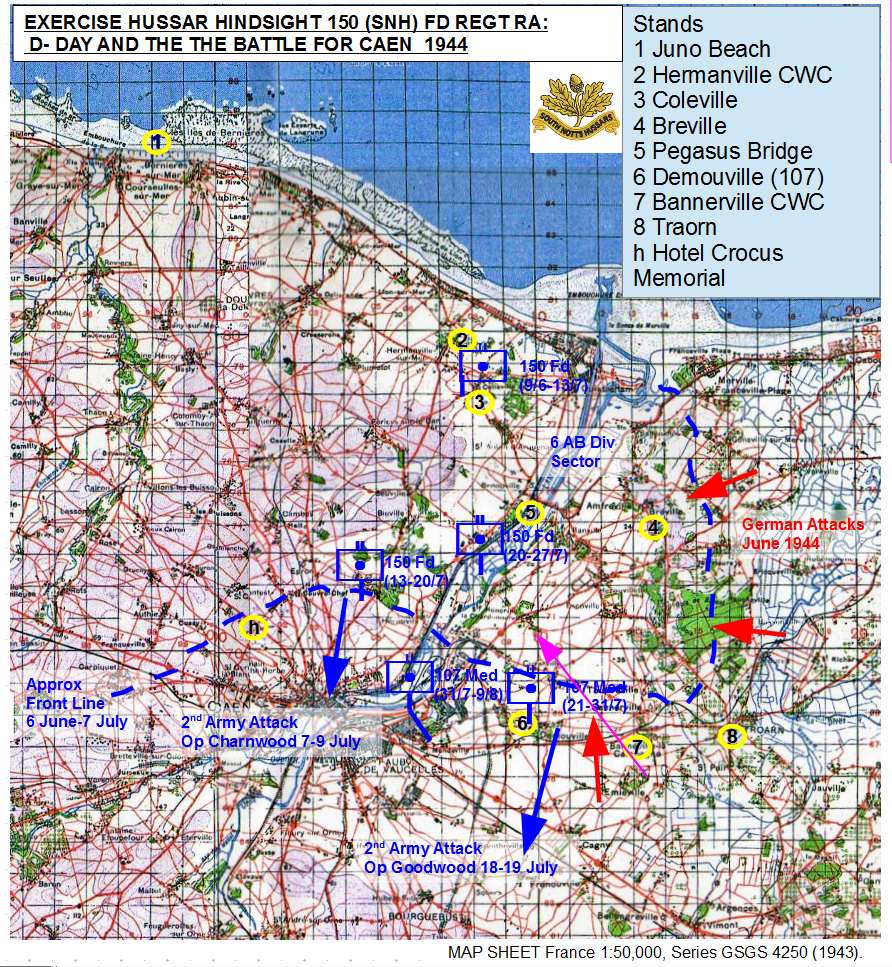
SATURDAY MORNING – 150 FD REGT AND THE D DAY BEACH AREATwo years to the day after the destruction of the Regiment, members of the SNH landed in Normandy and played their part in the defeat of the German armies. Although neither unit landed on D Day, individual soldiers and officers from both SNH units served as additional FOO parties, which did land on D Day with the airborne forces and assault troops. The allies had a huge advantage in fire-power over the Germans, in the form of artillery, naval gunfire and aircraft. However, this fire-power could only be brought to bear if controlled by a forward observer. The scale of the airborne and seaborne invasion on D-Day meant that many more artillery observers would be needed for D-Day itself and shortly afterwards.
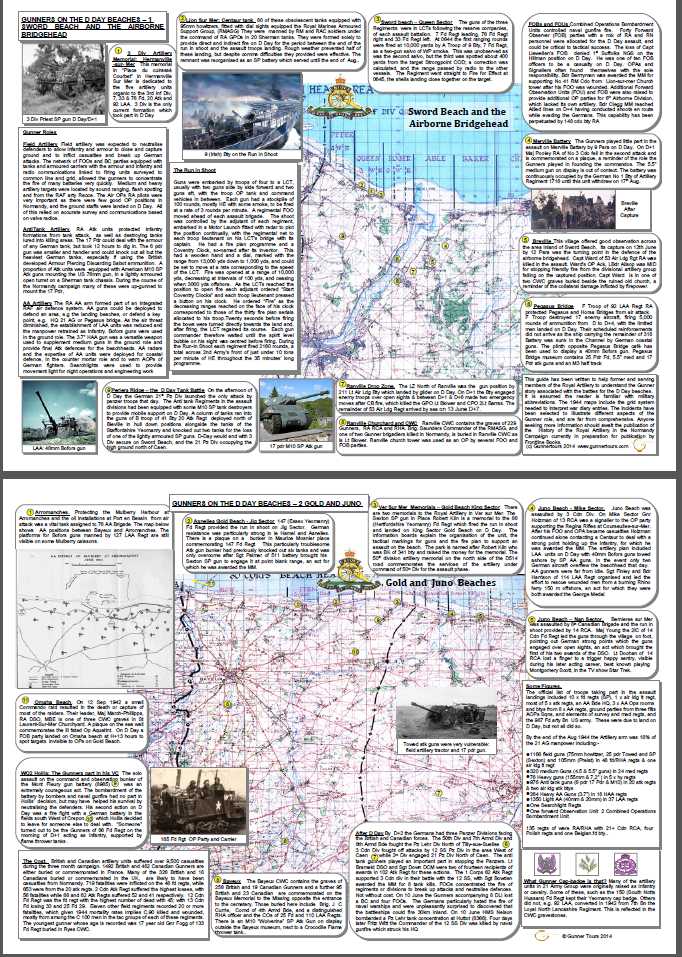
Captain Sharman from 150 Fd Regt trained as a Combined Operations Forward Bombardment Observation Officer and took part in the amphibious landing on Juno Beach supporting the Queens Own Regiment of Canada on D Day with fire from HMS Kempenfeld. (Stand 1. in the map above) The assault on Bernieres-Sur-Mer was quite costly and Sharman found it difficult to keep himself and his radio set fully under cover from enemy fire.
This was a good place for the battery to discuss the options facing the protagonists and practice military decision making.
The 6th Airborne Division, with a key role on the Eastern Flank of the beachhead had only one RA Regiment, one third of the proportion within an infantry division. Additional artillery OP parties were dropped by parachute or glider to provide the airborne troops with artillery support from artillery units landed by sea. LT Hastings also from the 150 Fd Regt SNH was one of these observers. At one point in the campaign these two officers met at the top of Ranville Church tower. Capt Sharman spotting ships while Lt Hastings, wearing his red beret, was observing artillery fire. These were not the only SNH soldiers to take part. Gunner John Woolmore of 107 Medium Regiment is recorded on the Bayeux memorial to the missing as killed on the 6th June 1944, the first member of the South Notts Hussars to be lost in the Normandy campaign. Presumably he was a member of a similar party, and either lost at sea or in the inundated ground.
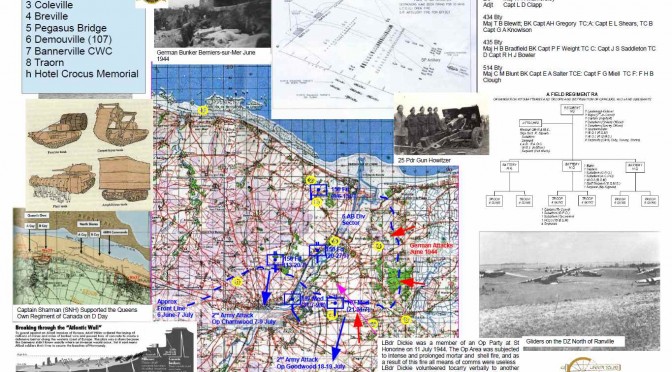
150 SNH Fd Regt was part of the 4th Army Group Royal Artillery (4 AGRA) but for almost the entire Normandy campaign was under command of the 6th airborne division. The recce parties landed on the 7th June and the guns on the 9th June. Between 9 June and 15 July the Regiment was deployed in action in the fields immediately West of the village of Coleville- Sur Mer, now Coleville Montgomery.(Stand 3)
It took part in the defensive fires which stopped the German attacks mounted between the 9-12th June. During the 24 hour period from 12 June 1944, 150 Field Regt fired 7,828 rounds, starting with Fire plan “Arrow” that supported the attack by 12 Para which seized Breville. This is regarded as the turning point, after which the airborne bridgehead east of the River Orne was never seriously threatened. The battle of Breville is suitable for a TEWT and to explore the realities of war.
After this 150 Field Regiment settled into a static routine, supporting the programme of raids undertaken by the paras and commandos, a counter mortar campaign and several fire plans supporting the other formations of 1st British Corps The Gun position was subject to occasional artillery fire and regular night time bombing from the Luftwaffe. The evidence of this is in the Hermanville CWGC Cemetery, on the edge of the next village. (Stand 2) Lt Davey, an Assistant CPO was killed by bomb fragments of an anti personnel bomb which hit his command post on 9th June 1944, the first night the Regiment deployed. Other problems facing them were the mosquitoes and the flies which fed on the bloated corpses of animals and humans. This was a good place for the battery to explore the implications of sustained operations.
The OP Parties took part in the raids and shared the dangers of the infantry. The second SNH grave in Hermanville is of Bdr Nelson, the BC’s assistance who died of wounds received when a shell burst over his and the BC’s heads on 14th June.
One of the more hazardous jobs in the Regiment was that of the OP Signaller, responsible for maintaining line and radio communications – even under fire. LBdr Dickie was a member of an OP Party at St Honorine on 11 July 1944, in support of an attack by 51 Highland Division. (Shown with the purple arrow) The OP Area was subjected to intense and prolonged mortar and shell fire, and as a result of this fire all means of communications were useless. LBdr Dickie volunteered to carry an urgent request to fire in support of our own troops to another Arty OP. He successfully crossed 250 yards of open ground under very heavy fire to deliver the messages. The artillery support thus obtained undoubtedly did much to relieve the heavy enemy fire. For this, Lbdr Dickie was awarded the Military Medal.
SATURDAY AFTERNOON – 107 MEDIUM REGIMENT ON THE ROAD TO FALAISE
The 107th (South Notts Hussars) Medium Regiment was given the title and number of the 107th RHA destroyed near Knightsbridge. It was a medium Regiment of 18 x 5.5” guns formed into two batteries 425 and 426 batteries. The latter was commanded by Major W F Barber who had commanded the original 426 battery pre war, been captured at Knightsbridge, but made a dramatic escape from Italy.
The Regiment landed in Normandy in July as part of 9 AGRA. By 21 July the Regiment had been deployed to Demouville SE of Caen. (Stand 6 in the Battle for Caen Map) This was a low lying, unhealthy, much shelled and bombed location in a salient further forwards than medium guns were usually deployed. From this area the Regiment supported the 2 Canadian Corps in its attacks south from Caen to Falaise. It took part in the fire plan to support the innovative Operations Totalise and Tractable as part of 9 AGRA. These assaults used heavy bombers by night and day to try to support deep attacks by Armours, mechanised and motorised troops into the German defences. The use of heavy bombers carried a high risk of “friendly fire” and the War Diary of 9 AGRA notes that action by a pilot from B/Flight 662 AOP Sqn managed to prevent US Bombers from bombing 107 Med Regiment.
On 14th August as part of Operation Tractable 107th Med Regt was under command 4th Canadian Armoured Division. The plan was to was to attack with phalanxes of armour, accompanied by infantry mounted in carriers and APCs and supported by engineer vehicles through a smoke screen, to enable the armour to penetrate the German defences, supported by a fire plan of artillery fire and bombing by medium and heavy bombers. (Stand 2 in Road to Falaise Map) The operations between Caen and Falaise offer a very different terrain and tactical setting to that of the D Day beaches and a place to explore mechanised operations..
OP Parties were mounted in Sherman OP tanks, which were modified for use as OP vehicles by removing the main armament to fit a map table and the replacement disguised with a rubber barrel. Capt Turner was travelling with the HQ of 4th Canadian Armoured Brigade when it came under fire from anti tank guns. His was one of several knocked out. Turner was wounded in the arm and bailed out. He managed to get Gnr Craig his signaller out of the tank before it caught fire. Gnr Craig and the other seriously wounded were loaded into an armoured ambulance which was itself knocked out and Gunner Craig’s body has never been found.
Captain Dobson, whose OP Assistant was Gnr Moore MM set off in support of the Lake Superior Regiment, an infantry unit mounted in carriers. Captain Dobson’s Sherman was described as “like a battleship among destroyers,” attracting enemy fire. His coolness under fire over two days was rewarded with a Military Cross.
The 4th Canadian Armoured Division was then ordered to block the escape route of the Germans trapped in the Falaise Pocket. 107th Med Regt’s guns were brought forwards to bring fire into the pocket. On the 17th August the gun batteries came under air attack from German fighter bombers while on the move in the village of Epaney.(Stand 2 Road to Falaise Map) One of the aircraft was shot down by Gunner Farmer with a Bren gun, for which he was awarded the Military Medal, but within half an hour one gun tractor hit a landmine, killing Gnr Cornish and wounding three other men. The speed of the advance and the confused situation around the edges of the Falaise pocket brought new problems.
A recce party, led by the CO, Lt Col Oswald and escorted by a troop of tanks was ambushed and the CO captured. He later escaped from captivity and returned a few days later. One newly occupied battery positions came under fire from German infantry and mortars and at one point the medium artillery was ordered to prepare for tanks. The medium artillery was need to both fire South West into the pocket and east to prevent the Germans from breaking back in. (In the area of Trun shown as Stand 3 on the Road to Falaise map)
The 29th Canadian Armoured Regiment, the South Alberta Regiment, was the lead armoured battle group, was ordered to take Lambert-sur-Dives, which dominated the river crossings through which many of the trapped Germans were heading. It was the cork in the neck of the Falaise Pocket. Captain Marsh of the 107th was an FOO deployed in support of D Squadron of the 29th regiment under the command of Major David Currie, who was awarded the Victoria Cross for his part in this action. The citation for Captain Marsh’s MC was signed by Canadian Corps commander General Simmonds the Army Commander. “Enemy tanks were at times within 500 yards of Captain Marsh’s tank before being knocked out either by anti-tank guns or the shells of Captain Marsh’s Regiment. It was largely due to his accurate shooting in a difficult situation that the Reconnaissance Regiment was able to hold on to the high ground north of St Lambert-sur-Dives and thus capture a great quantity of Prisoners of War. The latter stated that our shell fire was the cause of their collapse. Over 100 rounds per gun having been fired by Captain Marsh from his own Regiment, it was the fire from 107 med Regt which enabled the 29th Canadian armour Regiment to hold their positions and that their fire, over 100 rounds per gun was instrumental in the capture of the thousands or prisoners.” One of the Germans formations trapped inside the pocket was the 21st Panzer Division, which had been among their tormentors at Knightbridge. (Capt . Marsh’s Op is shown on the map in Blue East of Trun, close to the viewing platform for St Lambert -sur-Dives
SUNDAY MORNING – 150 FD REGT IN OP PADDLE – A NEGLECTED CHAPTER IN THE NORMANDY CAMPAIGN
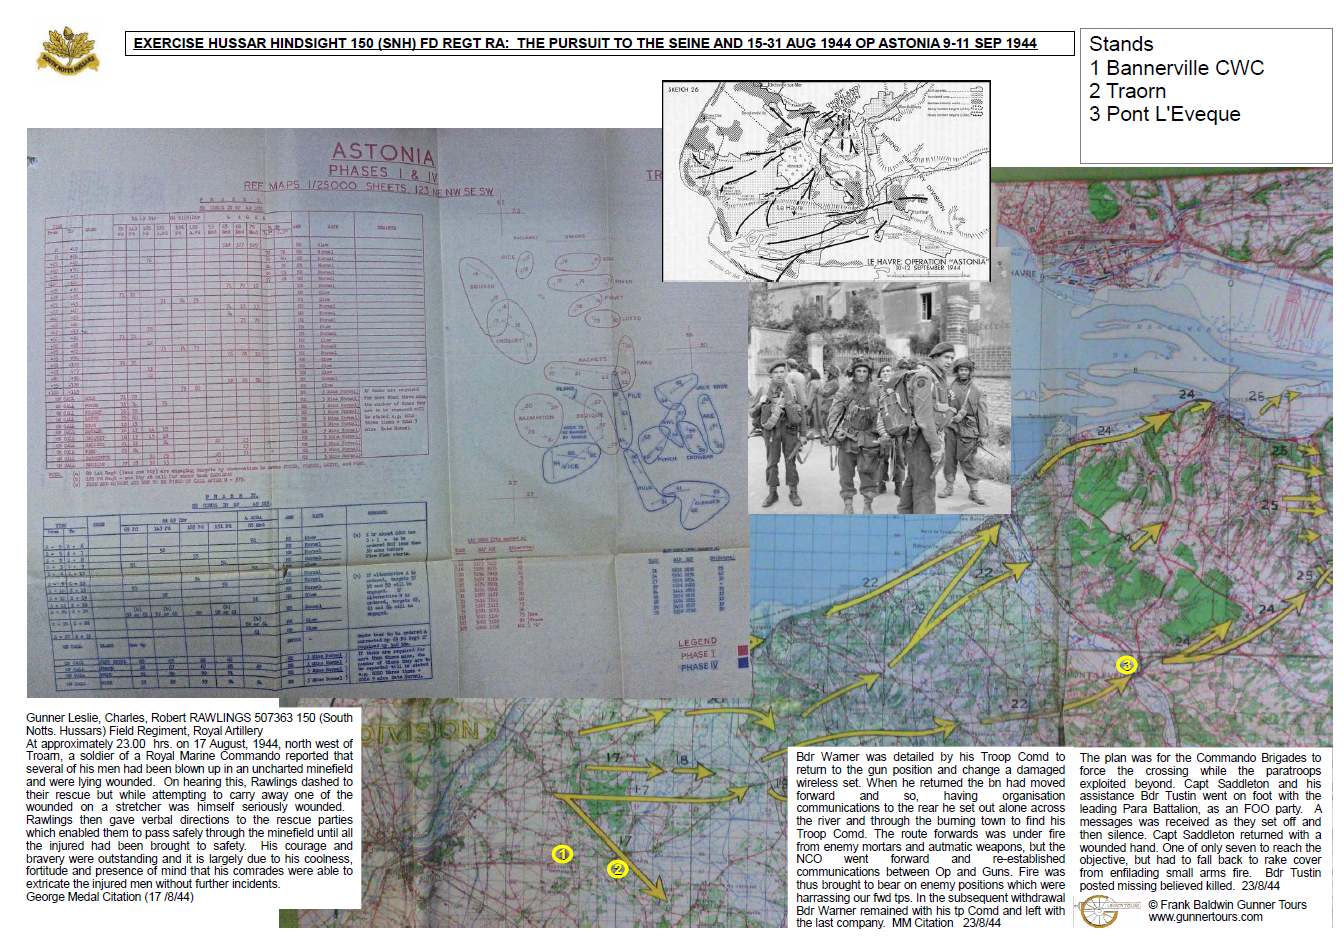
The journey home on Sunday Morning started with an act of Remembrance at Bannerville Commonwealth War Cemetery, where several South Notts Hussars as buried. The route followed the actions fought by 150 Fd Regt in the second half of August and the beginning of September 1944.
The situation on the Eastern flank changed in mid August 1944 as the German position in Normandy collapsed. At the same time as the allies executed a short envelopment of the German 7th Army at Falaise, Montgomery planned a wider encirclement, trapping the Germans outside the Falaise pocket against the river Seine. The I Corps, with 6th Airborne Division (6 AB Div) on the left flank, on the coast, would form the left wing of this advance, with the intention of linking up with the Third US Army. The 6th AB part was Operation Paddle. This operation, often overlooked in the story of the Normandy campaign took two weeks and was no walk over.
The operation was a frontal attack on the positions held by the German 711th Infantry division, which had been ordered to hold a series of delaying positions, based on the rivers emptying into the bay of the Seine. While the Germans were, at this point trying to extricate as much of their army as possible, every day’s delay
The 6th Airborne Division was a lightly equipped infantry formation intended to seize and hold objectives, rather than undertake mobile mechanised operations. It lacked the communications equipment for mobile warfare and the integral artillery. For this operation 6th AB Div’s three airborne brigades were augmented by two commando brigades, a Dutch motorised Brigade and a Belgian motorised battle group. It had some armour from its own recce Regiment. The 150th SNH Fd Regt, was placed under command of 6 Airborne Division for the advance supporting different parachute, air landing and Special Service, (commando) brigades.
The operation started with an attack from the positions which had been occupied for the past three months and ended on the banks of the Rover Seine. The first stage was to cross the river Dives. The battlefield was littered with minefields, marked and unmarked. Late in the evening at 11 pm. on 17 August, 1944, north west of Troarn, (Stand 2 on the Pursuit to the Seine map) a soldier from a Royal Marine Commando reported that several of his men had been blown up in an uncharted minefield and were lying wounded. On hearing this, Gunner Rawlings dashed to their rescue but while attempting to carry away one of the wounded on a stretcher was himself seriously wounded. Rawlings then gave verbal directions to the rescue parties which enabled them to pass safely through the minefield until all the injured had been brought to safety. For this action Rawlings was awarded the George Medal.
Two days later, at Putot-en-Auge on 19th Aug 150 Fd were key in assisting 3rd Para Brigade to break up a German counter attack and help them to drive back the Germans capturing 160 prisoners as well anti tank and anti aircraft guns.
At the next river, the Touques, 6th AB Division tried to force an attack at Pont L’Eveque. (Stand 3 on the Pursuit to the Seine Map) The fighting around Pont L’Eveque took the best part of three days from 21-24rd August. On the 22nd 5 Para Brigade attempted to force their way through with a battalion infiltrating through the town while a second battalion attacked via two fords south of the town. This assault was beaten back. On the 23rd the attack was resumed through the town and a foothold made on the eastern bank, but again forced to withdraw. Only seven men reached the objective, but were forced to withdraw. Two of these were Captain Saddleworth the FOO, who had been wounded the previous day. He was pinned down in the river itself and, while attempting to neutralise a sniper with a Tommy gun was wounded again in both hands. His OP Ack Bdr Tustin was fatally wounded in the same engagement. A second FOO, Captain Clough was wounded on the same day. The Germans brought down sufficiently heavy and accurate fire, for the actions taken by Bdr Warner the Op Signaller that day to re-establish communications between the Op and guns, to be rewarded with the MM.
The last river before the Seine was the River Risle and the crossing at Pont Audemer was also heavily contested by the Germans on the 26th August. The following day 150 Fd were detached from 6AB Division which would return to the UK. 150 Fd’s next battle was the final major operation in Normandy itself, the capture of the port of Le Havre as part of Operation Astonia. The port of le Havre can be seen from the post war bridge over the Seine. 150 Fd Regt’s part in the attack is documented on the Op Astonia Fireplan schedule and trace, included on the map.
The South Nottinghamshire Hussars were a British yeomanry unit which spent the first 150 years of its existence maintaining law and order, and war service in the First World War as mounted cavalry. In 1922 the SNH were one of the Yeomanry Regiments which converted to gunners. They retained their own cap badge the acorns and a selection of customs. It was one of some 20 former yeomanry regiments which took part in the Normandy campaign as Regiments of Royal Artillery. Despite this tradition, the 307 (South Notts Hussars) Fd Battery RA is about to disband, with the title and traditions being subsumed into the Royal Yeomanry
“Normandy” was not an honour title for 307 Battery. The battles in Normandy did not eclipse the gallantry, and steadfastness demonstrated by its predecessor at Knightsbridge. This was a chance to see how artillery was used in different phases of war and in a mechanised and dismounted environment over different types of terrain. It was possible to tell the story from D-Day to the Falaise Gap and the Seine through the stories of members of the South Notts Hussars. The 307th Battery RA was not very different to other batteries whose lineage includes service in Normandy. The 150thFd and 107th Med Regts were not elite units. Nor had they been singled out for a special role.
If not would like to find out more about developing a customised Normandy battlefield study focusing on a particular cap badge, or unit heritage contact Gunner Tours www.gunnertours.com info@gunnertours.com
Here is an opportunity to obtain a unique guide prepared for the British Army which is a guide to the Royal Artillery story of the actions on the D Day Beaches and landing grounds.
Although the Royal Artillery was the largest single element of the 1944 British Liberation Army. there is little to inform the casual visitor to the D Day Beaches or the role of the Gunners or their achievements. There four memorials to the Gunners to the 86 Fd Reg 147 and the artillery of the 3rd and 50th Divisions. The only explanation of field artillery are on the information board surrounding the Sexton SP Gun commemorating the 86th (Hertfordshire Yeomanry) Field Regiment There are neither memorials nor any explanation for the Anti tank or AA artillery. There are artillery pieces scattered around Normandy, but usually out of context. other branches of the Artillery AA with no explanation. There are only two places that mention the exploits of individual Gunners or their sacrifice.
A handout has been prepared for Royal Artillery soldiers attending the 70th anniversary of the D Day Landings to explain the Gunner story associated with the major D Day sites. The incidents have been selected to illustrate the different roles of the Gunners and draw attention to those men whose action made a difference.
The A3 double sided annotated map includes:-
A copy of a 1944 map of the British beaches and the Orne bridgehead with the 1944 grid to help to interpret the locations in war diaries.
Description of the Gunners role at different places on the most visited D Day locations.
Mention of the Gunners who took part in the actions at places from Merville Battery to Omaha Beach.
Summary information about the role, organisation and equipment of the artillery of 21 Army Group.
Information about Gunner war dead.
If you would like to have your own copy of the map, a high resolution electronic copy can be yours for £6.00, for your own non commercial use. If you want a hard copy printed for you it will cost an additional £3.50 plus postage and packing. Send an email to the author frank.baldwin@gunnertours.com
For every copy sold Gunner Tours will donate £1 to the Royal Artillery Charitable Fund. If you would like to make your own donation you can do so though their Virgin Giving page.
If you would like a print of David Rowlands’ splendid painting of 9 (Irish) Battery firing the Run in Shoot on Sword Beach order it from his website
SS Selvistan, sunk on 5 May 1943 while part of ONS 5 by U 266. Gne R Clarke of 3 Maritime Regiment was killed in the attack
“Just before the first explosion I was on the Bridge; the SELVISTAN was rather close to the next ship abeam, which was an American Tanker, when suddenly I saw something moving through the water, which at first I thought was a porpoise, as it appeared to be spouting water. This object passed very close across the American Tanker’s bow, and when it was half way between the SILVEISTAN and the American ship, it jumped out of the waterm and then continued on its course; I immediately realised that it was a torpedo, si I rang “Full speed ahead”, and put the helm hard to port, but unfortunately the ship did not have enough speed to swing clear. This torpedo struck the ship in No. 5 hold,” Extract from the Master’s Report on the loss of SS Selvistan5 May 1943
On the 5th May 1943 Slow Outbound Convoy Convoy ONS 5, outbound from Liverpool to Halifax lost eleven merchant ships to U Boat attack in a force 6 seas in the mid Atlantic. The Battle of the Atlantic was the most important naval campaign waged by Britain in WW2 and the only matter which Winston Churchill said kept him awake at night
By the time the week long voyage n the course of a week, ONS 5 had been the subject of attacks by a force of over 40 U-boats. With the loss of 13 ships totalling 63,000 tons, the escorts had inflicted the loss of 6 U-boats, and serious damage on 7 more.
Many of these ships included detachments of Royal Artillery Gunners, who manned the armament of Defensively equipped merchant ship (DEMS) alongside RN Gunners. The ships sunk in ONS-5 typically had two or three RA Gunners in the gun detachments of around a dozen.
This battle demonstrated that the convoy escorts had mastered the art of convoy protection; the weapons and expertise at their disposal meant that henceforth they would be able not only to protect their charges and repel attack, but also to inflict significant losses on the attacker.
Possibly the last minutes of U266 under attack by aa Handley Page Halifax GR Mk II of No.58 Squadron in the Bay of Biscay, 15 May 1943. U266 was sunk by this attack with no survivors from its crew of 47.
ONS 5 marked the turning point in the battle of the Atlantic. Following this action, the Allies inflicted a series of defeats and heavy losses on the U-boat Arm, a period known as Black May. This culminated in Dönitz withdrawing his forces from the North Atlantic arena.
The official historian, Stephen Roskill commented: “This seven day battle, fought against thirty U-boats, is marked only by latitude and longitude, and has no name by which it will be remembered; but it was, in its own way, as decisive as Quiberon Bay or the Nile”(1)
The Maritime Regiments.were the largest Regiments in the Royal Artillery in the Second World War. Their actions are also some of the most under appreciated. Serving in small groups which Bombardier as the most senior rank, out of sight, and largely of mind of the rest of the British Army. Their actions too numerous and disparate to attach particular attention. It is worth sparing a moment to consider the RA participation in ONS-5. Thirty one of the forty two merchant ships in the Convoy were British. With two or three Gunners on each ship, there would have been around 75 members of the Royal Regiment at this battle, a big troop or small Battery by modern standards. Not many fewer than in some of the smaller RA Battle Honours title engagements.
The Gunners are listed in the following table with the ship annotated where known.
Gnr
DOUGHERTY
2 Maritime Regt.
PORTSMOUTH NAVAL MEM.
SS North Britain
Gnr
HARMER
2 Maritime Regt.
PORTSMOUTH NAVAL MEM.
Gnr
CLARKE
3 Maritime Regt.
CHATHAM NAVAL MEM.
SS Selvistan
Gnr
WILSON
3 Maritime Regt.
CHATHAM NAVAL MEM.
LBdr
KNIGHT
5 Maritime Regt.
CHATHAM NAVAL MEM.
SS Lorient
Gnr
RIORDAN
5 Maritime Regt.
CHATHAM NAVAL MEM.
SS Lorient
Bdr
MITCHELL
6 Maritime Regt.
PLYMOUTH NAVAL MEM
SS Bristol City
LBdr
FORD
6 Maritime Regt.
PLYMOUTH NAVAL MEM
SS Harbury
Gnr
BRUNNER
6 Maritime Regt.
PLYMOUTH NAVAL MEM
The accounts from the interviews with the Masters of the sunk ships gives some insight into the conditions under which these men served, and died. These were the records from the ships sailing in convoy , many of whose survivors were rescued. The men on the Lorient were on a vessel straggling from the convoy and any that managed to take to a life boat were subsequently lost.
There is no mention of the DEMS Gunners in The Cruel Sea, the book and film which is a portrait of the U Boat war.
Although the battle has no name or location other than a track over points of latitude and longitude, there are places to see the U Boat war in Britain.
It is possible to see a U Boat in Birkenhead on Merseyside. This is a type XI larger than the type VII Uboats used by the German wolf packs against ONS 5.
U 534 preserved in Birkinhead
The Western Approaches control room in Liverpool is where the Atlantic war was fought.
The Commonwealth War Grave Commission lists 736 fatalities on 4-5 May 1943, a time when there were operations on land in Burma and Tunisia and in the air over Germany. Of these 114 were lost at sea, most oif them in the battle for ONS-5
Tower Hill Merchant Marine Memorial
The merchant marine sailors who lost their lives on ONS 5 are recorded on the Tower Hill memorial to the missing. The Royal Artillery and Royal Navy Gunners are listed on the Chatham , Portsmouth and Plymouth Memorials.
If you would like to visit any of the places associated with this battle contact Gunner Tours
Troops coming ashore landing from Landing ships during an invasion exercise in Britain 5 May 1944
Exercise Fabius 2-7 May 1944 was, arguably, the largest training exercise to take place in the UK. It would be the final rehearsal for Operation Overlord . It was a rehearsal of the landings on the four invasion beaches in the Normandy coast between the rivers Orne and Dives; ( Sword, Juno, Gold and Omaha beaches) .
Utah beach, geographically separated from the other four beaches was considered a separate assault from naval point of view. The rehearsal for the landing on Utah Beach was Exercise Tiger and took place on 26-30 April on Slapton Sands in Devon.
Ex Fabius allowed participants the chance to rehearse under conditions as close as possible to those they would face. It also allowed the ports to practice supporting a large scale landing. This was a dress rehearsal with the landing forces approaching the beaches behind mine sweepers and landing craft lowered ten miles off shore. The landings were accompanied by live firing from ships.
Men of 6th Battalion the Green Howards receive 48-hour ration packs before embarking onto landing ships during Exercise Fabius 5 May 1944. IWM H38222 These men will land on Gold beach a month later.
The assault troops for each of the D Day beaches would practice landing on a stretch of coast with a similar configuration to that they would face on D Day. The exercise was too close to D Day for any further experimentation or changes to the plan. Some units would not return to their previous accommodation, but instread to their assault assembly area.
3rd British Infantry Division was assigned to assault Sword beach with the town of Ouistrhem and the River Orne on their left flank and the city of Caen as its objective. On Exercise Fabius it landed near Littlehampton with the River Arun on its Left and Arundel its objective.
On 5th May Hayling Island would substitute for Gold Beach.
Robin Dunn, who was Battery Commander of 16 Battery of 7 Field Regiment claimed post war that there were problems which were identified and if put right would have enabled the allies to do better on D Day.
” While at Bolney we had our final rehearsal of the invasion on the south coast near Arundel……..We had a new divisional commander, Tom Rennie, who had commanded a brigade of 5lst Highland Division with distinction in 8th Army and had a high reputation. The commander of 185th Brigade was Brigadier K. R Smith, who had been with the brigade for some time and had so far in the war seen no action. He was a good trainer of troops who had worked us hard during our training in Scotland. But he did not fully accept the role of the brigade in the divisional plan. We had heard that 21st Panzer Division had been identified as having recently arrived about thirty miles inland of our landing beach. The presence of this division became a fixation in K.P.’s mind. He was haunted by the idea that, if 185th Brigade pushed too boldly inland, 2lst Panzer would come round our right flank, which was in open country and cut us off from the beaches. There was wooded country on the left and KP. wished to infiltrate his infantry through the woods beside the river and approach the objective in that way along the divisional left flank. During our final rehearsal he attempted this manoeuvre, which involved keeping one battalion on our original thrust line and passing the other two round their left flank in a wide turning movement. The result was chaos. The battalions became separated from one another and the Brigadier lost communication with the flanking force which lost all momentum. I was at brigade HQ when Tom Rennie arrived and said wearily, ‘You won’t let this happen on the day will you KP? It would have been better, even at that late stage, if he had sacked KP. on the spot.” Robn Dunn Sword and Wig.
Littlehampton, the stand in for Ouestsrhem on the dress rehearsal for D Day
Although many fewer than on Ex Tiger, there were casualties on Exercise Fabius. On the Morning of 4 May twin engine fighter bomber aircraft of Coastal Command attached Allied motor boats inflicting many casualties. Possibly the German attack on Ex Tiger had made the airmen a little trigger happy.
Places associated with the story of the training and rehearsals for D day can be found across Britain, from the sections of Atlantic Wall built in Scotland to the beaches which stood in for the Norman Coast.
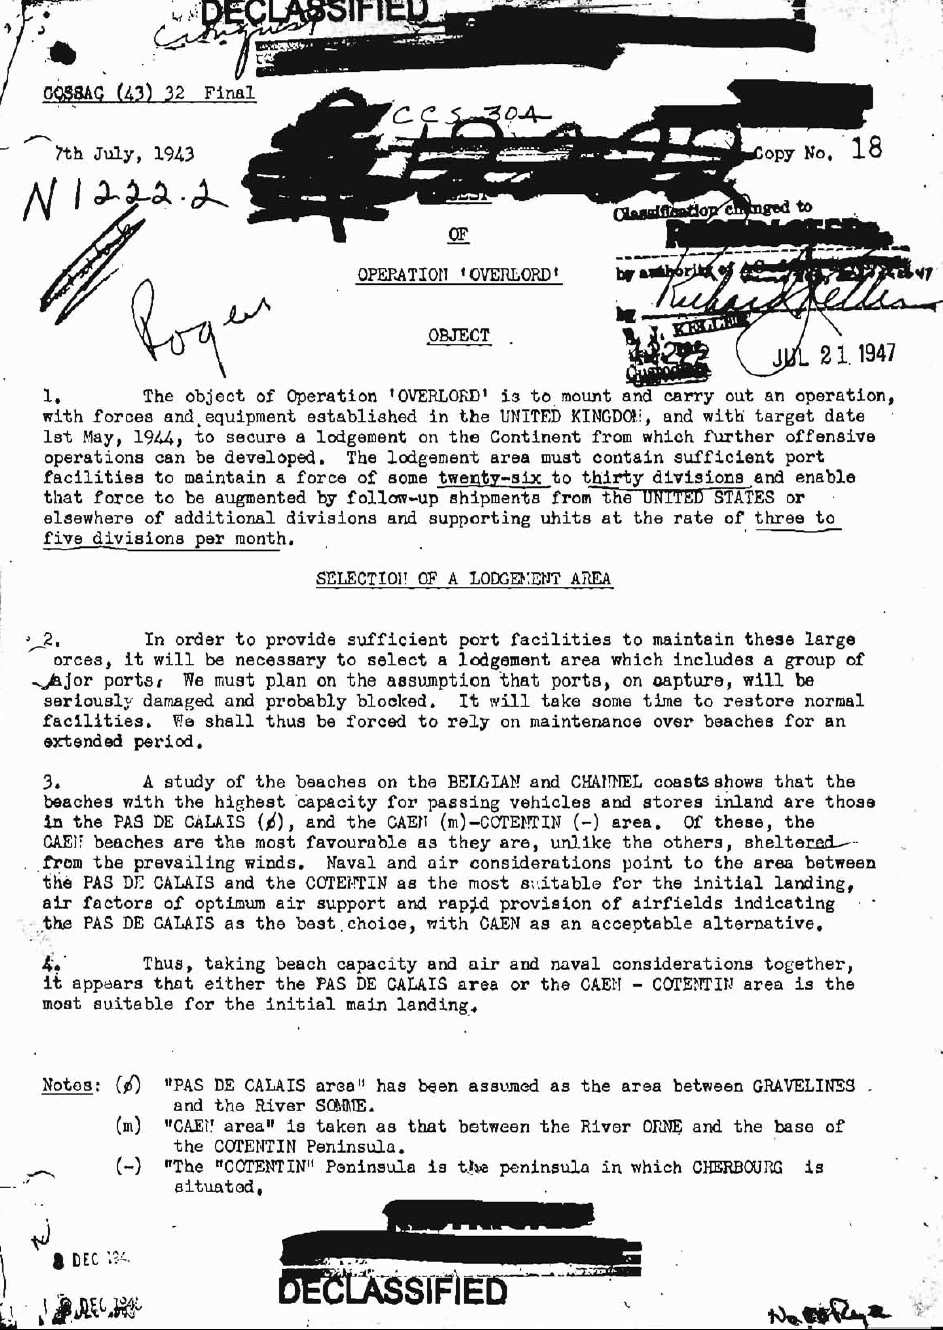
After the Casablanca Allied committed to setting up a planning team to draw up a plan for the invasion as well as make provisions for any opportunities that may arise in 1943 as well as building up and training the forces in the Uk to mount an invasion
The planning team was set up under Lt Gen Frederick Morgan appointed as the Chief of Staff to the Supreme Allied Commander – COSSAC. Alanbrooke briefed him with the skeptical comment that it was an impossible job but he had to do it. The formal orders appointing him arrived on the auspicious date 1st April 1943 He was given offices in Norfolk House and tasked with producing a plan by July 1943. Morgan had difficulties finding staff willing to work on the project. There was a a lot of skepticism about whether the exercises was worth while or would ever amount to anything. Even in wartime career minded officers were keen to avoid being sucked into tasks which were time consuming, nugatory and offering limited opportunities for advancement or glory. This is the world that Evelyn Waugh pilloried in the Sword of Honour Trilogy.
Nowadays we are used to international organisations, but in the 1940s it was rare for the different armed services to work together, let alone with those of other nations. Frederick Morgan would have been a role model for Programme Managers anywhere. He tried to weld his people from a mixture of services and nation into a team. The same applied to Lord Louis Mountbatten whose Combined Operations Organisation was a model of teamwork. Whatever criticisms may be made of either man, getting people from different services and nationalities to work together for a common purpose isn’t an easy task.
US War hero general Norman D. Cota singled out COSSAC and Combined operations as “one force; one foe; one fight” and “united we conquer”. (1) Its a bit of sloganising , but a good message to weld people from different organisations into a common purpose. The top floor of Norfolk House was turned into a Mess and equipped with a fine cellar to entertain visitors. The team was encouraged to out on a skit, Operation Overboard to let off steam in a way familiar to the British services.
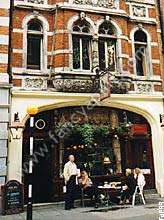
The Black Horse public house became an unofficial part of COSSAC. Morgans Military Assistant Canadian Major Peter
Wright, a Canadian Engineer was in lodgings near Baker Street and spent the evenings in the Black Horse on Marylebone High Street. “The Clientèle of the Black Horse, like that in every pub in British Isles took a keen interest in the the course of world events and were in the habit of debating nightly the proper steps which would be taken to accelerate the downfall of the enemy. This was in their view clearly being delayed at this time by incompetent leadership, by vested interests or by other similar well known obstacles to progress. At the time when Peter Joined me the “Black Horse” Plan for the invasion was already well advanced. “We found ourselves confronted by one of the many insoluble problems that continued to crop up. Peter’s sense of humour suggested that the problem should be put to the Black Horse. From this time onwards the habit grew up of consulting from time to time, naturally or without their knowledge, the thoroughly representative body of opinion that congregated at this hospitable bar. “(2)
The Black Horse Public House is , sadly , no longer a Pub. However, it is still somewhere to eat and drink as it is currently a restaurant. Somewhere there might be the ghosts of the regulars who once unwittingly did their bit for the war effort over a pint. A very British way to wage a war.
References
1. Papers from HQ ETOUSA Conference on amphibious Landings, London May-JUne 1943
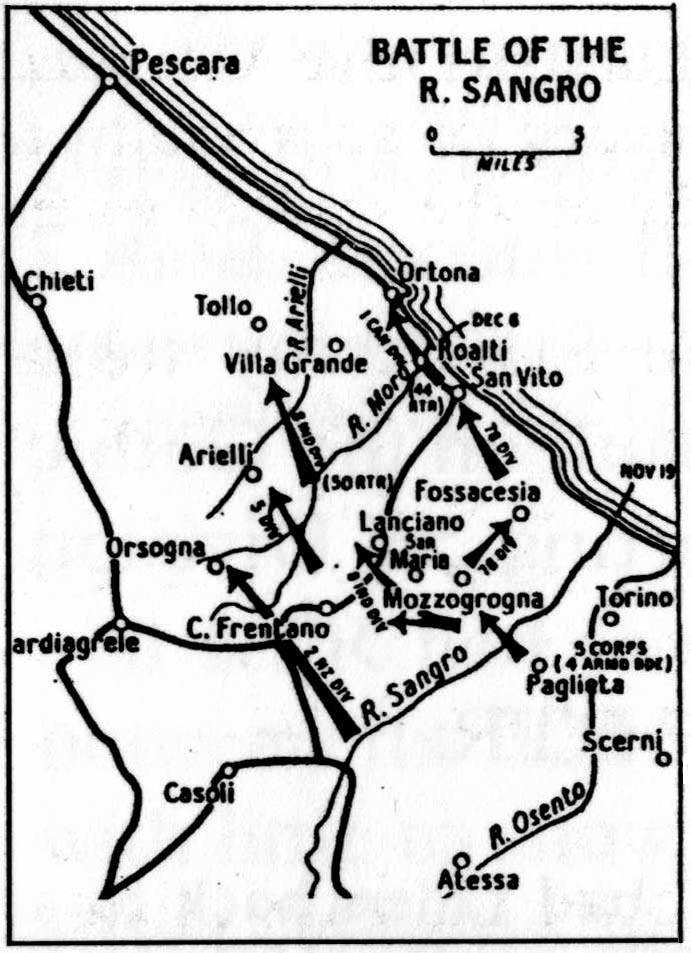
The 18th December 2013 is the 70th anniversary of the death of Lt Harry Goslin RA of 53 Field Regiment. He is buried in the River Sangro Commonwealth War Cemetery, in Cheti Province, Italy. His story and that of the battle in which he died deserve to be remembered as they show a different aspect of the Second World War.
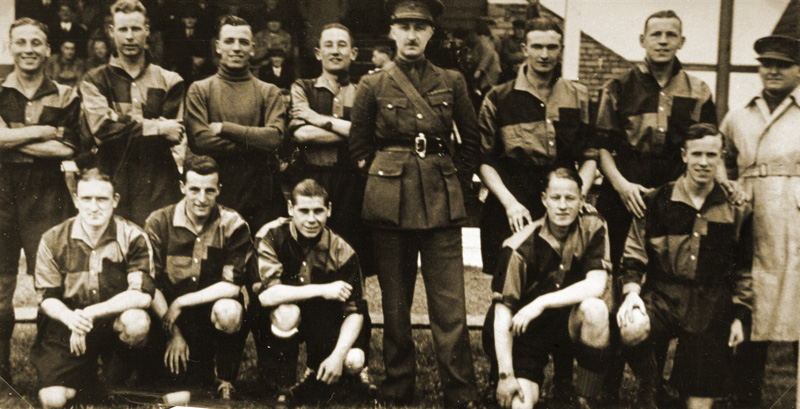
THE WARTIME WANDERERS
Bolton Artillery – 53rd (Bolton) Field Regiment football team – The Wartime Wanderers Standing: Danny Winter, Harry Goslin, Stan Hanson, George Catterall, (Lt Col G Bennet), Jimmy Ithell, Jack Hurst, (Capt J J Clavell QM) Front row: Albert Geldard, Donny Howe, Ray Westwood, Jack Roberts, Tommy Sinclair http://www.boltonswar.org.uk/i-ra-09.htm (1)
Before the Second World War Henry “Harry” Goslin had been the captain of Bolton Wanderers Football Club. On 1st March 1939 Hitler broke the terms of the Munich Agreement by invading the rest of Czechoslovakia. On 14th March 1939, before the next home match Harry addressed the crowd with a megaphone urging them to join the Territorial Army. After the match, 32 out of 37 men on the playing staff joined the armed forces, 17 joining their local TA unit, the Bolton Artillery. The idea of “pals” battalions of chums joining the same unit and serving together is much more associated with the First rather than the Second World War. However the Wartime Wanderers joined together and served together in what was mobilised as 53rd (Bolton) Field Regiment RA. They served in France and Belgium in 1940, were evacuated at Dunkirk, then sent overseas serving in Iraq and at the second battle of El Alamein as part of the 8th Indian Division. The Regimental football team was much in demand as an expert position matches. While the Regiment was based in the Uk, players continued to play for their own side and as guests for football clubs close to where the Regiment was stationed. Harry Goslin played for Bolton in 4 out of 22 matches played in the 1939-40 season as well as appearing as a guest for Chelsea and Norwich City.
Wartime Wanderers – Ray Westwood (foot on trail), Jack Hurst (tall figure at back) Ernie Forrest, Tommy Sinclair and Harry Goslin (just behind instructor) http://www.boltonswar.org.uk/i-ra-10.htm (1)
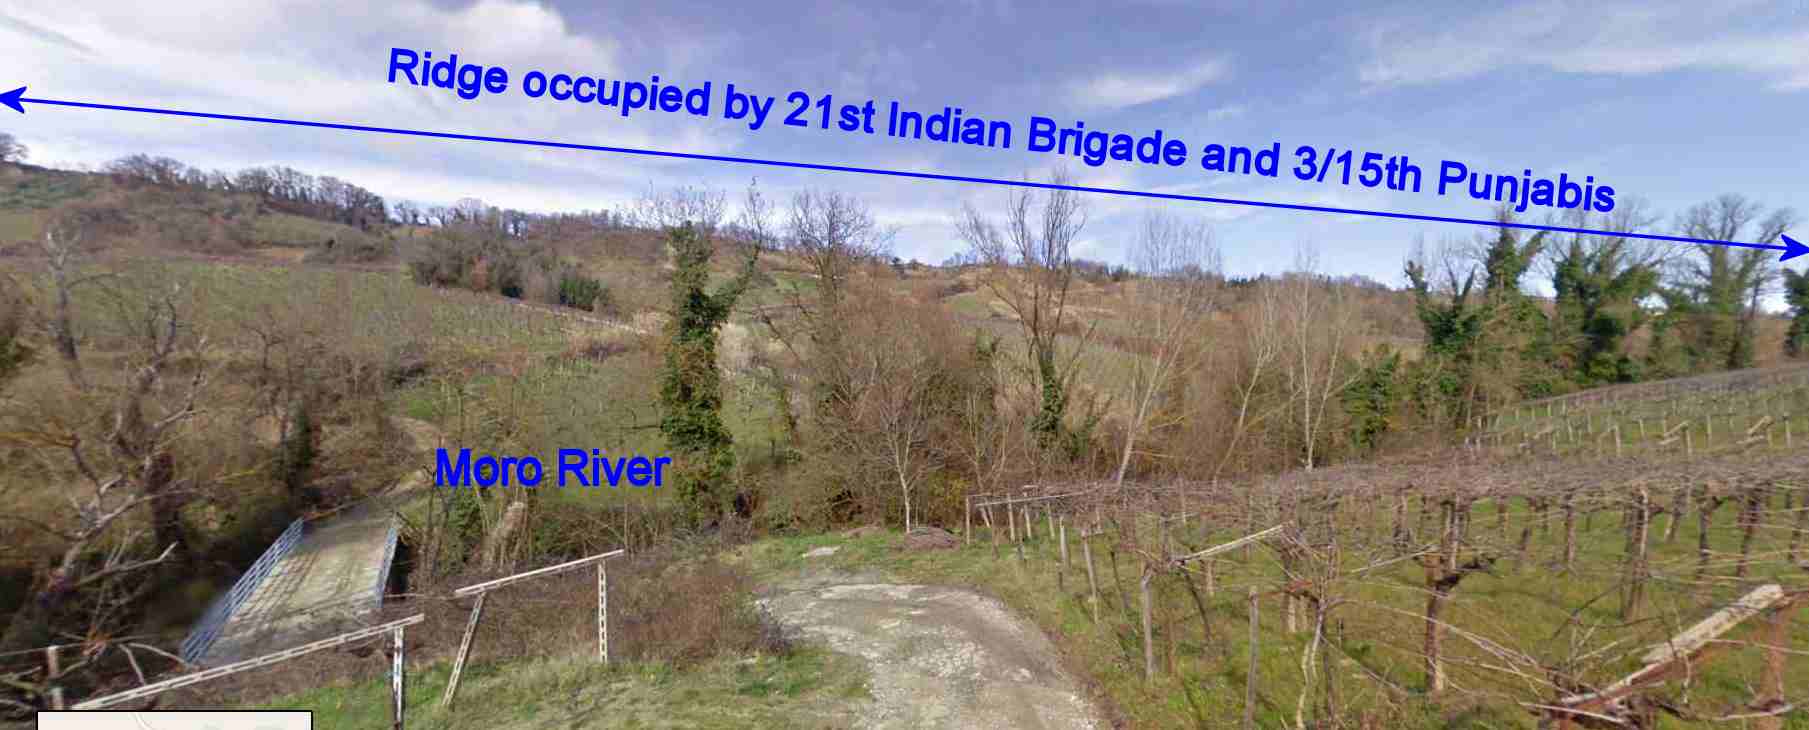
THE EIGHTH INDIAN DIVISION
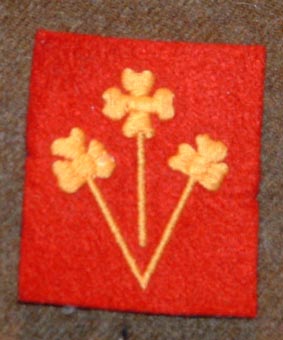
The 53rd (Bolton) Field Regiment RA was in direct support of the 21st Indian Brigade, comprising the 5th Battalion the Royal West Kent Regiment, the 3/15th Punjabi battalion and the 1/5th Mahratta. Harry Goslin was a Forward Observation Officer attached to the 3rd Battalion of the 15th Punjabi Regiment. (3/15th Punjabi) Divisions of the Indian Army were comprised of a mixture of British and Indian troops. Two thirds of the infantry would be Indian, with the remainder from the British army, all the artillery would be British while the sappers and services would be Indian. The “Indian” units were still mainly commanded by British officers but the proportion of Indians holding a Kings Commission rose during the war. The divisional machine battalion of the 8th Indian Division was commanded by Lt Col D S Brar, one of the Indian officers to command a combatant unit in the field. (2)
8th Indian Divisional Badge worn on the upper sleeve and painted on vehicles (2)
The 3/15th Punjabi Regiment had originally been raised as the Rawlpindi Regiment in 1857, and served in the Second Opium War alongside some of the Dragon batteries, and then in Afghanistan and Somaliland. As the 27th Punjabi Regiment it served in France and Mesopotamia in the First World War, and was renumbered 3/14th when the Indian army was reorganised in the 1920s. After partition it was transferred to the Pakistan army where it still exists as the 11th Punjabi Regiment. The Punjab countryside was fertile recruiting ground for the British Indian Army, with military service an attractive alternative to life on the land. In return the British values its soldiers for loyalty and hardiness. These were some of the conditions which led British post war industry to attract workers from the Punjab to serve in the textile industry of the North of England.
The policy not to raise artillery units from the Indian population dated from the aftermath of the Indian mutiny, as a measure to prevent any future rebellion from having access to the firepower of the artillery. The story of the Royal Artillery in the World Wars is that of the Indian as well as the British Army and its formations. Three Indian Army Divisions served in Italy, the 4th, 8th and 10th and with them nine field regiments and three LAA regiments. In September 1943 the 8th Indian Division and with it the Wartime Wanderers sailed to Italy to reinforce the 8th Army.
MONTGOMERY ON THE SANGRO NOV-DEC 1943
River Sangro Battlefield
The battlefields of the Sangro and Moro rivers do not attract as many visitors as those on the Garigliano and Rapido, conveniently between Rome and Naples with the focus of the historic cultural icon of the Abbey of Monte Cassino. The Sangro battlefields took place in the Adriatic region of Chieti, which isn’t as accessible and further from the major cultural tourist sites. The battle has also been overshadowed by the historic drama of the battles of Cassino and the Anzio landing.
But this battlefield does not deserve to be neglected. These battles were the last battle fought by Montgomery as commander of the Eighth Army, and the largest set piece battle commanded by him on the mainland of Italy. In late 1943 the allies stiller had hopes of capturing Rome. In October the Germans made the decision to try to stop the allies south of Rome and constructed the Gustav or Winter Line based on the Garigliano River flowing west and the Sangro River flowing east across the “calf” of the Italian boot. The Fifth Army under Mark Clark was to advance from Salerno and Naples via the West coast. Montgomery with 8th army was to push along the Eastern Adriatic coast, break through the Gustav line on the coastal plan, press on the Pescara and then attack Rome from the east, across the ApennineMountains. While the coastal strip south East of Pescara is much gentler country than the mountainous terrain around Cassino, the landscape played an important part in shaping the battle and is reasonably well preserved.
The battle of the Sangro was a set piece battle mounted by the four infantry divisions of the Vth Corps, and started on the 20th November 1943. Supported by 652 guns and the Desert Air Force the Eighth Army blasted its way across the Sangro River and almost obliterated the 65th German infantry division defending the sector and capturing its divisional commander.
The operation took place under appalling weather conditions. “The winter rains had set in, and no reprieve from bitter cold, swollen streams, and sodden earth could be expected. The Sangro in spate averaged five feet in depth, and was of such turbulence that patrols on more than one occasion had been drowned. The infantry bivouacked miserably in boggy fields under pelting showers. Transport speedily churned the water-logged earth into mud soup; vehicles slithered and skidded uncontrollably on the greasy tracks. Heavy transport and guns were winched and manhandled into position by their shivering, mud-soaked crews. Sappers and transport services toiled unceasingly to keep the roads open, and to get supplies through to the advanced positions.”(3) The 100ft wide Sangro River became a 1000ft wide torrent which washed away the initial bridges constructed by the Engineers.
After a week of fighting, which drew in the German reserves from across Italy, the German commander decided to fall back from the Line of the Sangro and the Gustav line defences and defend the next river line back, that of the River Moro. In itself this was an achievement as it took the 5th Army many more months to break through the Gustav line on the admittedly more difficult sector they faced.
THE BATTLE OF THE MORO RIVER
(1) 8th Indian Division build the “Impossible bridge “ across Moro River. (2) From 9th Dec 1943 The 21st Indian Brigade secures the ridge above the River Moro Crossing by 13th Dec 1943. This is where the 1/15th Punjabis and Harry Goslin would have been likely to have been. (3) 17th Indian Brigade attack Caldari and seize pt198 on the lateral road. (4) Attack by 1st Canadian Division on 14th Dec 1943 towards Casa Beradi. (5) The guns of the 53rd Fd Regt RA deployed West of the village of Tregelia.
Technically, Harry Goslin fell at the battle of the Moro River rather than the Sangro. The title of the History of the 8th Indian Division is “One more River”. (1) The geography of the Italian peninsular meant that the campaign was the story of an assault on the inevitable hill between one river valley and the next. The Germans did not defend the river banks themselves. Instead they held the high ground dominating the exits from the river valleys and reverse slope positions beyond the ridgelines, while deploying snipers and patrols on the forward slopes. Towns and villages on the ridges such as Orsogna and Ortona were often built on tactically important positions, which had withstood the ancient endemic risk of attack by pirates. The German defenders were drawn from the 26 Panzer Division, 90th Panzer Grenadier Division and the 1st Fallschirmjaeger Division.
25 Pdr Guns firing from a muddy emplacement on the Sangro Battlefield
In early December 1943, the 8th Indian division was deployed between the 2nd New Zealand Division and 1st Canadian Division which were intended to make the main attacks on the towns of Orsogna and Ortona respectively on the ridges. Initially the 8th Indian division was tasked with making a diversion to distract attention from the attacks on their flanks. To this end very obvious preparations were made to build a bridge across the Moro. The configuration of the approaches made it impossible to build from the home bank, so the sappers manhandled materials across the river and built the “Impossible Bridge” from the enemy bank. On 8/9th December, as the flanking Canadian and New Zealand attacks faltered and the Indians were ordered to secure the village and the ridge line north west of the MoroRiver. On the night 9/10th December the 3/15th Pubjabis with one company of 5th Royal Mahratta Machine-Gunners, and other supporting arms the Forward Observation Officer (FOO) parties from 53 Field Regiment Royal Artillery crossed the Moro to secure the bridgeheads. FOO parties consisted of an officer, such as Harry Goslin, trained to control artillery fire, and soldiers providing technical and communications support. It was on his judgment, and the competence of his signallers in maintaining communications to the guns 7km in the rear, that the survival of the infantry might depend. He and his men would move and live with the infantry sharing the dangers of the front line. The presence of FOO parties was sufficiently important that Montgomery himself took a personal interest that they were correctly allocated. A few weeks earlier, at the Sangro crossing, one infantry company of another division crossed the river without an FOO party and found themselves unable to call for artillery fire and forced to retreat. This made Montgomery very angry and spoke severely to the Corps commander on the subject and obtained an assurance that it would not happen again. ()
“The Germans reacted violently to this incursion. From patrol clashes the fighting mounted into a tense struggle. The Punjabis went forward to clear a strong-point with the bayonet. That night, “Impossible Bridge” was strengthened, and next morning British tanks crossed to come up in close support of the Punjabis and Mahrattas. Mopping up continued, but the area remained unhealthy with enemy snipers and mortar teams infiltrating audaciously. In destroying these pests a number of cat-eyed, soft-footed Indians compiled remarkable individual bags. Havildar Badlu Ram of the Punjabis slew sixteen Germans, and others were not far behind his total. The ground was cleansed and a firm bridgehead established.“ (3)
On the 13th and 14th other troops from the Indian Division attacked towards Villa Caldieri and the lateral road on the ridgeline parallel to the Moro. The Germans shelled the area heavily and counterattacked with infantry and tanks. The war diary of the 53 Field Regiment made at 0250hours on the 14th records that the Regiment had fired 170 rounds per gun ona timed programme to support the advance of 17 Brigade through the Punjabis positions and then a series of defensive fires against counter attacks made at dawn by German tanks and infantry. (4)
Later that day the diary noted “heavy enemy shelling of the Observation Post (OP) positions – an increase” and two serious casualties. One was Gunner Plummer an OP signaller killed by a sniper’s bullet. The second was Harry Goslin, wounded by a shell or mortar round bursting in a tree above his slit trench. The slit trenches customary in the Second World War provided protection against splinters from shells or bombs bursting on the ground. However, without overhead cover they were vulnerable to splinters from exploding shells overhead. Prior to the invention of radar “proximity” fuses, it was difficult to achieve accurate air bursts. However, if a shell struck a tree it would burst at the optimum height to inflict casualties. Harry Goslin was caught like this and paralysed by a shell splinter in the back. He was evacuated but died four days later and is buried 20 km south at the Sangro War cemetery in plot XV. Row C. grave 29. He was the only member of the Wartime Wanderers to be killed in the Second World War, but two other members of the seventeen who served in 53rd Field Regiment were wounded during the war.
The conditions under which the troops fought were atrocious, and closer to the popular imagination of the First World War than the Second. The weather was vile. According to the New Zealand histories, it took six men to carry a laden stretcher. One Canadian soldier described the land beyond the Moro river as “ a landscape that seemed almost lunar in its desolation where men lived and died in unremembered ways.” Brigadier Kippenberger, a New Zealander veteran of the First World War, wrote that “I had not seen men so exhausted since Flanders. Their faces were grey”
The Battle of the MoroRiver was a significant battle, the last attempt by the 8th Army to break through on the Adriatic coast. To the right of the 8th Indian Division the 1st Canadian Division attacked towards Casa Beradi and the crossroads leading towards the town of Ortona. The bitter house to house fighting in Ortona between the Canadians and the German paratroops which lasted until the New Year is the main episode remembered from the battle of the Moro River. The story of the Indians who fought alongside them and endured the mud and slit trenches in awful conditions, deserves to be remembered, as does that of the gunners who supported them.
BRITAIN’S BAND OF BROTHERS
A film is being made.It is great to see that it is about a bunch of gunners.
The View looking across the River Morro from the track leading North from Frisa, (Gr 308081) on the 1:100,000 map
Pescara is a good base for exploring the battlefields of the Sangro and the Moro. There are cheap direct flights from the UK to Pescara. As a holiday resort it has ample accommodation and, out of Italian peak season it is easy to find accommodation. It is possible to fly to Rome and travel over the Apennines by road or rail. The countryside is quite spectacular and illustrates why the Allied plan to take Rome via Pescara was doomed from the moment the Germans decided to stand South of Rome. Ortona has a fine little military museum and the Commonwealth War Cemeteries, as everywhere, are well maintained and their staff helpful.
The battlefield is one of the battlefields that need to be visited to appreciate the micro-terrain, the tactically important minor features of what Montgomery described as “ridge and furrow” countryside. Although Ortona has sprawled along the lateral road the battlefield is much less overgrown than the Monte Cassino massif or litter laden and developed than Anzio. There are plenty of view points beloved for military studies and TEWTs.
The area is less geared to battlefield tourism than around Cassino, but when aware of the purpose of a visit the local response can be humbling. An explanation to the hotel owner of the purpose of the visit resulted in the owner telling the story of her father, taken prisoner in Sicily and her uncle who fought with the partisans alongside the British Major Lionel Wigram. As soon as the occupants of the “manor House” in Casa Beradi had worked out that the group of people in German registered minibuses were British soldiers the hospitality was overwhelming.
For more information about visiting the battlefield contact Gunner Tours www.gunnertours.com +44 207 387 6620
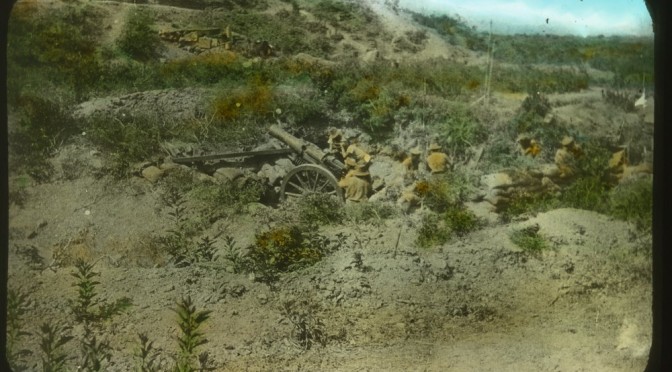
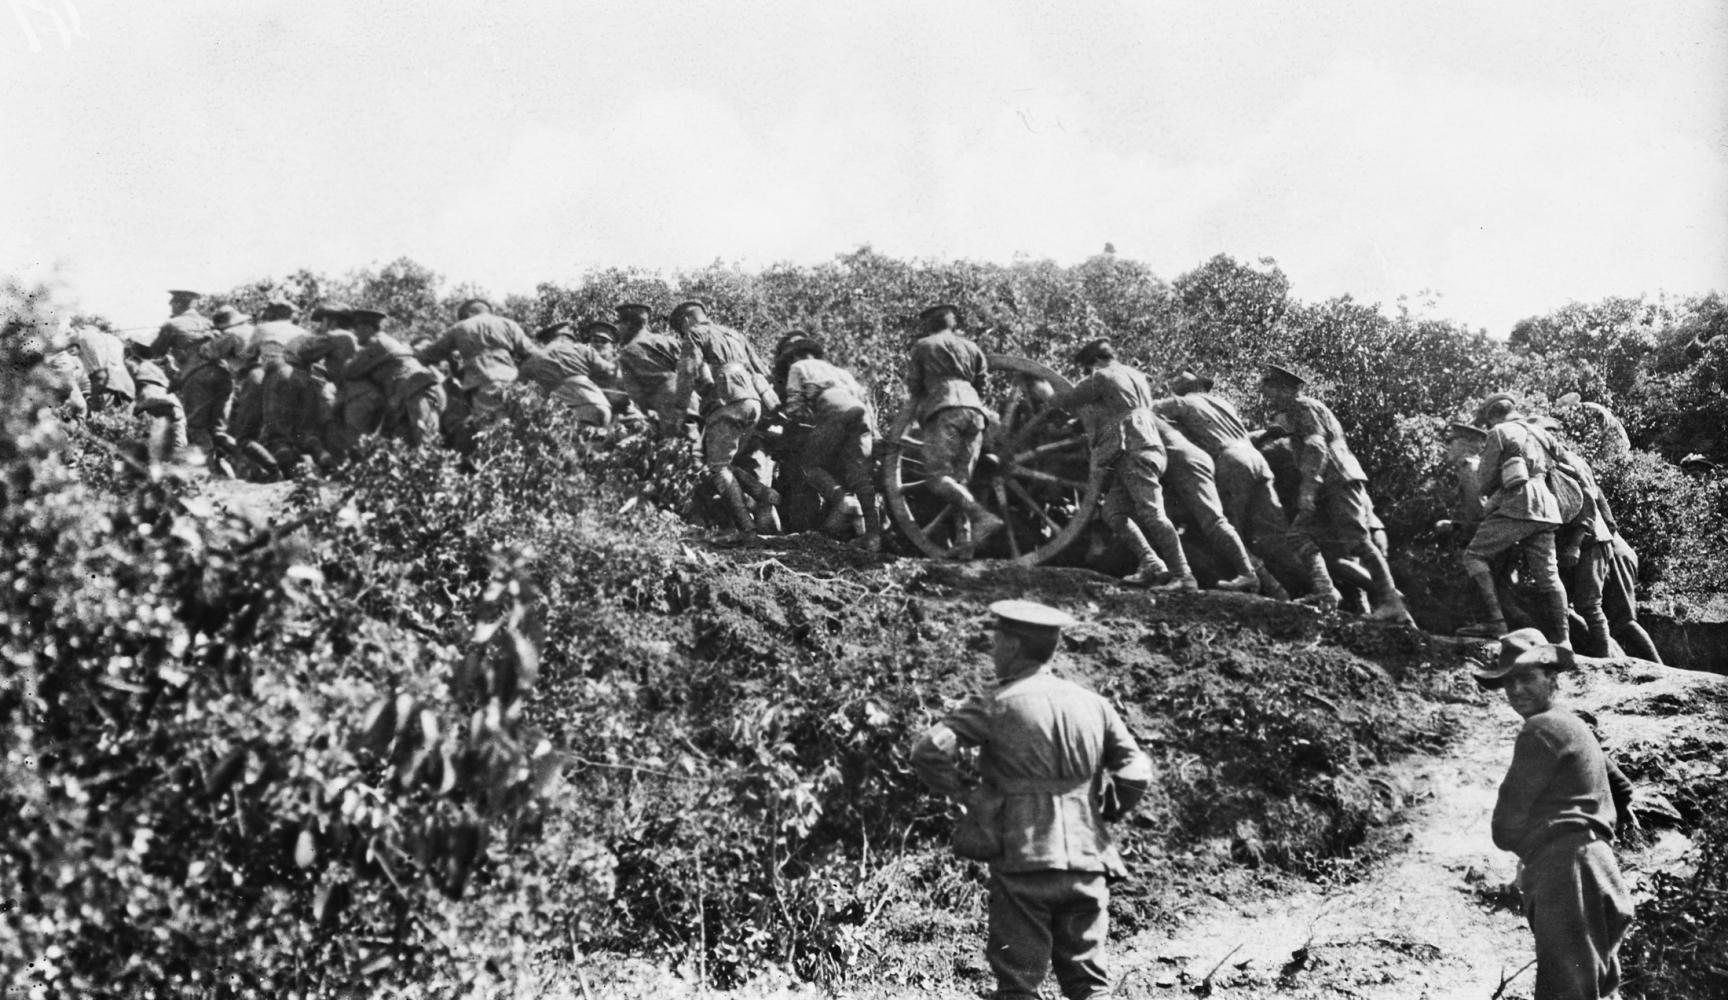
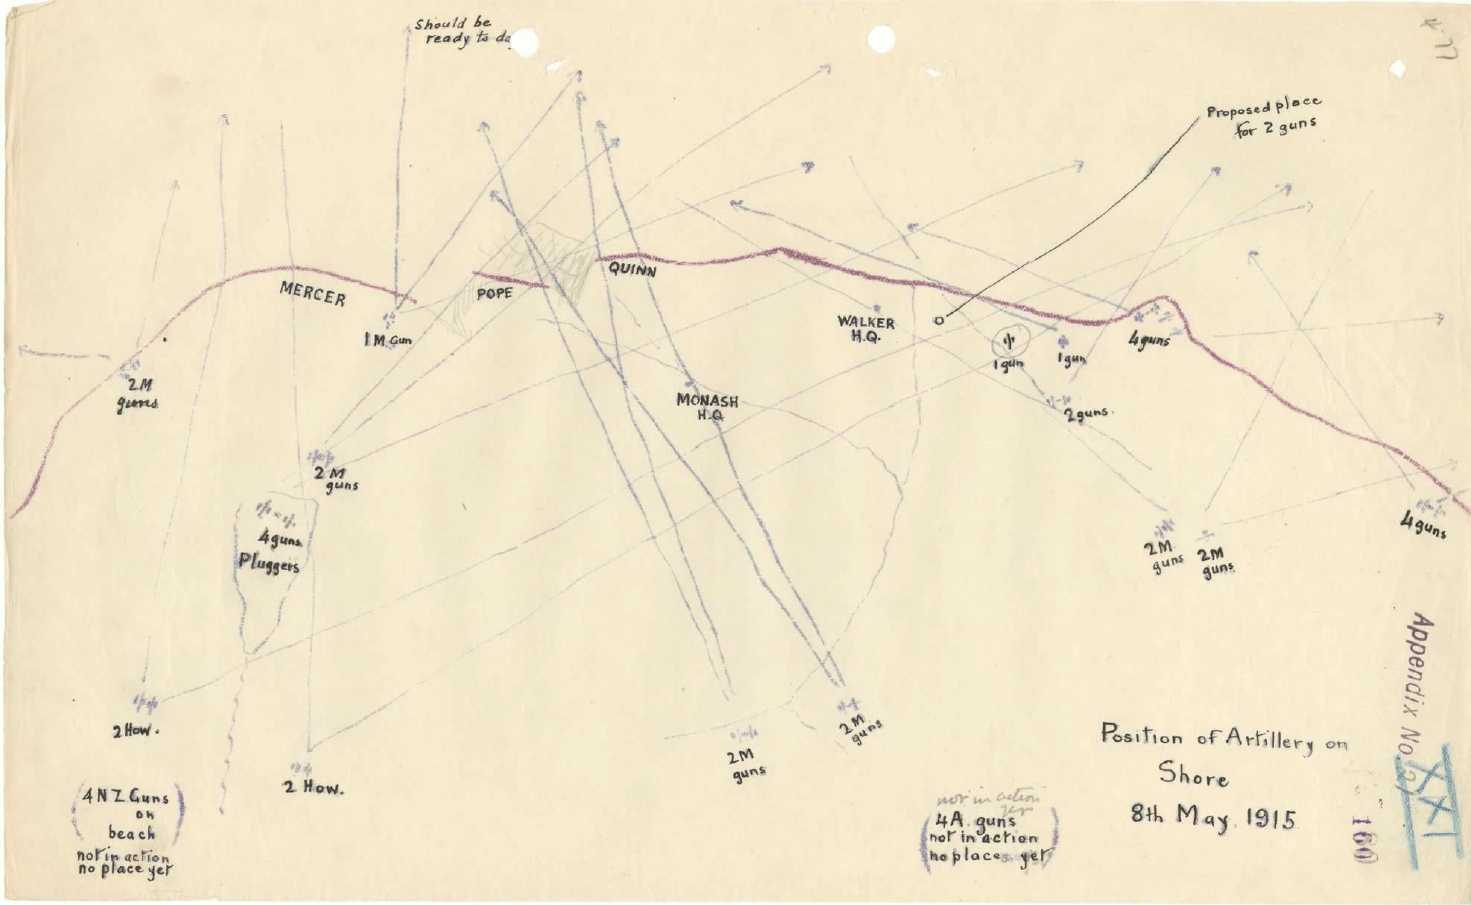
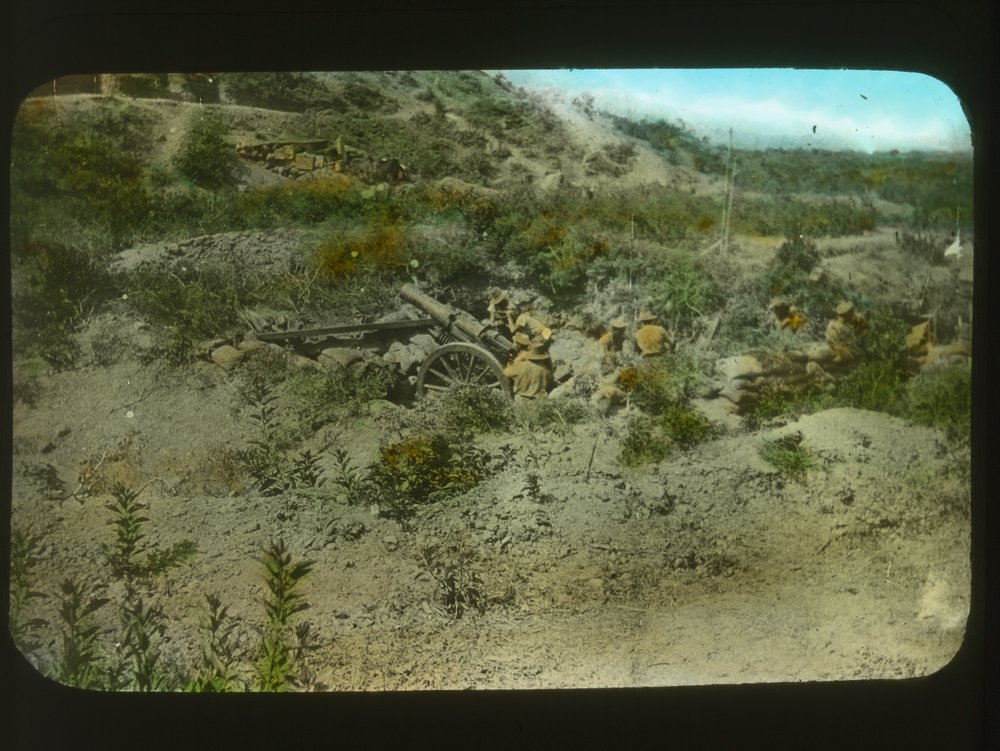 It was particularly short of howitzers capable of lobbing high explosive shells over hills and into trenches. Almost all of its guns were 18 Pdr guns with a flat trajectory and very difficult to deploy in the hills inland from Anzac Cove. Often the way to enable the guns to engage was to run them forwards with the infantry in the direct role. These guns were supplied solely with shrapnel shells which was almost useless against troops in trenches. Although the Allies could call on the support of the naval guns of the fleet, these too had a flat trajectory and could not be easily brought to bear onto Turkish positions among the hills.
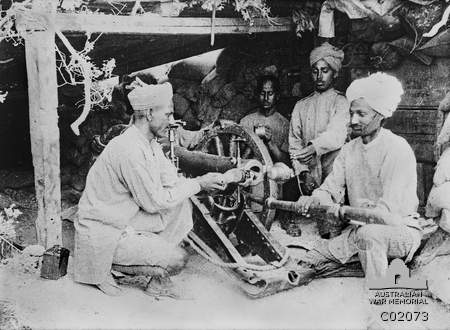
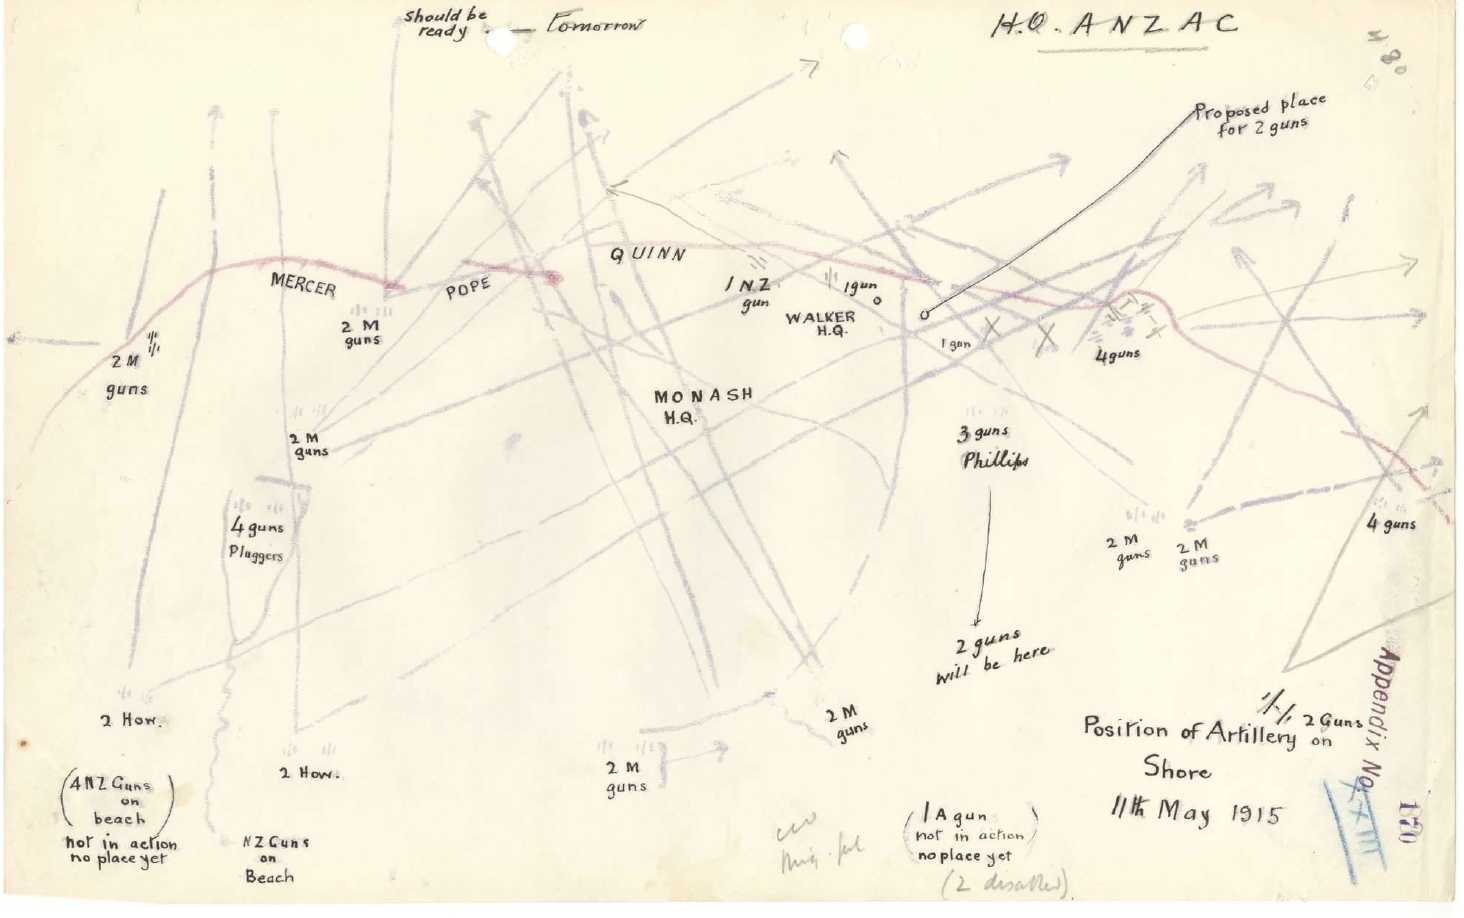
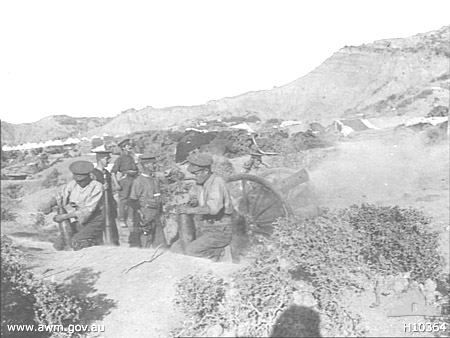

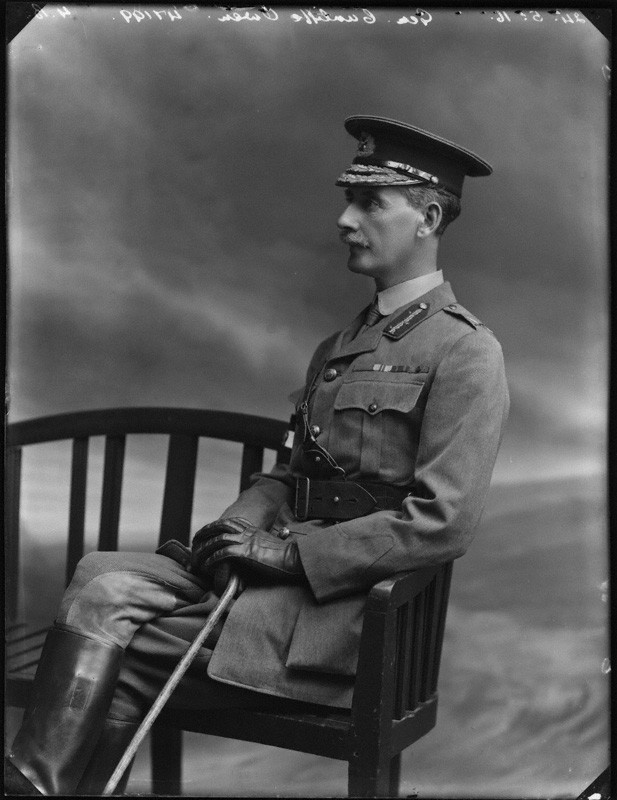


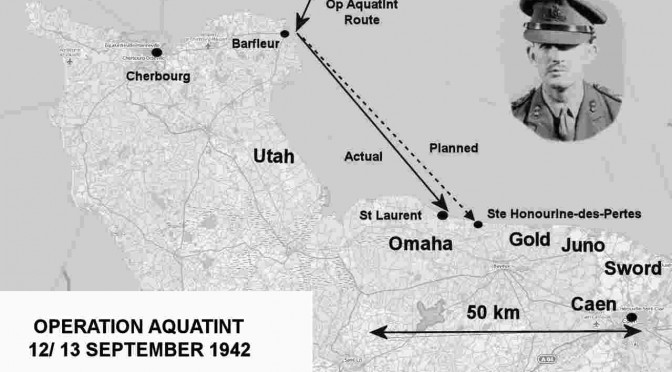
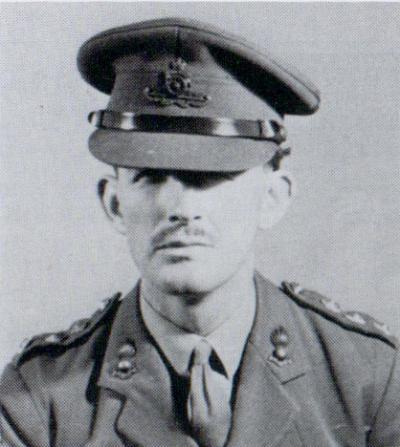

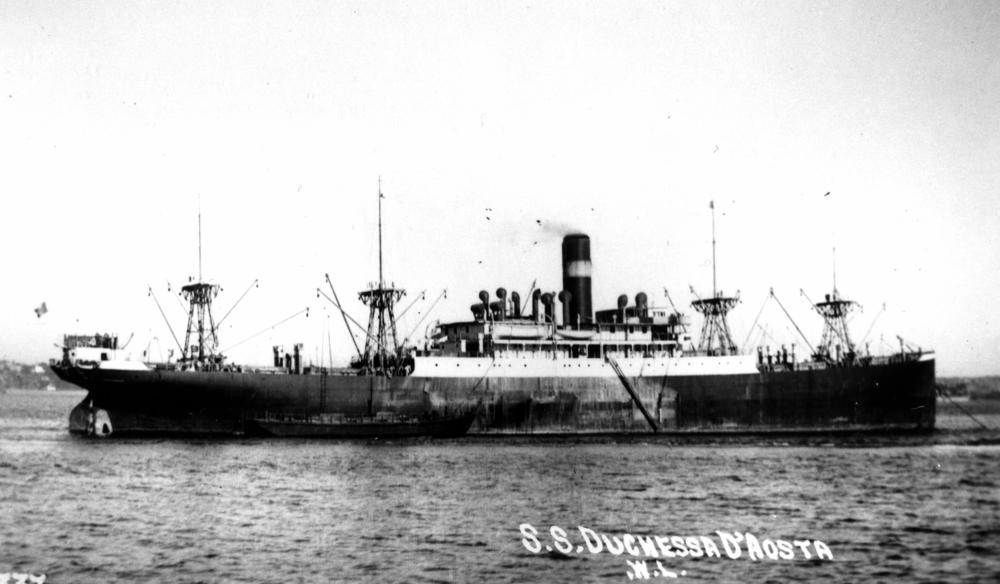
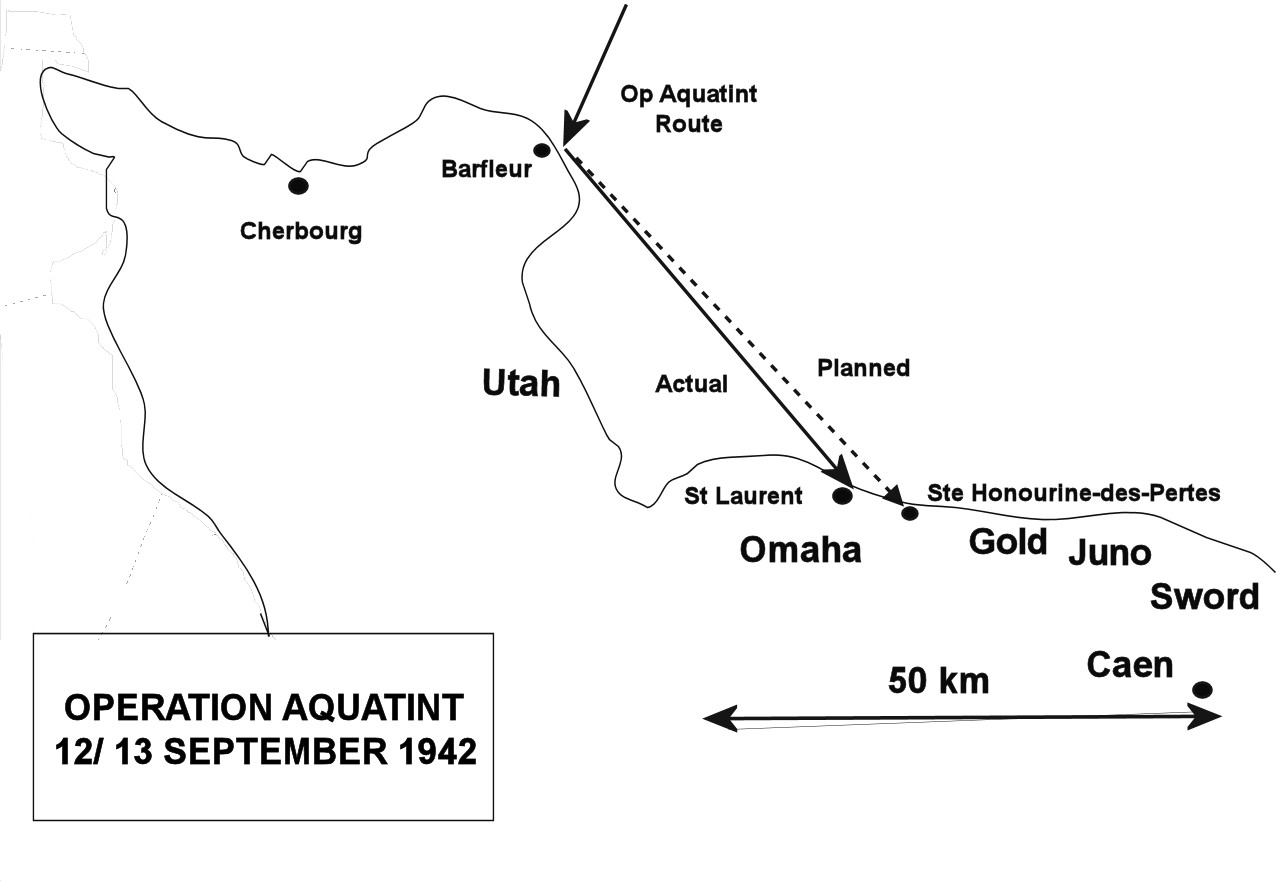


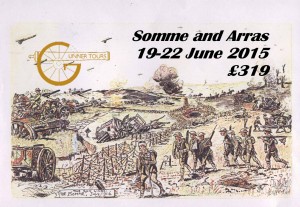 ng weekend of four days