This article appeared in the Royal Artillery Journal September 2019. Unfortunately some of the maps were not reproduced correctly. This article includes the corrected maps, which are illustrations from the book “Gunners in Normandy” due for publication in Februrary 2020.
Seventy-five years have elapsed since D Day and the battle for Normandy. Since then there have been countless publications, including several in the Royal Artillery Journal.[i] The Gunner contribution was recognised with the highest praise by commanders, and widely acknowledged. The Gunner contribution to the battle has been included in the more thoughtful works about the campaign.[ii] However, many of the most popular and respected histories are flawed and contain inaccuracies, if not outright howlers. The Gunners are ubiquitous, but faceless and voiceless. One reason for this has been the absence of a Regimental history of the Normandy campaign, which documents the actions of individual Gunners and Gunner units. This article is based on the narrative from Gunners in Normandy, the History of the Royal Artillery in North West Europe Part 1, a work started by the Late Lieutenant Colonel Will Townend.
Artillery were the largest single cap badge in Normandy. Comprising some 18% of the force, in comparison to 15% of infantrymen. If the proportion of service troops is considered, just under half of the British troops serving in Normandy were either gunners or supporting the artillery. Of the 135 RHA or RA regiments in the British Liberation Army, 11% had seen service in France and Belgium in 1940, and 13% had been in the Middle East. Only 5th RHA and 74th Field Regiments had served in Belgium and France in 1940, in the Middle East and in Normandy. Some individuals had served in both. There was a policy of cross posting officers to share knowledge and experience. Most of the officers and men were conscripts, from a generation whose fathers First World War experiences served as a benchmark.
A handful were pre-war regular regiments including 3rd, 4th and 5th RHA, 7th and 33rd Field, 7th Medium, 20th and 21st Anti-Tank Regiments. Many of the Gunner units were reservist units mobilised at the start of the war. Some had a strong regional character like the World War I Pals, for example the 15th Light Anti-aircraft Regiment, the Manx TA, the 90th (City of London) and 76th (Highland) Field Regiments. At least thirty-eight Regiments were originally raised under a different cap badge. Several, such as 151st (Ayrshire Yeomanry) Field Regiment were mobilised as mounted, yeomanry cavalry; only became gunners in 1939-40 and retained their own cap badges. In 1942 twenty infantry battalions were converted to light anti-aircraft regiments, and nine to field and medium artillery regiments. Some of these units retained a dual identity, such as the 92th (7th Loyals) Light AA or 181st (6th Battalion King’s Shropshire Light Infantry) Field Regiments. Their unit histories record their dual identity with pride. Others, such as 110th Light AA Regiment originally raised as 7th Dorsets appear to have been subsumed completely as Gunners. Some Gunner regiments tolerated or sported non-issue items of clothing. Some extended their individuality to fire discipline, with questions raised about the extent to which the use of code words in 7 Armoured Division originating in the Western Desert, hindered them in Normandy.[iii]
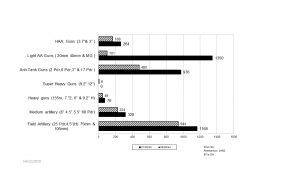
By comparison with the British Expeditionary Force on 1940 the British Liberation Army of 1944 had a few more field and medium guns, but far more anti-tank and light Anti-aircraft guns. Not shown is the substantial increase in communications and locating equipment, Air OPs and a 50% increase in numbers of BCs and FOO parties.
The two principal field artillery equipment, guns, used in Normandy were the 25-pounder, the workhorse of the divisional artilleries and the 5.5-inch, the mainstay of the Army Groups Royal Artillery (AGRA). Others were:
- The 75 mm (US) Pack Howitzer, used by the Airborne Artillery.
- 5-inch, Gun. This equipped two medium batteries for counter battery work on account of its range.
- 155 mm (US Long Tom – 6-inch), designated heavy artillery and used primarily for counter battery work
- 2-inch (Mk 6 on US M1 carriage, or a box trail carriage), used for heavy bombardment
- 25-pounder Sexton self-propelled gun (on a Canadian Ram tank chassis and often known as the Ram), mainly used by the regiments supporting the armoured brigades in the armoured divisions, with two from disbanded formations as Army Group assets, and 90th Field Regiment from 50th Division converted for D Day.
- 105 mm (US) M7 Priest self-propelled gun (on a US M3 tank chassis), used by 3rd British and 3rd Canadian Division Artillery and the 19th Canadian Field Regiment. The Priest was replaced in most units by the towed 25-pounder at the end of July-beginning of August.
- The 3.7” HAA Gun was used extensively in the field artillery role. It out-ranged the 5.5” Medium gun and had a useful HE round and mechanical time fuse
- The Centaur CS tank mounted a 95mm howitzer. This equipped the Royal Marine Armoured Support Group, formed initially for the D Day assault.
Field Regiments comprised 24 guns organised into three batteries, each of two troops of four guns. Medium regiments of 16 guns organised into two batteries of eight guns, each of two troops. Heavy Regiments. Heavy Regiments had 16 guns, eight each of 155mm and 7.2”, organised into four batteries of four guns. Within field regiments the battery and troop commanders provided the observation and liaison element in direct support of infantry or armoured units. Medium and heavy Regiments could provide liaison and additional observers. Each infantry division had three field regiments of towed 25 pounders. Each armoured division had a field regiment of towed 25 pounders and in direct support of the infantry brigade and a field regiment of SP 25 pounders in direct support of the armoured brigade. The AGRAs were of mixed composition, but normally included a heavy regiment, two or more medium regiments and a field regiment.
The principal anti-tank guns in use in Normandy were:
- 6-pounder anti-tank gun, used by both infantry and Royal Artillery anti-tank units in 1944
- 17-pounder anti-tank gun, used exclusively by the Royal Artillery anti-tank regiments
- US M10 self-propelled (on an M3 tank chassis) 3-inch anti-tank gun
- US M10 self-propelled (on an M3 tank chassis) with British 17-pounder anti-tank gun (Achilles)
The 57mm calibre 6 pounder had entered service in 1942 and proved effective in North Africa against the German Mark III and IV tanks and could inflict damage on the German Mark VI Tiger heavy tank with Ballistically Capped Armour Piercing Steel shot (CAPC).[iv] By D Day this ammunition was supplemented by Armour Piercing Discarding Sabot ammunition (APDS) which could had improved penetration. The six-pounders were light and manoeuvrable and could deal with all but the Tiger and the front armour of Panther tanks. They were towed by the Universal carrier, although this was under-powered and possessed a “paralytic” cross country performance when towing a gun.[v]
The 17-pounder was a very effective anti-tank gun, but, was heavy and unwieldy to manhandle into position. Introduced in 1943, an APC shot from the 17 pounder could penetrate the armour of the heaviest German tanks. The gun detachment had no protection from shell splinters and a gun pit took 12 hours to dig. The soft skin Field Artillery Tractor was inadequate in a forward area swept by shell splinters and bullets. Obsolete Crusader tanks were converted into gun tractors and issued to the towed batteries of the Corps Anti-tank Regiments. The towed 17 pounders in armoured divisions used M14 half-tracks as tractors.
The American M10 Gun Motor Carriage which mounted a 3-inch gun in an open topped turret on a Sherman tank chassis. The M10’s armour gave little protection against German tank guns. The 3-inch gun was replaced with a 17-pounder as production capacity – and industrial relations permitted. There is no evidence of the inferiority complex that seems to have affected the RAC tank crews facing Panther and Tiger tanks. “The 3” M10 is a good SP Gun; The 17 Pounder M10 is a terror”[vi]
There were two types of anti-tank regiment: those supporting infantry divisions and those supporting armoured divisions and the corps anti-tank regiments. Both types had four batteries of three troops each of four guns, a total of 48 guns. In the infantry divisions all four batteries comprised one (or two) troops each of four 6-pounders and two, (or one) each of four 17-pounders. The D Day assault divisions were given US M10 3-inch SP anti-tank guns in place of the towed 17-pounders. The anti-tank regiments of the armoured divisions and corps anti-tank regiments comprised two SP batteries each with three troops of four M10s and two towed batteries with three troops of four 17-pounders.
The anti-tank defences were supplemented by field and anti-aircraft equipment which had a secondary anti-tank role. AP shot from 3.7” HAA Guns would penetrate armour almost as thick as a 17 Pounder could penetrate.
The AA forces for Operation ‘Overlord’ included the largest concentration of British AA Artillery assigned to any operation. Thirteen AA Brigade HQ, seventy AA Regiments, several independent batteries and an RM AA Regiment. Almost half of the gunners landed in Normandy in the first few days were AA gunners. By the 25th June twenty-nine AA regiments had been landed. Twelve of these were assigned to the Corps and Divisions. A further seventeen were part of three AA brigades under army command in Normandy.
The principal anti-aircraft guns used by the Royal Artillery were the 3.7-inch heavy anti-aircraft gun and the 40mm Bofors. The heavy anti-aircraft regiments had three batteries each of two troops of four 3.7-inch guns, a total of 24 guns, and the light anti-aircraft regiments had three batteries each of three troops of six 40 mm Bofors guns, a total of 54 guns, in various combinations of SP and towed guns. They also had three troops each with 20mm Oerlikon guns, although, these did not arrive in Normandy until mid-July. The anti-aircraft brigades had varying numbers of heavy and light anti-aircraft regiments and searchlight batteries under command, depending on the task. LAA regiments manned the off-shore anti-aircraft guns on the Mulberry, Gooseberries and Landing Barges Flak, and deployed ashore to protect the beachhead and Mulberry harbour had special establishments and equipment. In August 1944, the Light AA regiments were reduced and reorganised; the 20mm troops and one troop of 40mm guns per battery handed in their equipment and sent the manpower to the reinforcement holding units for reallocation.
The 3.7” Heavy AA Gun was comparable to the German 88mm Flak 36 AA gun. Progressive improvements to ammunition, warning, detection and fire control technology improved its effectiveness over the course of the war around a hundredfold. It was towed by a four-wheeled AEC Matador, a 10 ton capacity four wheel drive vehicle.
The 40mm Bofors gun was the British version of the eponymous Swedish Light AA gun used by almost every combatant. It had an effective ceiling of 5,000ft. The Bofors gun was towed by the Bedford QLB, based on the Bedford QL chassis. The SP variant mounted the 40mm Bofors on the chassis of the Morris Field Artillery Tractor. The SP Bofors was much quicker into action that the towed equipment and popular in service. These were disproportionately issued to the Light AA Regiments in the three Assault divisions and the Light AA of 76th and 80th AA Brigades
In order to ensure that the first wave of Light AA could get ashore without waiting for beach roadways to be laid, the first wave of Light AA to land were provided with thirty 40mm Bofors guns mounted on old Crusader tank chassis with the turrets removed. The hulls were modified to take the maximum ammunition.[vii]
In order to engage low flying fast aircraft the British Army adopted 20mm AA guns. The 20mm Oerlikon, used by the Navy and installed in RAC AA tanks, lacked the self-destructing fuses that detonated after a set time. They could only be safely fired into ground known not to be occupied by friendly forces, which restricted its use. In 1944 the Polish designed Polsten was introduced with a self-destruct round. Fifty-four triple mount Polsten guns were equipped the batteries of 93rd Light AA Regiment. Twenty-seven were mounted on Crusader tank chassis and a further twenty-seven mounted on 40mm carriages.[viii] These would provide low level point air defence to the beaches.
The Royal Artillery used several types of radar equipment to detect and locate enemy aircraft. Few, if any photographs exist of these in service in Normandy. The loading lists for 80th AA Brigade suggest that each troop of four guns was accompanied by its own pair of radars.
The Gun laying Radar AA No3 MkII, also known as the GL III, was a 10cm mobile radar for accurate fire control of heavy anti-aircraft guns. Depending on the source, this radar could pick up and engage a medium bomber at 27,000 yards (25km)[ix]. or pick up at 36,000 yards( 33km) and engage at 14,000yards (12.5km)[x] It was mounted on a four wheeled trailer. It could transmit continuous information the range, bearing and elevation to a predictor, which could then further transmit information to individual guns. This radar had a very narrow field of view and was used in conjunction with another radar with a wider beam which provided early warning and tracking information
The main radar used for local warning and “putting on” the GLIII was the. Radar AA No 1 MII, commonly known as GL (Gun Laying) II. It had a pick-up range of 50,000 and could be used for fire control out to 14,000 yards, but was inferior to the GLIII. The radar comprised separate transmitter and receivers mounted on trailers.
Passive air defence equipment included barrage balloons and smoke generators deployed as part of the Gunner controlled air defences, but manned by other arms.
The operational methods of the British Army in Normandy were the product of doctrine, the lessons learned during the war and the personality of its successful field commander General B L Montgomery. Montgomery had a preference for set piece battles, characterised by a master plan, concentration of force, and fire-power based attrition. He described his set piece battles as consisting of a break in, a dog fight and a break out. The Break in would take place on D Day. Montgomery’s theatre strategy for the Normandy “dog fight” envisaged a series of holding attacks on the British sector, designed to draw the bulk of the German forces to that front, thus permitting the Americans to advance in the West. His approach also strove to keep t he initiative, forcing the Germans to react to Allied moves.
The key to Montgomery’s conduct of battle was the use of overwhelming concentration of massed artillery fire power, supplemented by aerial bombardment when possible. He had seen how massed fire power together with the anti-tank action of anti-tank guns had brought success at El Alamein, and this impressed itself indelibly on his mind.[xi]
It would be wrong to attribute these tactics solely to Montgomery. While he was the commander of the formations which achieved success, the artillery techniques were the product of the developments made within the Royal Artillery and the evolution of thinking within the British Army, supported from the top by the CIGS, Brooke.
D Day would be the “Break in Battle “for the battle of Normandy. The story of the fire plan and the run in shoot has been covered in the pages of the RA Journal, in several articles including by one by Brigadier H J Parham BRA Second British Army responsible for the D Day Fire plan.[xii] Parham also kept a planning diary, held by the Firepower archives. This documented the planning efforts made during four months of intense planning with the RA staff working daily until 02.00.[xiii]
On 31st May 1944 Brigadier Parham confided to his diary his predictions for D Day. “As long as the cloud allows the Fire plan will, given perfect weather and freedom from cloud (which is essential), as follows when it comes off in a few days time.
- A vast quantity of moderately aimed assorted missiles will fall on or near or not so near the beach localities from H-30 to H.
- There will be a vast pall of smoke . As a result the very high proportion of the fire which is dependent on direct laying , will go haywire. But so will the Huns’.
- Defiladed AT guns on beaches will cause a lot of trouble as many will survive. They will be hard to KO and will account for a lot of our own DDs and Centaurs on some beaches.
- Counter battery and counter mortar will be our biggest headache.
- The successful engagement of hull down tanks (Tigers and Panthers) lying back 3,000-4,000 yards from beaches and covering our painful progress through minefields will be difficult.
- We shall be badly short of aerial observation early on.
- The battle on D Day and for the next days will be a very rough house indeed. On it the war’s result depends. BUT…we are absolutely certain to be ashore in enough places to stay there. Nothing else matters and we will then win the war , sooner or later & we hope soon. The Hun commanders on the spot are in for an interesting, exciting and highly depressing day”
Parham took a realistic view of the effectiveness of the fire power being applied to the D Day objectives. He knew that there was very little in the allied armoury that could target an anti-tank gun in a concrete bunker sited to fire in enfilade across the beach. There could not be a solution until the development of precision guided weapons.
The D Day fireplan has been heavily criticised by American and Canadian historians for the apparent failure to destroy more of the beach defences. Yet as Parham’s note makes clear, the fireplan required clear visibility. The decision by Eisenhower to launch the invasion in marginal weather meant that the US Heavy bombers, which provided some 5 kilotons of bombs would be ordered to aim 1,000 off their targets. Parham’s expectations are also a reminder that the outcome on D Day exceeded all contemporary expectations.
Parham had strong views about the need for early Air OPs. There were few natural vantage points on the Normandy battlefield, other than heavily shelled church towers and vegetation restricted what could be seen. He lobbied strongly, but unsuccessfully[xiv], for an aircraft carrier to operate Air OPs on D Day[xv] and even for Sikorski’s prototype helicopters to be operated from Landing craft.[xvi] Air OPs were essential for adjusting fire. Most artillery shoots ordered from the ground were predicted rather than observed fire, using the spread of fire from multi battery missions to offset inaccuracy, with undoubted waste on agricultural targets.
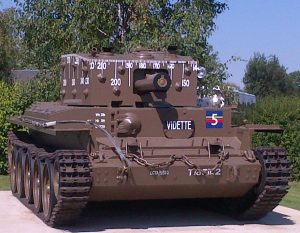
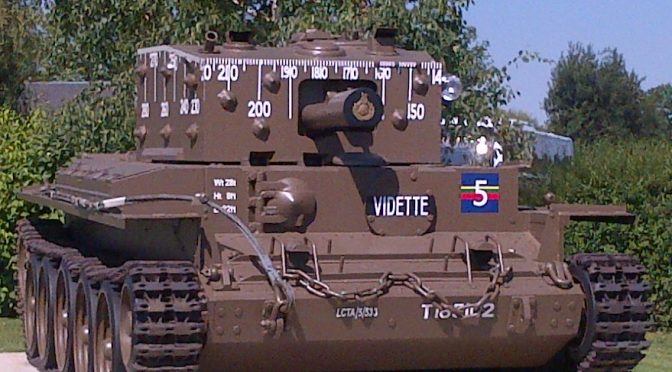
Parham was a champion of the Royal Marines Armoured Support Group (RMASG) who would man obsolete tanks firing in the run in shoot from H-15, thickening the fire after H-10 when the field artillery barrage would end. The RMASG is not well understood, although two of their Centaurs remain as memorials in Normandy. The RMASG was manned by a mixture of RM, RAC and RA and commanded by a CRA. The formation was organised into five batteries each of four troops of four Centaur tanks and a GPO’s Sherman. The Centaurs were fitted with dial sights. There was one battery per assault brigade group to provide direct fire on the run in shoot and indirect fire once ashore. There was no administrative support and most of the men were to be released after a few days in action. The RMASG was not a tank brigade, but a disposable assault gun brigade The CRA, Brigadier Sanders and many of the RM Gunners were from the artillery of the disbanded Royal Marines Division. Only half of the RMASG landed as scheduled, as the high armoured decks of the modified LCT (A) were barely seaworthy. However, as noted by RA 2nd Army, they were “A strange unit: amphibious, web footed, armoured, partly SP, partly RAC, fires off seas as HM craft, on the land as tanks or SP Artillery according to taste….a GRAND LOT OF CHAPS and it would not be their fault if they were not a great success.[xvii] Due to rough seas only half of the Centaurs landed. Those that did gave a good account of themselves and instrumental in an action that resulted in Canadian Gunner Holtzman’s military medal action on Juno Beach. Brigadier Sanders was killed in June, one of the highest-ranking Gunner officers to be killed in action by shellfire while visiting the Orne Bridgehead.
A “corps level battle drill” was promulgated in October 1943, based on experience in North Africa and Sicily.[xviii] This battle procedure included carrying out the procedures to survey guns and targets, identify enemy batteries and, where necessary, carry out preliminary operations to secure ground for gun positions. The techniques were practiced by all but one of the corps headquarters and their associated AGRA at Larkhill during the spring of 1944. The British Army would fight its battles at corps level. If a division fought on its own it would not prevail against a determined German defensive. This proved to be the case in Normandy as can be seen by the lack of success by 3rd British Division against Caen 6-7th June and by the 7th Armoured Division at Villers Bocage.
Inevitably, during battle the process was disrupted by an uncooperative the enemy, who kept artillery and mortars silent until after the attack started, deployed in depth to out range field artillery, and cunningly hid reserves of infantry and heavy tanks. At this point attacks would break down while new targets were acquired and fire-plans adjusted.
The battery commanders and troop commander FOOs played a key role, accompanying the infantry and armour and providing the network of informed observers around which concentrated artillery fire could be applied. The direct support element of field artillery suffered casualties comparable to the infantry. After fourteen days in action Major P Pettit of 481st Battery of 116th Field Regiment was the only un-wounded member of his party. Becoming a Troop Commander FOO, or Battery Commander would bring an officer promotion to Captain. The same was not true of OP signallers or drivers. Officers could be ordered to the OP and? in many units the OP parties were relieved by volunteers from Command posts.
One heroic example took place on the slopes of Hill 112 on 10th July. Major Mapp, BC 171st Battery supporting 7th Somerset Light Infantry was fatally wounded by mortar fire and the infantry CO killed. Both OP parties were deployed and pinned to the ground. Bombardier, Acting Sergeant Trevis at Battalion HQ then took command and assumed the BC’s responsibilities, co-ordinated the work of the O.P.s and brought down fire when required by the battalion. Captain Robinson, the B K, was killed coming up to relieve him. It was not until late in the evening that another officer could be made available. “Bombardier Trevis therefore commanded the battery for a period of 12 hours for the greater part of which he was under enemy mortar and shell fire. He did a job which would have been a credit to any Battery Commander.” An act recognised with the award of the Distinguished Conduct Medal [xix] A similar act, two weeks earlier resulted in the same decoration for Gunner, Acting Bombardier Moorin of 190 field Regiment.[xx]
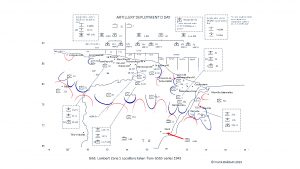
In mobile warfare the idea of the infantry securing every area was as outdated as long lines of trenches. Artillerymen could often find themselves face to face with the enemy. On 27th June 25th Field Regiment was ordered to deploy as far forward as possible to be able to support 31st Armoured Brigade in operation Epsom. Infantry progress had been slowed by a deep minefield. But reconnaissance of a gun position beyond this minefield and about one mile south of le Mesnil Patry from the village had been completed.
The guns started arrived on the position and, with the exception of “A” Troop, were got into action without any difficulty. As the leading gun of “A” Troop, 12/25 Battery (now 8 Alma Commando battery) entered the field in which it was to deploy the troop came under rifle fire. The GPOA, L/Bombardier Hobson, fell at the director not far from the edge of wood bordering the position. Efforts to reach him brought more fire, as did further movement of men or vehicles. Gun detachments, therefore, dismounted from their tractors and crawled away under cover of a hedge along which the guns were now halted.
The CPO. Lieutenant KJH. Astles, immediately formed two small patrols from Battery H.Q., each of two men, with himself in charge of one and the ACPO, Lieut. F. R. Gutt, in charge of the other. These had hardly entered before heavy rifle and automatic fire was opened. Only Gunner Erskine returned, reporting that both officers and two gunners had been killed and another seriously wounded.
Sergeant Duke, the NCO i/c Signals, who had been laying lines which ran through the wood appeared shortly after Gunner Erskine. He had been pinned down by fire and unable to reach the men whom he had seen shot. He later brought in L/Bombardier Hobson under fire. A section of infantry attempted to enter the wood but was forced to withdraw by heavy fire.
Meanwhile, the Second-in-Command, Major A F Johnson, had enlisted the help of a troop of Sherman tanks. A troop of M5 Stuart light tanks, hearing the noise, also arrived. Two of the Shermans, the Stuarts and the Battery’s Bren guns were sited to provide covering fire, while the third Sherman was to cover a party of gunners, under the command of Sergeant Duke, would enter and clear the wood. Gunner Erskine, also in the party, had made another expedition into the wood with two signalers and had located the area where most of the fire came from.
After a short intense bombardment by the tanks, the gunners entered the wood and very soon afterwards a white flag was hoisted by the enemy. To everyone’s astonishment, forty-three prisoners were rounded up, and some dead Germans.
When the whole Regimental area had been searched, it was plain that it had been an enemy reserve company locality, which had been overrun but not mopped up. In the action 25 Regiment lost two officers and four other ranks killed and three wounded, but took around fifty prisoners from the 12th SS. Sergeant Duke was awarded the Distinguished Conduct Medal and Gunner Erskine was awarded the Military Medal.[xxi] This action deserves to have been better known, and could have been a setting for many post war test exercises.
The Monty set piece battle envisaged that anti-tank guns should play a major role in defeating enemy armour. Each infantry battalion possessed six 6 pounder anti-tank guns and dozens of hand held anti tank weapons for self-protection. In the assault anti-tank guns would accompany the infantry, relieving the accompanying tanks as soon as possible. Self propelled 3” or 17 pounder guns were much in demand for this purpose. Both infantry and RA manned 6 pounder guns would be adequate, but the towed 17 pounder was very vulnerable for around 12 hours until it could be dug in. German doctrine called for immediate counter assault and planned counter attacks, supported by armour when available. The easily concealed and manhandled 6 pounder would have been adequate had the Germans not deployed Tiger or Panther tanks in the battles around Caen. Instead many of the battles around Caen included duels between heavy tanks and ill protected 17 pounder guns in the open.
In defence the infantry’s own anti-tank guns were intended to provide local protection, while the towed 6 pounders were sited on tank killing areas, with SP guns moving as appropriate and the towed 17 pounders forming a back stop. The last ditch anti-tank defences for the beaches themselves were the heavy AA guns, which were assigned anti tank positions.
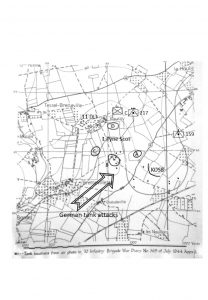
There were several occasions during the Normandy Campaign when the Germans attempted to launch their armour in an attempt to throw the allies into the sea. On D Day Sergeant Mitchley[xxii] No 1 of an M10 of 20 Anti tank regiment became one of the anti-tank regiment first fatal casualties stopping the 21st Panzer Division. There was particularly heavy fighting between the 7th and 11th June between Bayeux and Caen.
The M10 units were exhorted to remember that the M10 wasn’t a tank and was not supposed to be used as one. However, photographs from D Day provide testimony of its use bunker busting. Two No’s 1 were awarded the Military Medal for actions which would have been unlikely to win the approval of Anti tank Wing at the RSA. Sergeant Todd, the No 1 of an M10 of J Troop, 198 Battery 73rd Anti-tank Regiment was isolated after the infantry withdrew after a counter-attack. When German infantry burst through a hedge about 50 yards in front he engaged them with his 0.5” Browning, which was mounted on the open turret. He withdrew through a hedge, but only to charge back again and engage the enemy in an open field. He continued to move up and down the field causing some 30-40 casualties before withdrawing. On 18th July Sergeant Smith of 73rd Anti-tank Regiment was tasked to support an assault by 1/7th Staffordshire on the village of Bretteville. When the supporting armour did not arrive, he considered that the infantry, mortared in their FUP would not advance without armoured support he charged at H bringing his SP into action on the flank of the objective and providing covering fire.[xxvi]
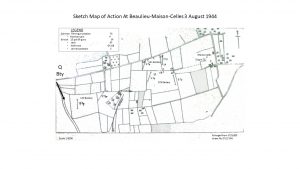
Perhaps the best example of an anti-tank battery action is Beaulieu-Maison-Celles on 3rd August. (shown as Maisoncelles on the sketch map) 153rd Field Regiment of the Guards Armoured Division were targets of a counter-attack by Panther tanks supported by infantry. 129th Battery lost two guns and a command post; the attack then reached 131st Battery in a neighbouring field. OP/CP Sherman tanks attempted to engage the Panthers but were knocked out. 129th and 131st Batteries deployed their 25 Pdr SP guns to anti-tank positions. The 2IC, ordered these two batteries to withdraw to Le Desert under covering fire from 130th Battery; two further guns were lost and nine ammunition lorries had to be abandoned. 130th Battery then withdrew under cover of its own smoke.
As the last gun withdrew, the first M10s of Q Battery, 21st Anti-tank Regiment arrived. The Panthers were difficult to locate and the Battery had to deal first with the enemy infantry, but after an hour Major Taylor’s gun destroyed a tank as it traversed a gateway. An hour later three more Panthers entered the field directly in front of HQ Troop. Major R I G Taylor got the first, Lieutenant L Hawker the second and the third withdrew. BSM Woolley and Lance-Sergeant Prudhoe were killed in their M10s. That evening Sergeant Farrow fired three rounds at where he thought he could see and hear – a tank in an orchard and was rewarded with a satisfying explosion; next day there was confirmation that he had destroyed a Panther but through the two stone walls of a cow-byre. Major Taylor and Lt Hawker were awarded the Military Cross. 153rd Field Regiment lost two OR s killed, Captain Cawley, Lt Leveson-Gower and 18 OR s wounded and Lt MacAlpine and 10 OR s missing, and four guns, two tanks, seven carriers and twenty B vehicles destroyed. [xxvii]
The story of the air defence of Normandy is a story of a forgotten army. The impression created in many histories of Normandy is that the allied air superiority was so overwhelming that the Luftwaffe did not have any noticeable impact. While this may reflect allied success, it does not do justice to the efforts needed to render a significant German air threat into insignificance.

AA was given a high priority in the D Day landings in anticipation of German air attacks. 76th AA Brigade was placed under 30 Corps Command for the Assault with the task of protecting Gold Beach, the Mulberry Harbour and the fuel facilities at Port-en-Bessin. 80th AA Brigade placed under 1st Corps command for the Assault was responsible for the air defence of Juno and Sword beaches.
Each assault infantry brigade group was accompanied by an AA Battlegroup comprising a mixture of 20mm and 40mm Light and 3.7” Heavy AA guns with their radars. AA Guns were some of the first Gunner equipment ashore. Major P F Tiarks BC 218th LAA Battery and four 40mm guns each of A and C Troops landed on Queen White and Red respectively at H+45, 0810 hours. Both beaches were under heavy fire from mortars and small arms. Major P F Tiarks was wounded in the hand by a mortar fragment. He and Captain Eburne were both were awarded the MC for inspiring troops in battle for the first time under trying conditions. On Gold beach the first artillery ashore seem to have been triple 20mm AA SP tanks from 320 Battery of 93 Light AA Regiment, who would provide low level air defence of the beach.
On Juno beach Sergeant James Finlay and Lance Bombardier Frederick Arthur Harrison from 114 Light AA Regiment were awarded the George Medal for saving the lives of men trapped on a burning “Rhino” ferry.
76th AA Brigade was responsible for the AA defences of Mulberry Harbour. These included the soldiers from 127th Light AA Regiment who manned the 40mm guns on the Phoenix caissons, and were towed across the channel. Several men were killed when a caisson was sunk en-route. The Gunners also endured the terrible conditions during the great storm 19-24 June.
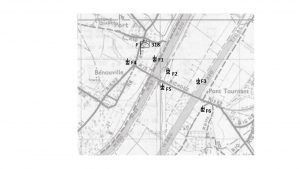
F Troop of 318th LAA Battery of 92th (7th Loyals) LAA Regiment, equipped with wheeled SP 40mm guns, was the only element of 3rd British Division’s Light AA Regiment to land on D Day. Their mission was to provide air defence cover to the Benouville bridges. The troop landed on schedule at H+6½ but was held up by congestion and the arrival of 6th Air Landing Brigade and then ran into contact with Germans at the village of Le Port. The troop commander, Captain Reid took twelve prisoners on his recce. The troop was held up by snipers in the church of Le Port which were only taken prisoner only after a Bofors was brought into action and opened fire. The Troop reached Benouville Bridge just as the light was fading, but did not come into action until first light 7 June. The bridges were a target for numerous air attacks. Over the five days F troop was credited with destroying 17 aircraft.
As the battle wore on and the German air threat diminished, the anti-aircraft regiments were given tasks in direct support of the ground troops. Increasingly 3.7-inch heavy anti-aircraft regiments were used as long-range field artillery and the 40 mm light anti-aircraft regiments were used to fire tracer to give direction to assaulting troops at night, an increasingly popular time for attacks, and were used in the anti-tank and counter-mortar role. Even searchlights, a particularly unglamorous task, were used to provide artificial moonlight by reflecting their beams off low cloud – Monty’s Moonlight.
The Commonwealth War Graves Commission lists 2,021 British and Canadian artillerymen killed between 5th June and 1st September 1944 from units serving in Normandy. For each fatality there were three to four others wounded. The Royal Artillery lost an average of around 23 dead and 70 wounded the best part of a modern-day battery per day. The highest fatal casualties occurred on D Day, when 61 men died, while on three days in early July there were over forty fatalities. Anti-tank regiments suffered the highest numbers of fatalities. Some of the Field Regiments, also suffered high casualties and disproportionately these are endured by the OP parties and the command post parties.
Frank Baldwin is the co-author of Gunners in Normandy the forthcoming Regimental history of the campaign. He served in 40th and 2nd Fields regiments,17 Training Regiment and HQRA 4th Armoured Division. He is a member of the British Commission for Military History.
[i] RAJ Vol
[ii] E.g. Stephen Hart, Colossal Cracks, John Buckley, Monty’s Men: the British Army and the Liberation of Europe, and Terry Copp, Montgomery’s Scientists and Fields of Fire
[iii] Gorle, Richmond, The Quiet Gunner (2011) Ch 21
[iv] Penetration figures from WO/219/2806, Appendix G to SHAEF/166652/GCT/Arty dated 11 July 1944
[v] Parham diary May 1944
[vi] Flower, Desmond, History of 5th Argylls 91st Anti Tank Regiment Thomas Nelson (1950) p
[vii] RA 21 Army Group War Diary May 1944
[viii] WO 171/155 Annex A RA Branch HQ 21 Army Gp
[ix] Pemberton, S. The Development of Artillery Tactics and Equipment, table B Page 24 1950
[x] Routledge, N W. AA Artillery 1914-55 P 107 Table XVI.
[xi] Hart, Stephen, Colossal Cracks
[xii] RA Journal 1970
[xiii] RA 2 Army planning diary file note Planning for Overlord May 1944
[xiv] RA 21 Army Group WD May 1944 Annex A
[xv] RA 2 Army planning diary memorandum Carrier-borne Air OPs 7 May 1944
[xvi] RA 2 Army planning diary memorandum The Case for Helicopters on D Day 14 March 1944
[xvii] RA 2 Army planning diary file note undated
[xviii] Army Training Memorandum October 1943
[xix] WO 373 DCM Citation LG 24.12.44
[xx] WO 373 DCM Citation. LG 19.10.44
[xxi] 25th Field Regiment Royal Artillery : North-West Europe, 1944-1945 [Aldershot : Gale & Polden, 1948
[xxii] Ranville CWC II. E. 35.
[xxiii] CAB 44/ Liberation Campaign North West Europe Book III chapter 6 diagram A
[xxiv] WD 55 Atk Regt July 1944 attached report by C Troop Commander
[xxv] Suffolk Yeomanry at War, Extracts from the diary of Maj B S Gooch
[xxvi] WO 373 MM Citation
[xxvii] Pilkington & Dow Regimental; History of 153 Leicester Yeomanry Field Regiment RA 1939-45 (Chapter Two) Hinckley Brassey
[xxviii] McCarthy, T. True Loyals a History of 7th Battalion, The Loyal Regiment (North Lancashire)/92nd (Loyals) Light Anti-Aircraft Regiment, Royal Artillery, 1940-1946 (2010)
[xxix] WO 373 MC Citation Captain Read
.
