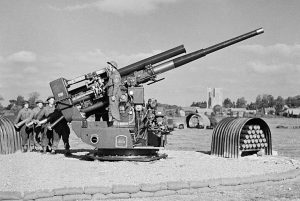
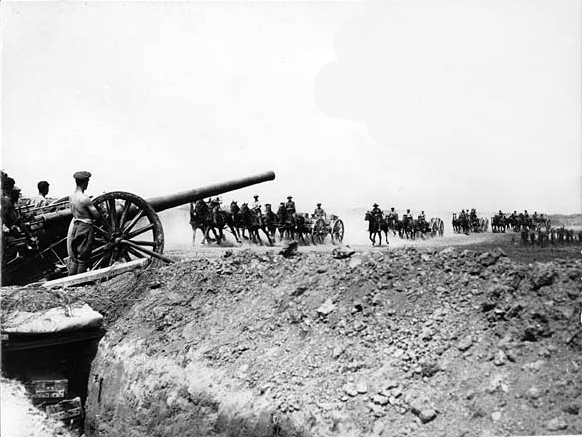
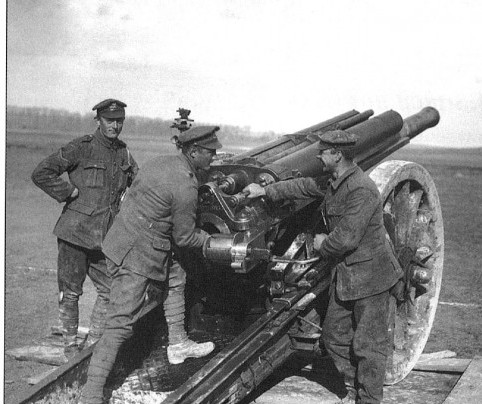
The 3.7 inch Heavy AA gun in 1939 in a London Park in its planned role – 18,000 rounds to down a bomber.
Innovation is a key factor in modern warfare. It is said, often unkindly, that every army prepares to fight the last war. Changes in technology will determine the characteristics of the next war, which will be different to the last. The side that can adapt and innovate fastest is likely to be at an advantage. The story of the 3.7 inch Heavy AA Gun is about the British Army responded to two sets of technical challenges. One is a great success story. The second a failure that has been a puzzle for 80 years.
Two big ideas emerged after the first world war that offered an opportunity to avoid the bloody stalemate of the First World War. The advocates of air power claimed that long range bombers could strike the enemy heartlands and industry avoiding the need for bloody land campaigns. Similarly tank enthusiasts argued that a highly mechanized army would cut through slow moving massed armies destroying their command control and logistics, again avoiding the massed slaughter of attrition warfare. Neither idea led to bloodless victory in the Second World War.
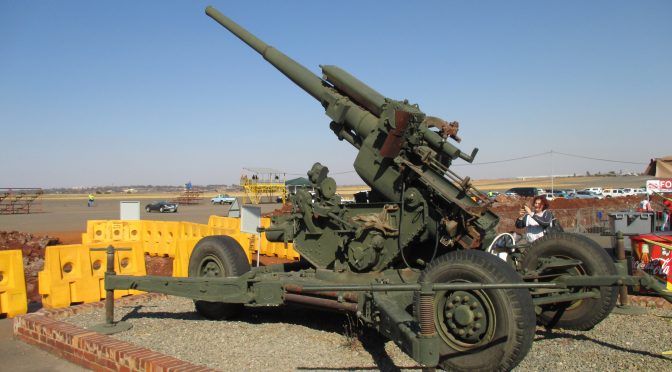
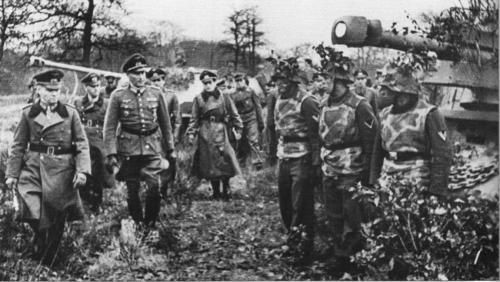
The British 3.7 inch (93 mm) Heavy AA Gun had a similar role and performance to the German 88 mm Flak 36 AA gun. However, while the German “88” was famous as an anti-tank gun and the armament for some of the most feared German tanks, the 3.7 inch AA gun was rarely used in that role. Given the reverses that the British army suffered against Rommel’s Panzers in North Africa, this, in retrospect was a mistake. There is much interest in how armies innovate. The story of how the British did not use their heavy AA Guns against Rommel in 1941-42 is a case study in innovation – how not to do it.
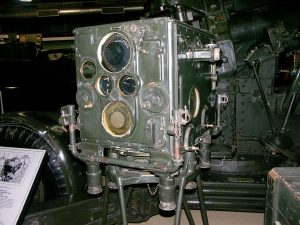
The AA Predictor No 1 Mark III – this mechanical computer provided azimuth and elevation date.
Aimee Fox Godden’s ‘Learning to Fight’ is a study of military innovation in the First World War. She referred to top down, bottom up, horizontal, incidental or external learning. She reviewed the formal and informal mechanisms that the army of 1914-1918 used to transfer learning. There is a language to explore organisational learning in warfare. There isn’t space in this piece to do justice to the topic, but the aim is to with the appetite and inspire someone with the time to carry out the research.
The 3.7 inch AA Gun as an Air Defence Weapon
Between 1915 and 1918 Britain had been the target for the first strategic bombing offensive in history. The modest capabilities of the aircraft of the first world war caused sufficient alarm and damage to force the deployment of hundreds of AA Guns and aircraft and was the catalyst for Britain to form the Royal Air Force the world’s first independent air forces to take charge of the air defence of Britain.
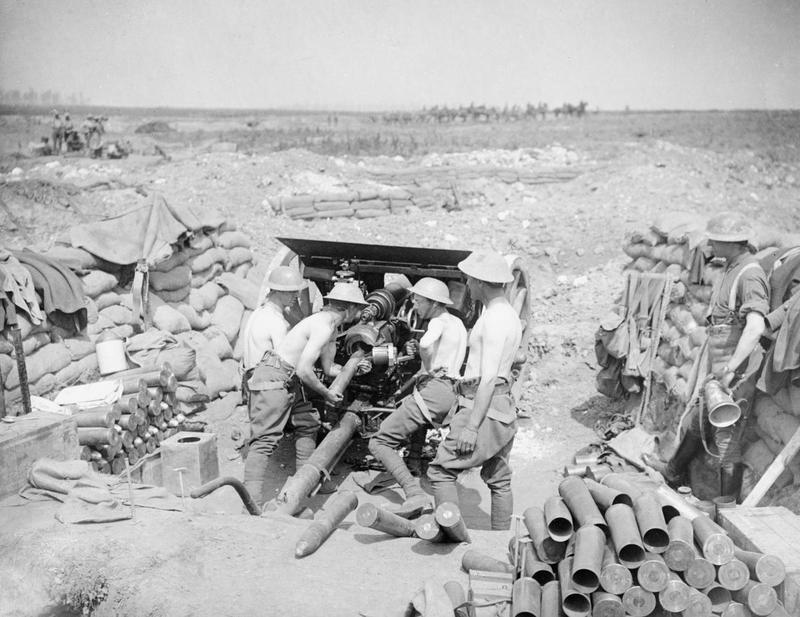
3.7 inch AA Gun in a static mount defending the UK against V1 flying bombs in October 1944. With radar fire control and fuses it took 156 rounds to down a V1 – 10,000 improvement from 1939
The air defences were swiftly cut back after 1919 as funding was reduced on an annually renewed assumption that would be no war for ten years. However, there were two developments in the 1920s. A joint RAF and Army committee examined the plans that might be needed in the event of a future threat to Britain. Anti-aircraft artillery text-book written in 1925 defined the theoretical requirements of an capabilities of air defence artillery.
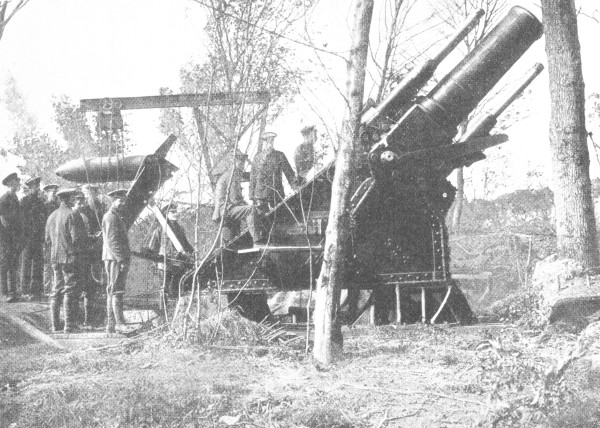
The 3.7 inch AA gun originated in a 1928 Royal Artillery Committee minute. By 1933 this had become a General Service Specification for a 3.7 inch gun weighing 8 tons capable of being put into action in 15 minutes and towed at 25 mph. The pilot model passed proof in 1936 and the first production guns were delivered in 1938. Production continued until 1945, with peak monthly production of 228 in March 1942.
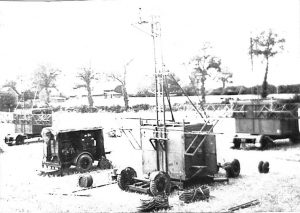
Gun Laying Radar Early Warning sets. This image, possibly taken from a Soviet Cold war recognition manual ,shows the Radar No 1 Mk II (Gun Laying II) used later as the early warning system for the radar No 3 Mk II GL MK III. The presence of highly classified radars is probably the reason why there are so few photographs of 3.7 inch Guns deployed in the field.
The gun was an advanced weapon for 1936, the gunners received information electronically and only needed to operate the gun controls to keep the gun pointers aligned. The 3.7 inch gun should be seen as part of a weapon system, including the ammunition, warning, detection and fire control technology. Progressive improvements in all of these greatly improved its effectiveness over the course of the war. In its original form the 3.7 inch gun fired a 28lb (12.7kg) HE shell fitted with a powder-burning Fuze Time No 199 to an effective ceiling of 23,500ft using Predictor No1 at a maximum 8 rounds per minute with manual fuse setting and loading. By the end of the war the Mk1-3 equipment firing the same shell with a proximity fuse and predictor No 11 and auto-loading had an effective ceiling of 32,000 and a rate of fire of 32 rounds per minute. In the 1940 blitz 18,500 rounds were fired for each aircraft shot down. By 1944-45 the guns averaged 156 rounds per V1 brought down, an over 100-fold, (10,000%) improvement.
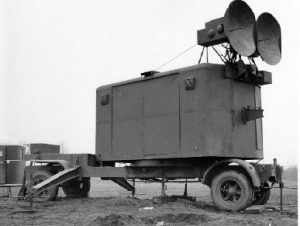
Radar No 3 Mk II GL MK II. This Centimetric radar provided accurate gun laying.
Initially targets were acquired visually, and the fire control computations made using a mechanical predictor developed in the late 1920s. The discovery of radar made it possible to consider new ways of engaging targets at night or through cloud. The first gun laying radar could only indicate a rough bearing and range, refinements enabled an indication of elevation. The invention of the cavity magnetron in 1940 at Birmingham University led to Canadian and British centimetric gun laying radar introduced at the end of 1942.At the same time fire control equipment was replaced with electromechanical predictors. The American SCR 583 radar arriving in 1943 offered outstanding performance, when used with the American Bell Telephone AAA computer. Another innovations included the Plan Position Indicating screen that showed the now familiar display with the rotating linear time base. American industry developed proximity fuses each containing a radar. These innovations enabled British HAA to play its part in defeating the world’s first strategic bombing campaign mounted by jet powered cruise missiles, the V1 Blitz.
Heavy AA Guns in the Anti-tank Role
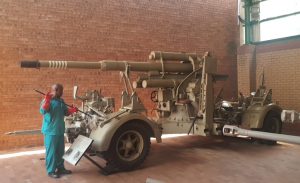
German Flak 36 8.8 cm dual purpose gun greatly feared by allied tank crews. This example is in the South African military museum Johannesburg and shows the height of the equipment.
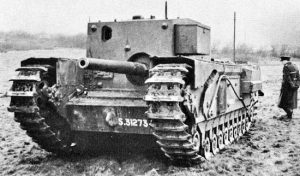
There is less credit in the British story of innovation in the face of the German armoured threat. Indeed the failure to use British Heavy AA in the anti-tank role is also a case study on innovation. Every combatant had heavy AA guns roughly comparable to the 3.7” gun, and by the end of WW2 almost all armed their tanks and anti-tank artillery with guns based on their Heavy AA Guns. The German 88, Tiger, Jagdpanther & Hornisse; the Russian 85 mm in the SU 85 & T34/85,and the US 90 mm in the M 36 tank destroyer and T26 Pershing tanks. Except for the British, who neither used their excellent 3.7” AA Gun, nor the 3 inch 20 cwt gun it replaced, as an anti-tank gun in North Africa.
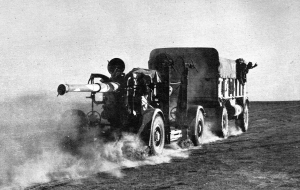
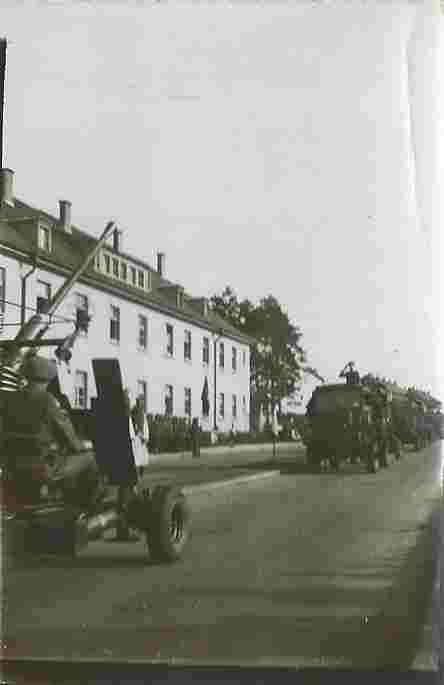
3.7 inch gun on the move in the Western Desert
Although, the British faced German armour in 1940, it was the battles in North Africa that tested the British Army against German tanks. Failure to defeat Rommel cost a succession of senior British Generals their jobs, including Aukinleck, Wavell, Cunningham, Ritchie and Corbett, and undermined the reputation of the British Army and confidence of its soldiers. Dunkirk revealed that the British army had far too few anti-tank weapons. A problem exacerbated by the loss of guns in the debacle of Dunkirk. Even by May 1942 the 8th Army in North Africa was over 100 anti -tank guns short of establishment.
This 3 inch 20 cwt AA Gun served with the South African forces in North Africa. Lacking modern fire control and with a limited ceiling it was obsolete as an AA gun by 1941. However, it was still a highly effective anti tank gun. 100 retired from AA Command were held by Home Forces in the event of a German invasion. They were not used in battle the Middle East.
German doctrine provided for AA Guns to supplement anti-tank guns. In the 1940 campaign one third of the ammunition for Luftwaffe heavy AA Guns was anti-tank shot. German tactic used tanks and anti-tank guns in conjunction. By summer 1942 more perceptive observers had noted that Germans possession of anti-tank guns that out ranged British tank guns goaded British armour to undertake costly charges to close the range. By El Alamein the Royal Armoured Corps was very wary of the presence of 88s.
There were some attempts to deploy the 3.7” Gun in the field, but only on a small scale and belatedly. Nor was there any systematic attempt to re-deploy a proportion of British heavy AA guns in the Middle East inot the desert.
By the end of the second world the 3.7 inch AA gun was used extensively in the ground role. This image shows the equipment in Australian service in Tarakan in 1945.
There was no technical reason why the 3.7 inch Gun and the 3 inch 20 cwt gun it replaced could not have been used as anti-tank guns. Besides the 3.7inch AA Gun, around 200 obsolete 3“(76mm) 20 cwt AA Guns were replaced by 3.7 inch HAA Guns. In 1940 in France at least once HAA engaged Germans tanks to great effect. In the UK HAA gun positions were laid out in order to engage an local ground attacks by parachutists and tanks. In the summer of 1941, General A F Brooke, Commander Home Forces made it his business to test the capabilities of Britain’s anti-tank weapons including HAA. By July at least one 3.7 inch HAA Regiment, 103, was tasked with a secondary anti-tank role, to tackle any German heavy tanks.
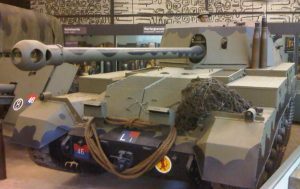
One of the fifty 3 inch 20 cwt guns mounted on Churchill tank chassis. A missed opportunity to deploy an effective tank destroyer by 1942.
Alanbrooke’s intervention also lead to a plan to assign fifty 3-inch 20 cwt AA guns to be mounted on towed carriages and fifty to be mounted on Churchill tank chassis. None of these activities led to an additional anti-tank weapons in North Africa by summer 1942. The Germans could do this. Major Becker, a German artillery officer with a background in engineering had developed a range of self-propelled guns based on captured British and French AFVs. These included 75mm anti-tank guns and 105mm self propelled howitzers sent to the Afrika Corps. It was not beyond the wit of man for the British to have mounted one of their HAA guns on an armoured chassis. But they did not do so.
What Might have Gone wrong?
The 17 Pounder Archer SP anti tank gun. It took until 1944 to deploy a British SP anti tank gun. It too mounted a 76mm gun on an infantry tank chassis, but with an open top and rear .facing gun there was no doubt that this was an artillery piece.
So what might have gone wrong? No one can ever be certain of cause and effect of historic events, and counter factuals are speculation. However, here are some of the factors that may have played a part in the failure to apply HAA as part of the solution to German tanks.
#1 Misunderstand the Problem.
No one at a senior level seemed to grasp the significance of German Heavy AA Guns, used first in North Africa in May and June 1941 to defeat heavy British tanks. After these battles the armoured division commander noted German tactics of luring British armour onto anti-tank guns and an artillery commander noted the Germans were using high velocity AA Guns. But the British did not put two and two together and copy these tactics. Instead, there were grumbles about the quality of British tanks, their armour and armament. Over the next year the British learned to fear the “88s”, as any and every German anti-tank gun was regarded. This wasn’t helped by the lack of common doctrine between the Royal Armoured Corps and the other arms.
#2 Ignore the Past.
Truck mounted 77mm anti aircraft guns formed the German army’s mobile anti tank reserve in the First World War. Two guns like this played engaged tanks at Cambrai in 1917.
The German Army was the first army to face massed tanks, in the First World War. They had experience of anti tan k warfare. One of their remedies was to employ any artillery in the anti-tank role. Mobile 75mm anti-aircraft guns mounted on trucks were the anti-tank reserve and rushed to the site of tank attacks. The 88mm Flak 36 used by the Wehrmacht was designed to be dual role. German army and Luftwaffe AA units were trained to operate in the ground and anti-tank role. One third of 88mm AA ammunition in 1940 was anti-tank shot. The British closed their minds to the possibility.
#3 Create Organisational Stovepipes.
During the first half of the Second World War the Royal Artillery was divided into Anti Aaircraft and Field Artillery. There was no transfer of officers between the branches. Transfer of ideas may also have been hampered by the cultural and social distinction between the field and AA branches. The AA Branches offered fewer routes to front line action for the bold and adventurous. AA Command was so far in the rear that the women of the ATS to serve in many roles. Besides professional status, there was a difference in social status between the officers of the Royal Horse Artillery, who supported the armoured divisions, and the lower status “fish and chip mob” of the Heavy AA..
#4 Set blinkered doctrine and procedures
British regulations saw no role for Heavy AA Guns in any field operation and provided no guidance for their use. Most AA Artillerymen were neither trained nor equipped to fight in the ground battle.
#5 Let Internal Politics Get in the Way.
The project to mount 3inch 20 cwt guns on a Churchill tank chassis failed to result in any AFVs in service. The official history of British Armour notes that this gun would have “proved a powerful and effective tank destroyer” but the Royal Armoured Corps and Royal Artillery could not agree who should operate the weapon. Fifty heavily armoured self-propelled guns might have made a big difference in mid-1942 in North Africa.
This article appeared in the Royal Artillery Journal September 2019. Unfortunately some of the maps were not reproduced correctly. This article includes the corrected maps, which are illustrations from the book “Gunners in Normandy” due for publication in Februrary 2020.
Seventy-five years have elapsed since D Day and the battle for Normandy. Since then there have been countless publications, including several in the Royal Artillery Journal.[i] The Gunner contribution was recognised with the highest praise by commanders, and widely acknowledged. The Gunner contribution to the battle has been included in the more thoughtful works about the campaign.[ii] However, many of the most popular and respected histories are flawed and contain inaccuracies, if not outright howlers. The Gunners are ubiquitous, but faceless and voiceless. One reason for this has been the absence of a Regimental history of the Normandy campaign, which documents the actions of individual Gunners and Gunner units. This article is based on the narrative from Gunners in Normandy, the History of the Royal Artillery in North West Europe Part 1, a work started by the Late Lieutenant Colonel Will Townend.
Artillery were the largest single cap badge in Normandy. Comprising some 18% of the force, in comparison to 15% of infantrymen. If the proportion of service troops is considered, just under half of the British troops serving in Normandy were either gunners or supporting the artillery. Of the 135 RHA or RA regiments in the British Liberation Army, 11% had seen service in France and Belgium in 1940, and 13% had been in the Middle East. Only 5th RHA and 74th Field Regiments had served in Belgium and France in 1940, in the Middle East and in Normandy. Some individuals had served in both. There was a policy of cross posting officers to share knowledge and experience. Most of the officers and men were conscripts, from a generation whose fathers First World War experiences served as a benchmark.
A handful were pre-war regular regiments including 3rd, 4th and 5th RHA, 7th and 33rd Field, 7th Medium, 20th and 21st Anti-Tank Regiments. Many of the Gunner units were reservist units mobilised at the start of the war. Some had a strong regional character like the World War I Pals, for example the 15th Light Anti-aircraft Regiment, the Manx TA, the 90th (City of London) and 76th (Highland) Field Regiments. At least thirty-eight Regiments were originally raised under a different cap badge. Several, such as 151st (Ayrshire Yeomanry) Field Regiment were mobilised as mounted, yeomanry cavalry; only became gunners in 1939-40 and retained their own cap badges. In 1942 twenty infantry battalions were converted to light anti-aircraft regiments, and nine to field and medium artillery regiments. Some of these units retained a dual identity, such as the 92th (7th Loyals) Light AA or 181st (6th Battalion King’s Shropshire Light Infantry) Field Regiments. Their unit histories record their dual identity with pride. Others, such as 110th Light AA Regiment originally raised as 7th Dorsets appear to have been subsumed completely as Gunners. Some Gunner regiments tolerated or sported non-issue items of clothing. Some extended their individuality to fire discipline, with questions raised about the extent to which the use of code words in 7 Armoured Division originating in the Western Desert, hindered them in Normandy.[iii]
Besides the obvious increase in light anti-aircraft and anti-tank equipments the artillery of the British Liberation Army of 1944 was superior in every way. Equipments had longer range and greater lethality and were supported by a vastly superior target acquisition, command and control.
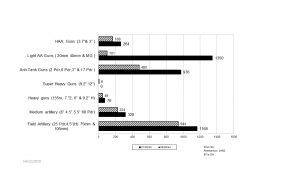
By comparison with the British Expeditionary Force on 1940 the British Liberation Army of 1944 had a few more field and medium guns, but far more anti-tank and light Anti-aircraft guns. Not shown is the substantial increase in communications and locating equipment, Air OPs and a 50% increase in numbers of BCs and FOO parties.
The two principal field artillery equipment, guns, used in Normandy were the 25-pounder, the workhorse of the divisional artilleries and the 5.5-inch, the mainstay of the Army Groups Royal Artillery (AGRA). Others were:
The 75 mm (US) Pack Howitzer, used by the Airborne Artillery.
5-inch, Gun. This equipped two medium batteries for counter battery work on account of its range.
155 mm (US Long Tom – 6-inch), designated heavy artillery and used primarily for counter battery work
2-inch (Mk 6 on US M1 carriage, or a box trail carriage), used for heavy bombardment
25-pounder Sexton self-propelled gun (on a Canadian Ram tank chassis and often known as the Ram), mainly used by the regiments supporting the armoured brigades in the armoured divisions, with two from disbanded formations as Army Group assets, and 90th Field Regiment from 50th Division converted for D Day.
105 mm (US) M7 Priest self-propelled gun (on a US M3 tank chassis), used by 3rd British and 3rd Canadian Division Artillery and the 19th Canadian Field Regiment. The Priest was replaced in most units by the towed 25-pounder at the end of July-beginning of August.
The 3.7” HAA Gun was used extensively in the field artillery role. It out-ranged the 5.5” Medium gun and had a useful HE round and mechanical time fuse
The Centaur CS tank mounted a 95mm howitzer. This equipped the Royal Marine Armoured Support Group, formed initially for the D Day assault.
Field Regiments comprised 24 guns organised into three batteries, each of two troops of four guns. Medium regiments of 16 guns organised into two batteries of eight guns, each of two troops. Heavy Regiments. Heavy Regiments had 16 guns, eight each of 155mm and 7.2”, organised into four batteries of four guns. Within field regiments the battery and troop commanders provided the observation and liaison element in direct support of infantry or armoured units. Medium and heavy Regiments could provide liaison and additional observers. Each infantry division had three field regiments of towed 25 pounders. Each armoured division had a field regiment of towed 25 pounders and in direct support of the infantry brigade and a field regiment of SP 25 pounders in direct support of the armoured brigade. The AGRAs were of mixed composition, but normally included a heavy regiment, two or more medium regiments and a field regiment.
The principal anti-tank guns in use in Normandy were:
6-pounder anti-tank gun, used by both infantry and Royal Artillery anti-tank units in 1944
17-pounder anti-tank gun, used exclusively by the Royal Artillery anti-tank regiments
US M10 self-propelled (on an M3 tank chassis) 3-inch anti-tank gun
US M10 self-propelled (on an M3 tank chassis) with British 17-pounder anti-tank gun (Achilles)
The 57mm calibre 6 pounder had entered service in 1942 and proved effective in North Africa against the German Mark III and IV tanks and could inflict damage on the German Mark VI Tiger heavy tank with Ballistically Capped Armour Piercing Steel shot (CAPC).[iv] By D Day this ammunition was supplemented by Armour Piercing Discarding Sabot ammunition (APDS) which could had improved penetration. The six-pounders were light and manoeuvrable and could deal with all but the Tiger and the front armour of Panther tanks. They were towed by the Universal carrier, although this was under-powered and possessed a “paralytic” cross country performance when towing a gun.[v]
The 17-pounder was a very effective anti-tank gun, but, was heavy and unwieldy to manhandle into position. Introduced in 1943, an APC shot from the 17 pounder could penetrate the armour of the heaviest German tanks. The gun detachment had no protection from shell splinters and a gun pit took 12 hours to dig. The soft skin Field Artillery Tractor was inadequate in a forward area swept by shell splinters and bullets. Obsolete Crusader tanks were converted into gun tractors and issued to the towed batteries of the Corps Anti-tank Regiments. The towed 17 pounders in armoured divisions used M14 half-tracks as tractors.
Misleadingly painted in the markings of the Royal Armoured Corps, this 17 Pounder armed M10 SP Gun was a “terror” capable of knocking out any German tank it might face. (Image (c) Frank Baldwin 2012)
The American M10 Gun Motor Carriage which mounted a 3-inch gun in an open topped turret on a Sherman tank chassis. The M10’s armour gave little protection against German tank guns. The 3-inch gun was replaced with a 17-pounder as production capacity – and industrial relations permitted. There is no evidence of the inferiority complex that seems to have affected the RAC tank crews facing Panther and Tiger tanks. “The 3” M10 is a good SP Gun; The 17 Pounder M10 is a terror”[vi]
There were two types of anti-tank regiment: those supporting infantry divisions and those supporting armoured divisions and the corps anti-tank regiments. Both types had four batteries of three troops each of four guns, a total of 48 guns. In the infantry divisions all four batteries comprised one (or two) troops each of four 6-pounders and two, (or one) each of four 17-pounders. The D Day assault divisions were given US M10 3-inch SP anti-tank guns in place of the towed 17-pounders. The anti-tank regiments of the armoured divisions and corps anti-tank regiments comprised two SP batteries each with three troops of four M10s and two towed batteries with three troops of four 17-pounders.
The anti-tank defences were supplemented by field and anti-aircraft equipment which had a secondary anti-tank role. AP shot from 3.7” HAA Guns would penetrate armour almost as thick as a 17 Pounder could penetrate.
The AA forces for Operation ‘Overlord’ included the largest concentration of British AA Artillery assigned to any operation. Thirteen AA Brigade HQ, seventy AA Regiments, several independent batteries and an RM AA Regiment. Almost half of the gunners landed in Normandy in the first few days were AA gunners. By the 25th June twenty-nine AA regiments had been landed. Twelve of these were assigned to the Corps and Divisions. A further seventeen were part of three AA brigades under army command in Normandy.
The principal anti-aircraft guns used by the Royal Artillery were the 3.7-inch heavy anti-aircraft gun and the 40mm Bofors. The heavy anti-aircraft regiments had three batteries each of two troops of four 3.7-inch guns, a total of 24 guns, and the light anti-aircraft regiments had three batteries each of three troops of six 40 mm Bofors guns, a total of 54 guns, in various combinations of SP and towed guns. They also had three troops each with 20mm Oerlikon guns, although, these did not arrive in Normandy until mid-July. The anti-aircraft brigades had varying numbers of heavy and light anti-aircraft regiments and searchlight batteries under command, depending on the task. LAA regiments manned the off-shore anti-aircraft guns on the Mulberry, Gooseberries and Landing Barges Flak, and deployed ashore to protect the beachhead and Mulberry harbour had special establishments and equipment. In August 1944, the Light AA regiments were reduced and reorganised; the 20mm troops and one troop of 40mm guns per battery handed in their equipment and sent the manpower to the reinforcement holding units for reallocation.
The 3.7” Heavy AA Gun was comparable to the German 88mm Flak 36 AA gun. Progressive improvements to ammunition, warning, detection and fire control technology improved its effectiveness over the course of the war around a hundredfold. It was towed by a four-wheeled AEC Matador, a 10 ton capacity four wheel drive vehicle.
The 40mm Bofors gun was the British version of the eponymous Swedish Light AA gun used by almost every combatant. It had an effective ceiling of 5,000ft. The Bofors gun was towed by the Bedford QLB, based on the Bedford QL chassis. The SP variant mounted the 40mm Bofors on the chassis of the Morris Field Artillery Tractor. The SP Bofors was much quicker into action that the towed equipment and popular in service. These were disproportionately issued to the Light AA Regiments in the three Assault divisions and the Light AA of 76th and 80th AA Brigades
In order to ensure that the first wave of Light AA could get ashore without waiting for beach roadways to be laid, the first wave of Light AA to land were provided with thirty 40mm Bofors guns mounted on old Crusader tank chassis with the turrets removed. The hulls were modified to take the maximum ammunition.[vii]
In order to engage low flying fast aircraft the British Army adopted 20mm AA guns. The 20mm Oerlikon, used by the Navy and installed in RAC AA tanks, lacked the self-destructing fuses that detonated after a set time. They could only be safely fired into ground known not to be occupied by friendly forces, which restricted its use. In 1944 the Polish designed Polsten was introduced with a self-destruct round. Fifty-four triple mount Polsten guns were equipped the batteries of 93rd Light AA Regiment. Twenty-seven were mounted on Crusader tank chassis and a further twenty-seven mounted on 40mm carriages.[viii] These would provide low level point air defence to the beaches.
The Royal Artillery used several types of radar equipment to detect and locate enemy aircraft. Few, if any photographs exist of these in service in Normandy. The loading lists for 80th AA Brigade suggest that each troop of four guns was accompanied by its own pair of radars.
The Gun laying Radar AA No3 MkII, also known as the GL III, was a 10cm mobile radar for accurate fire control of heavy anti-aircraft guns. Depending on the source, this radar could pick up and engage a medium bomber at 27,000 yards (25km)[ix]. or pick up at 36,000 yards( 33km) and engage at 14,000yards (12.5km)[x] It was mounted on a four wheeled trailer. It could transmit continuous information the range, bearing and elevation to a predictor, which could then further transmit information to individual guns. This radar had a very narrow field of view and was used in conjunction with another radar with a wider beam which provided early warning and tracking information
The main radar used for local warning and “putting on” the GLIII was the. Radar AA No 1 MII, commonly known as GL (Gun Laying) II. It had a pick-up range of 50,000 and could be used for fire control out to 14,000 yards, but was inferior to the GLIII. The radar comprised separate transmitter and receivers mounted on trailers.
Passive air defence equipment included barrage balloons and smoke generators deployed as part of the Gunner controlled air defences, but manned by other arms.
The operational methods of the British Army in Normandy were the product of doctrine, the lessons learned during the war and the personality of its successful field commander General B L Montgomery. Montgomery had a preference for set piece battles, characterised by a master plan, concentration of force, and fire-power based attrition. He described his set piece battles as consisting of a break in, a dog fight and a break out. The Break in would take place on D Day. Montgomery’s theatre strategy for the Normandy “dog fight” envisaged a series of holding attacks on the British sector, designed to draw the bulk of the German forces to that front, thus permitting the Americans to advance in the West. His approach also strove to keep t he initiative, forcing the Germans to react to Allied moves.
The key to Montgomery’s conduct of battle was the use of overwhelming concentration of massed artillery fire power, supplemented by aerial bombardment when possible. He had seen how massed fire power together with the anti-tank action of anti-tank guns had brought success at El Alamein, and this impressed itself indelibly on his mind.[xi]
It would be wrong to attribute these tactics solely to Montgomery. While he was the commander of the formations which achieved success, the artillery techniques were the product of the developments made within the Royal Artillery and the evolution of thinking within the British Army, supported from the top by the CIGS, Brooke.
D Day would be the “Break in Battle “for the battle of Normandy. The story of the fire plan and the run in shoot has been covered in the pages of the RA Journal, in several articles including by one by Brigadier H J Parham BRA Second British Army responsible for the D Day Fire plan.[xii] Parham also kept a planning diary, held by the Firepower archives. This documented the planning efforts made during four months of intense planning with the RA staff working daily until 02.00.[xiii]
On 31st May 1944 Brigadier Parham confided to his diary his predictions for D Day. “As long as the cloud allows the Fire plan will, given perfect weather and freedom from cloud (which is essential), as follows when it comes off in a few days time.
A vast quantity of moderately aimed assorted missiles will fall on or near or not so near the beach localities from H-30 to H.
There will be a vast pall of smoke . As a result the very high proportion of the fire which is dependent on direct laying , will go haywire. But so will the Huns’.
Defiladed AT guns on beaches will cause a lot of trouble as many will survive. They will be hard to KO and will account for a lot of our own DDs and Centaurs on some beaches.
Counter battery and counter mortar will be our biggest headache.
The successful engagement of hull down tanks (Tigers and Panthers) lying back 3,000-4,000 yards from beaches and covering our painful progress through minefields will be difficult.
We shall be badly short of aerial observation early on.
The battle on D Day and for the next days will be a very rough house indeed. On it the war’s result depends. BUT…we are absolutely certain to be ashore in enough places to stay there. Nothing else matters and we will then win the war , sooner or later & we hope soon. The Hun commanders on the spot are in for an interesting, exciting and highly depressing day”
Parham took a realistic view of the effectiveness of the fire power being applied to the D Day objectives. He knew that there was very little in the allied armoury that could target an anti-tank gun in a concrete bunker sited to fire in enfilade across the beach. There could not be a solution until the development of precision guided weapons.
The D Day fireplan has been heavily criticised by American and Canadian historians for the apparent failure to destroy more of the beach defences. Yet as Parham’s note makes clear, the fireplan required clear visibility. The decision by Eisenhower to launch the invasion in marginal weather meant that the US Heavy bombers, which provided some 5 kilotons of bombs would be ordered to aim 1,000 off their targets. Parham’s expectations are also a reminder that the outcome on D Day exceeded all contemporary expectations.
Parham had strong views about the need for early Air OPs. There were few natural vantage points on the Normandy battlefield, other than heavily shelled church towers and vegetation restricted what could be seen. He lobbied strongly, but unsuccessfully[xiv], for an aircraft carrier to operate Air OPs on D Day[xv] and even for Sikorski’s prototype helicopters to be operated from Landing craft.[xvi] Air OPs were essential for adjusting fire. Most artillery shoots ordered from the ground were predicted rather than observed fire, using the spread of fire from multi battery missions to offset inaccuracy, with undoubted waste on agricultural targets.
This Centaur in the Pegasus Bridge Museum is a surviving example of the remarkable disposable assault gun brigade formed for D Day, and manned by a “Grand lot of Chaps” from the Royal Armoured Corps, Royal Marines and the Gunners. Image (c) Frank Baldwin 2014
Parham was a champion of the Royal Marines Armoured Support Group (RMASG) who would man obsolete tanks firing in the run in shoot from H-15, thickening the fire after H-10 when the field artillery barrage would end. The RMASG is not well understood, although two of their Centaurs remain as memorials in Normandy. The RMASG was manned by a mixture of RM, RAC and RA and commanded by a CRA. The formation was organised into five batteries each of four troops of four Centaur tanks and a GPO’s Sherman. The Centaurs were fitted with dial sights. There was one battery per assault brigade group to provide direct fire on the run in shoot and indirect fire once ashore. There was no administrative support and most of the men were to be released after a few days in action. The RMASG was not a tank brigade, but a disposable assault gun brigade The CRA, Brigadier Sanders and many of the RM Gunners were from the artillery of the disbanded Royal Marines Division. Only half of the RMASG landed as scheduled, as the high armoured decks of the modified LCT (A) were barely seaworthy. However, as noted by RA 2nd Army, they were “A strange unit: amphibious, web footed, armoured, partly SP, partly RAC, fires off seas as HM craft, on the land as tanks or SP Artillery according to taste….a GRAND LOT OF CHAPS and it would not be their fault if they were not a great success.[xvii] Due to rough seas only half of the Centaurs landed. Those that did gave a good account of themselves and instrumental in an action that resulted in Canadian Gunner Holtzman’s military medal action on Juno Beach. Brigadier Sanders was killed in June, one of the highest-ranking Gunner officers to be killed in action by shellfire while visiting the Orne Bridgehead.
The situation at the end of D Day, showing significant units. There were also advance parties from units scheduled to land later.
A “corps level battle drill” was promulgated in October 1943, based on experience in North Africa and Sicily.[xviii] This battle procedure included carrying out the procedures to survey guns and targets, identify enemy batteries and, where necessary, carry out preliminary operations to secure ground for gun positions. The techniques were practiced by all but one of the corps headquarters and their associated AGRA at Larkhill during the spring of 1944. The British Army would fight its battles at corps level. If a division fought on its own it would not prevail against a determined German defensive. This proved to be the case in Normandy as can be seen by the lack of success by 3rd British Division against Caen 6-7th June and by the 7th Armoured Division at Villers Bocage.
Inevitably, during battle the process was disrupted by an uncooperative the enemy, who kept artillery and mortars silent until after the attack started, deployed in depth to out range field artillery, and cunningly hid reserves of infantry and heavy tanks. At this point attacks would break down while new targets were acquired and fire-plans adjusted.
The battery commanders and troop commander FOOs played a key role, accompanying the infantry and armour and providing the network of informed observers around which concentrated artillery fire could be applied. The direct support element of field artillery suffered casualties comparable to the infantry. After fourteen days in action Major P Pettit of 481st Battery of 116th Field Regiment was the only un-wounded member of his party. Becoming a Troop Commander FOO, or Battery Commander would bring an officer promotion to Captain. The same was not true of OP signallers or drivers. Officers could be ordered to the OP and? in many units the OP parties were relieved by volunteers from Command posts.
One heroic example took place on the slopes of Hill 112 on 10th July. Major Mapp, BC 171st Battery supporting 7th Somerset Light Infantry was fatally wounded by mortar fire and the infantry CO killed. Both OP parties were deployed and pinned to the ground. Bombardier, Acting Sergeant Trevis at Battalion HQ then took command and assumed the BC’s responsibilities, co-ordinated the work of the O.P.s and brought down fire when required by the battalion. Captain Robinson, the B K, was killed coming up to relieve him. It was not until late in the evening that another officer could be made available. “Bombardier Trevis therefore commanded the battery for a period of 12 hours for the greater part of which he was under enemy mortar and shell fire. He did a job which would have been a credit to any Battery Commander.” An act recognised with the award of the Distinguished Conduct Medal [xix] A similar act, two weeks earlier resulted in the same decoration for Gunner, Acting Bombardier Moorin of 190 field Regiment.[xx]
In mobile warfare the idea of the infantry securing every area was as outdated as long lines of trenches. Artillerymen could often find themselves face to face with the enemy. On 27th June 25th Field Regiment was ordered to deploy as far forward as possible to be able to support 31st Armoured Brigade in operation Epsom. Infantry progress had been slowed by a deep minefield. But reconnaissance of a gun position beyond this minefield and about one mile south of le Mesnil Patry from the village had been completed.
The guns started arrived on the position and, with the exception of “A” Troop, were got into action without any difficulty. As the leading gun of “A” Troop, 12/25 Battery (now 8 Alma Commando battery) entered the field in which it was to deploy the troop came under rifle fire. The GPOA, L/Bombardier Hobson, fell at the director not far from the edge of wood bordering the position. Efforts to reach him brought more fire, as did further movement of men or vehicles. Gun detachments, therefore, dismounted from their tractors and crawled away under cover of a hedge along which the guns were now halted.
The CPO. Lieutenant KJH. Astles, immediately formed two small patrols from Battery H.Q., each of two men, with himself in charge of one and the ACPO, Lieut. F. R. Gutt, in charge of the other. These had hardly entered before heavy rifle and automatic fire was opened. Only Gunner Erskine returned, reporting that both officers and two gunners had been killed and another seriously wounded.
Sergeant Duke, the NCO i/c Signals, who had been laying lines which ran through the wood appeared shortly after Gunner Erskine. He had been pinned down by fire and unable to reach the men whom he had seen shot. He later brought in L/Bombardier Hobson under fire. A section of infantry attempted to enter the wood but was forced to withdraw by heavy fire.
Meanwhile, the Second-in-Command, Major A F Johnson, had enlisted the help of a troop of Sherman tanks. A troop of M5 Stuart light tanks, hearing the noise, also arrived. Two of the Shermans, the Stuarts and the Battery’s Bren guns were sited to provide covering fire, while the third Sherman was to cover a party of gunners, under the command of Sergeant Duke, would enter and clear the wood. Gunner Erskine, also in the party, had made another expedition into the wood with two signalers and had located the area where most of the fire came from.
After a short intense bombardment by the tanks, the gunners entered the wood and very soon afterwards a white flag was hoisted by the enemy. To everyone’s astonishment, forty-three prisoners were rounded up, and some dead Germans.
When the whole Regimental area had been searched, it was plain that it had been an enemy reserve company locality, which had been overrun but not mopped up. In the action 25 Regiment lost two officers and four other ranks killed and three wounded, but took around fifty prisoners from the 12th SS. Sergeant Duke was awarded the Distinguished Conduct Medal and Gunner Erskine was awarded the Military Medal.[xxi] This action deserves to have been better known, and could have been a setting for many post war test exercises.
An outstanding anti-tank gunner. Sergeant W Hall DCM was an anti-tank “Ace” at Rauray on 1st July, knocking German tanks with his 6 pounder gun
The Monty set piece battle envisaged that anti-tank guns should play a major role in defeating enemy armour. Each infantry battalion possessed six 6 pounder anti-tank guns and dozens of hand held anti tank weapons for self-protection. In the assault anti-tank guns would accompany the infantry, relieving the accompanying tanks as soon as possible. Self propelled 3” or 17 pounder guns were much in demand for this purpose. Both infantry and RA manned 6 pounder guns would be adequate, but the towed 17 pounder was very vulnerable for around 12 hours until it could be dug in. German doctrine called for immediate counter assault and planned counter attacks, supported by armour when available. The easily concealed and manhandled 6 pounder would have been adequate had the Germans not deployed Tiger or Panther tanks in the battles around Caen. Instead many of the battles around Caen included duels between heavy tanks and ill protected 17 pounder guns in the open.
In defence the infantry’s own anti-tank guns were intended to provide local protection, while the towed 6 pounders were sited on tank killing areas, with SP guns moving as appropriate and the towed 17 pounders forming a back stop. The last ditch anti-tank defences for the beaches themselves were the heavy AA guns, which were assigned anti tank positions.
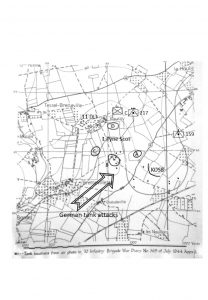
There were several occasions during the Normandy Campaign when the Germans attempted to launch their armour in an attempt to throw the allies into the sea. On D Day Sergeant Mitchley[xxii] No 1 of an M10 of 20 Anti tank regiment became one of the anti-tank regiment first fatal casualties stopping the 21st Panzer Division. There was particularly heavy fighting between the 7th and 11th June between Bayeux and Caen.
This sketch map shows the dispositions at the focal point of the engagement at Rauray. Each dot is the location of a knocked out German tank taken from an aerial photograph[xxiii]One of the biggest anti tank actions took place on 1st July 1944 at Rauray, when the II SS Panzer Corps launched an attack with elements of four panzer divisions into a British held salient SW of Caen. The Germans ran into the anti-tank guns of 55th Anti-tank Regiment reinforcing the infantry. Sergeant Hall of C Troop 217 Anti-tank Battery, 55th (Suffolk Yeomanry) Anti-tank Regiment was awarded the DCM after an action in which he manhandled his 6 pounder gun 350 yards to stalk a heavy German tank, as well as knocking out some four or five other others.[xxiv] In this action the Gunners were helped by an allocation of Armour Piercing Discarding Sabot ammunition which enabled the 6 pounder to penetrate the armour of the heaviest tanks they faced that day.[xxv]
The M10 units were exhorted to remember that the M10 wasn’t a tank and was not supposed to be used as one. However, photographs from D Day provide testimony of its use bunker busting. Two No’s 1 were awarded the Military Medal for actions which would have been unlikely to win the approval of Anti tank Wing at the RSA. Sergeant Todd, the No 1 of an M10 of J Troop, 198 Battery 73rd Anti-tank Regiment was isolated after the infantry withdrew after a counter-attack. When German infantry burst through a hedge about 50 yards in front he engaged them with his 0.5” Browning, which was mounted on the open turret. He withdrew through a hedge, but only to charge back again and engage the enemy in an open field. He continued to move up and down the field causing some 30-40 casualties before withdrawing. On 18th July Sergeant Smith of 73rd Anti-tank Regiment was tasked to support an assault by 1/7th Staffordshire on the village of Bretteville. When the supporting armour did not arrive, he considered that the infantry, mortared in their FUP would not advance without armoured support he charged at H bringing his SP into action on the flank of the objective and providing covering fire.[xxvi]
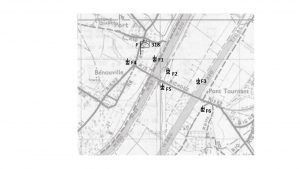
This sketch map, based on the sketch in the history of the Leicestershire Yeomanry focuses on the positions of 153rd (Leicestershire Yeomanry) Field Regiment. However, it is the scene of a fine action by both 153 Regiment and Q Battery.
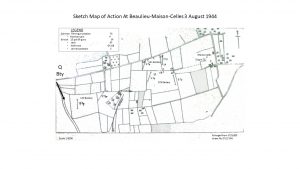
Perhaps the best example of an anti-tank battery action is Beaulieu-Maison-Celles on 3rd August. (shown as Maisoncelles on the sketch map) 153rd Field Regiment of the Guards Armoured Division were targets of a counter-attack by Panther tanks supported by infantry. 129th Battery lost two guns and a command post; the attack then reached 131st Battery in a neighbouring field. OP/CP Sherman tanks attempted to engage the Panthers but were knocked out. 129th and 131st Batteries deployed their 25 Pdr SP guns to anti-tank positions. The 2IC, ordered these two batteries to withdraw to Le Desert under covering fire from 130th Battery; two further guns were lost and nine ammunition lorries had to be abandoned. 130th Battery then withdrew under cover of its own smoke.
As the last gun withdrew, the first M10s of Q Battery, 21st Anti-tank Regiment arrived. The Panthers were difficult to locate and the Battery had to deal first with the enemy infantry, but after an hour Major Taylor’s gun destroyed a tank as it traversed a gateway. An hour later three more Panthers entered the field directly in front of HQ Troop. Major R I G Taylor got the first, Lieutenant L Hawker the second and the third withdrew. BSM Woolley and Lance-Sergeant Prudhoe were killed in their M10s. That evening Sergeant Farrow fired three rounds at where he thought he could see and hear – a tank in an orchard and was rewarded with a satisfying explosion; next day there was confirmation that he had destroyed a Panther but through the two stone walls of a cow-byre. Major Taylor and Lt Hawker were awarded the Military Cross. 153rd Field Regiment lost two OR s killed, Captain Cawley, Lt Leveson-Gower and 18 OR s wounded and Lt MacAlpine and 10 OR s missing, and four guns, two tanks, seven carriers and twenty B vehicles destroyed. [xxvii]
The story of the air defence of Normandy is a story of a forgotten army. The impression created in many histories of Normandy is that the allied air superiority was so overwhelming that the Luftwaffe did not have any noticeable impact. While this may reflect allied success, it does not do justice to the efforts needed to render a significant German air threat into insignificance.
AA defence had a high priority in the plans for the cross-channel assault, based on experience at Sicily, Salerno, Leros and Anzio. An AA Battlegroup would land early in the assault.
AA was given a high priority in the D Day landings in anticipation of German air attacks. 76th AA Brigade was placed under 30 Corps Command for the Assault with the task of protecting Gold Beach, the Mulberry Harbour and the fuel facilities at Port-en-Bessin. 80th AA Brigade placed under 1st Corps command for the Assault was responsible for the air defence of Juno and Sword beaches.
Each assault infantry brigade group was accompanied by an AA Battlegroup comprising a mixture of 20mm and 40mm Light and 3.7” Heavy AA guns with their radars. AA Guns were some of the first Gunner equipment ashore. Major P F Tiarks BC 218th LAA Battery and four 40mm guns each of A and C Troops landed on Queen White and Red respectively at H+45, 0810 hours. Both beaches were under heavy fire from mortars and small arms. Major P F Tiarks was wounded in the hand by a mortar fragment. He and Captain Eburne were both were awarded the MC for inspiring troops in battle for the first time under trying conditions. On Gold beach the first artillery ashore seem to have been triple 20mm AA SP tanks from 320 Battery of 93 Light AA Regiment, who would provide low level air defence of the beach.
On Juno beach Sergeant James Finlay and Lance Bombardier Frederick Arthur Harrison from 114 Light AA Regiment were awarded the George Medal for saving the lives of men trapped on a burning “Rhino” ferry.
76th AA Brigade was responsible for the AA defences of Mulberry Harbour. These included the soldiers from 127th Light AA Regiment who manned the 40mm guns on the Phoenix caissons, and were towed across the channel. Several men were killed when a caisson was sunk en-route. The Gunners also endured the terrible conditions during the great storm 19-24 June.
Layout of SP Bofors guns of F Troop 218 Battery 92 Light AA Regiment. The gunner battle for Pegasus Bridge started with its capture. The gun locations are taken from the annotated aerial photograph in “True Loyals”[xxviii]CAPTION ENDS
F Troop of 318th LAA Battery of 92th (7th Loyals) LAA Regiment, equipped with wheeled SP 40mm guns, was the only element of 3rd British Division’s Light AA Regiment to land on D Day. Their mission was to provide air defence cover to the Benouville bridges. The troop landed on schedule at H+6½ but was held up by congestion and the arrival of 6th Air Landing Brigade and then ran into contact with Germans at the village of Le Port. The troop commander, Captain Reid took twelve prisoners on his recce. The troop was held up by snipers in the church of Le Port which were only taken prisoner only after a Bofors was brought into action and opened fire. The Troop reached Benouville Bridge just as the light was fading, but did not come into action until first light 7 June. The bridges were a target for numerous air attacks. Over the five days F troop was credited with destroying 17 aircraft.
As the battle wore on and the German air threat diminished, the anti-aircraft regiments were given tasks in direct support of the ground troops. Increasingly 3.7-inch heavy anti-aircraft regiments were used as long-range field artillery and the 40 mm light anti-aircraft regiments were used to fire tracer to give direction to assaulting troops at night, an increasingly popular time for attacks, and were used in the anti-tank and counter-mortar role. Even searchlights, a particularly unglamorous task, were used to provide artificial moonlight by reflecting their beams off low cloud – Monty’s Moonlight.
The Commonwealth War Graves Commission lists 2,021 British and Canadian artillerymen killed between 5th June and 1st September 1944 from units serving in Normandy. For each fatality there were three to four others wounded. The Royal Artillery lost an average of around 23 dead and 70 wounded the best part of a modern-day battery per day. The highest fatal casualties occurred on D Day, when 61 men died, while on three days in early July there were over forty fatalities. Anti-tank regiments suffered the highest numbers of fatalities. Some of the Field Regiments, also suffered high casualties and disproportionately these are endured by the OP parties and the command post parties.
Frank Baldwin is the co-author of Gunners in Normandy the forthcoming Regimental history of the campaign. He served in 40th and 2nd Fields regiments,17 Training Regiment and HQRA 4th Armoured Division. He is a member of the British Commission for Military History.
[ii] E.g. Stephen Hart, Colossal Cracks, John Buckley, Monty’s Men: the British Army and the Liberation of Europe, and Terry Copp, Montgomery’s Scientists and Fields of Fire
[iii] Gorle, Richmond, The Quiet Gunner (2011) Ch 21
[iv] Penetration figures from WO/219/2806, Appendix G to SHAEF/166652/GCT/Arty dated 11 July 1944
[xxvii] Pilkington & Dow Regimental; History of 153 Leicester Yeomanry Field Regiment RA 1939-45 (Chapter Two) Hinckley Brassey
[xxviii] McCarthy, T. True Loyals a History of 7th Battalion, The Loyal Regiment (North Lancashire)/92nd (Loyals) Light Anti-Aircraft Regiment, Royal Artillery, 1940-1946 (2010)
Robert Nivelle had a spectacular career trajectory. A meteoric rise from commanding an artillery Regiment in 1914 to command an Army at Verdun was followed by his appointment in late 1916 to command the French armies of the North and North East, over the heads of many more senior commanders. He fall was equally spectacular as his offensive in April 1917 failed to achieve the predicted gains, but instead cost 200,000 casualties. The story of the battle itself is here .
Nivelle was a man for whom the Peter Principle, that “Managers rise to the level of their incompetence,” might have been created. Historians and soldiers find much to criticise in Nivelle’s performance as de facto Allied supreme commander on the western front. But there is also much to admire about his performance that brought him to notice.
For a start, Nivelle was an outstanding field commander. He had already distinguished himself during the August battles. On the Marne on 6th September 1914 part of the 63e division de réserve broke and fled while attacking towards the village of Vincy . Nivelle’s 5e régiment d’artillerie de campagne was outside Puiseux close by, on a ridge behind the retreating troops. Nivelle saved the day. Rather than fall back, he took half his regiment and galloped forwards, through the retreating troops and unlimbered his guns among the French skirmish line. Their rapid fire stopped the Germans. This action alone made Nivelle a bit special as a horse gunner. Many actions of this era involving manoeuvre by horse drawn artillery ended badly for the gunners. Nivelle got away with something that ended badly for Colonel Long at Colenso and managed to avoid the fate of the British gunners at Le Cateau and Nery.
Promoted to command an infantry brigade, he did well in an otherwise failed attack north of Soissons above Crouy. His brigade, closely supported by artillery managed to reach the sites. Promotion to command the 61st Division Nivelle mounted a model operation in June 1915, the battle of Quennevieres. This introduced the form of the operations mounted at Verdun at the end of 1916 and of the Aisne in April 1917. This was based on a sudden and violent attack, supported by overwhelming artillery, followed by a lateral and forward exploitation. A rising star, he was promoted to command the 3 Army Corps in December 1915. Nivelle followed Petain to Verdun as part of his Second Army, and took over the tactical command at Verdun from Petain. It was Nivelle, not Petain who adopted the phrase “They shall not pass.” Nivelle’s aggression, optimism and tactical skill won praise. The recapture of Forts Vaux and Douamont in 1916 made him a national hero.
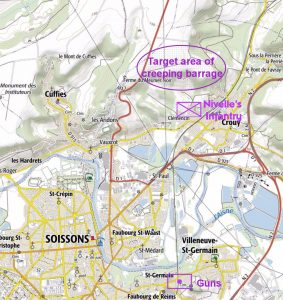
Nivelle was an innovative artilleryman. It is probably that the fire support he arranged for his brigade’s attack on 15th January 1915 was the first use of the barrage roulant – the creeping barrage. (1) He encouraged the scientist Hoffman to develop sound ranging. Australian Laurence Bragg would further improve on these for the technology use by the British. He also supported the development of the tank, which in France took the form of self-propelled artillery.
This diagram which can be used to illustrates Nivelle’s concept of exploitation to the flanks and in depth is taken from US Army FM3.0 Operations (2001)
Good Idea – pity about the means. The idea of a narrow front attack spearheaded by a phalanx was a good one. The untried and flawed Schneider tanks penetrated further into the German lines at Berry-au-Bac than the British at Flers on the Somme
Nivelle’s tactical methods had many similarities with the practises that emerged in other armies, combining artillery fire with infantry movement. However, he was an exponent of the operational idea of the breakthrough battle with the aim of the destruction of the enemy army. His emphasis on lateral and forward exploitation has something in common with Liddle Hart’s influential “Expanding Torrent” ideas, and the tactics used by the Germans in 1918, and 1940. What else is lateral exploitation other than “Aufrollen?” Under his command the French introduced more weapons at platoon level, including light machine guns and a light cannon – which might also serve as a anti-tank gun. This is along similar lines to the German all as assault groups that penetrated allied positions in 1918. His ideas were consistent with the pre-war doctrine based on offensive spirit. These contrasted with the pessimistic views of Petain who advocated a long game based on firepowers. Petain’s catch phrase was,” we will get them in the end.” While Petain’s emphasis on doing what was possible was proven right by events, at the time there were many who thought that the Allies could not win by remaining purely in the defensive. Even if correct for France of 1917, it flew in the face of the principles of war. Nor was, “waiting for the Americans” a strategy palatable to the politicians, the media or a patriot public.
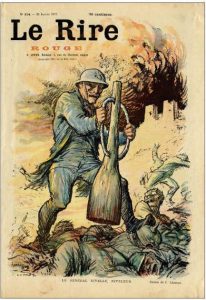
Magazine Cover January 1917. The French word Niveller means “to level”
After Nivelle’s dismissal his ideas became discredited and Petain’s methodical, “bite and hold” battle for limited objectives became the basis for French tactics for the remainder of the First World War, and their thinking after that conflict and leading to 1940. These is part of a pattern of French defeat. The pre -1914 doctrine based on offensive spirit and élan was finally discredited on the Chemin des Dames in 1917. Petain’s cautious techniques led to an army ill prepared for the German Blitzkrieg.
France might have been much better served if they had not thrown out the baby, of Nivelle’s ideas with the bath-water of his strategic command. Nivelle’s ideas were on the on the right lines for the mechanised age. A French army that tempered an appreciation of firepower with an offensive orientation might have put up a better fight in 1940.
Anyone interested in visiting these battlefields, or a talk on about them contact the OP at frank@frankbaldwin.co.uk
Gunnertours is organising a battlefield tour to the Western Front in November. Details here
Notes
1 Rolland Denis Nivelle: L’Inconnu du Chemin des Dames Imago (2012)
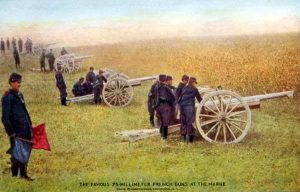
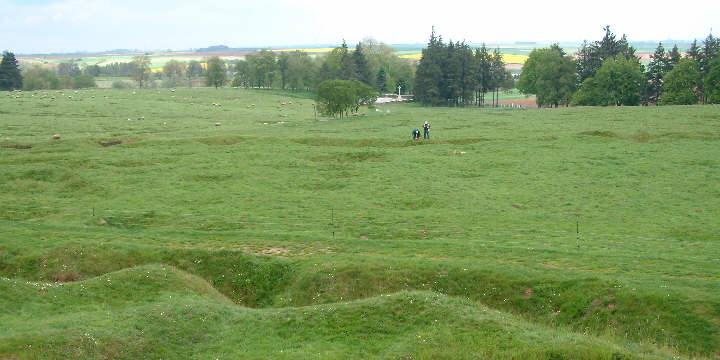
Everyone has heard of the first day of the Somme, famously the day on which the British Army suffered its highest casualties on a single day. Fourteen days later the British Army made its next big push. Demonstrating that occasionally lessons are learned and learned quickly, the plan was a bit different from on the 1st of July.
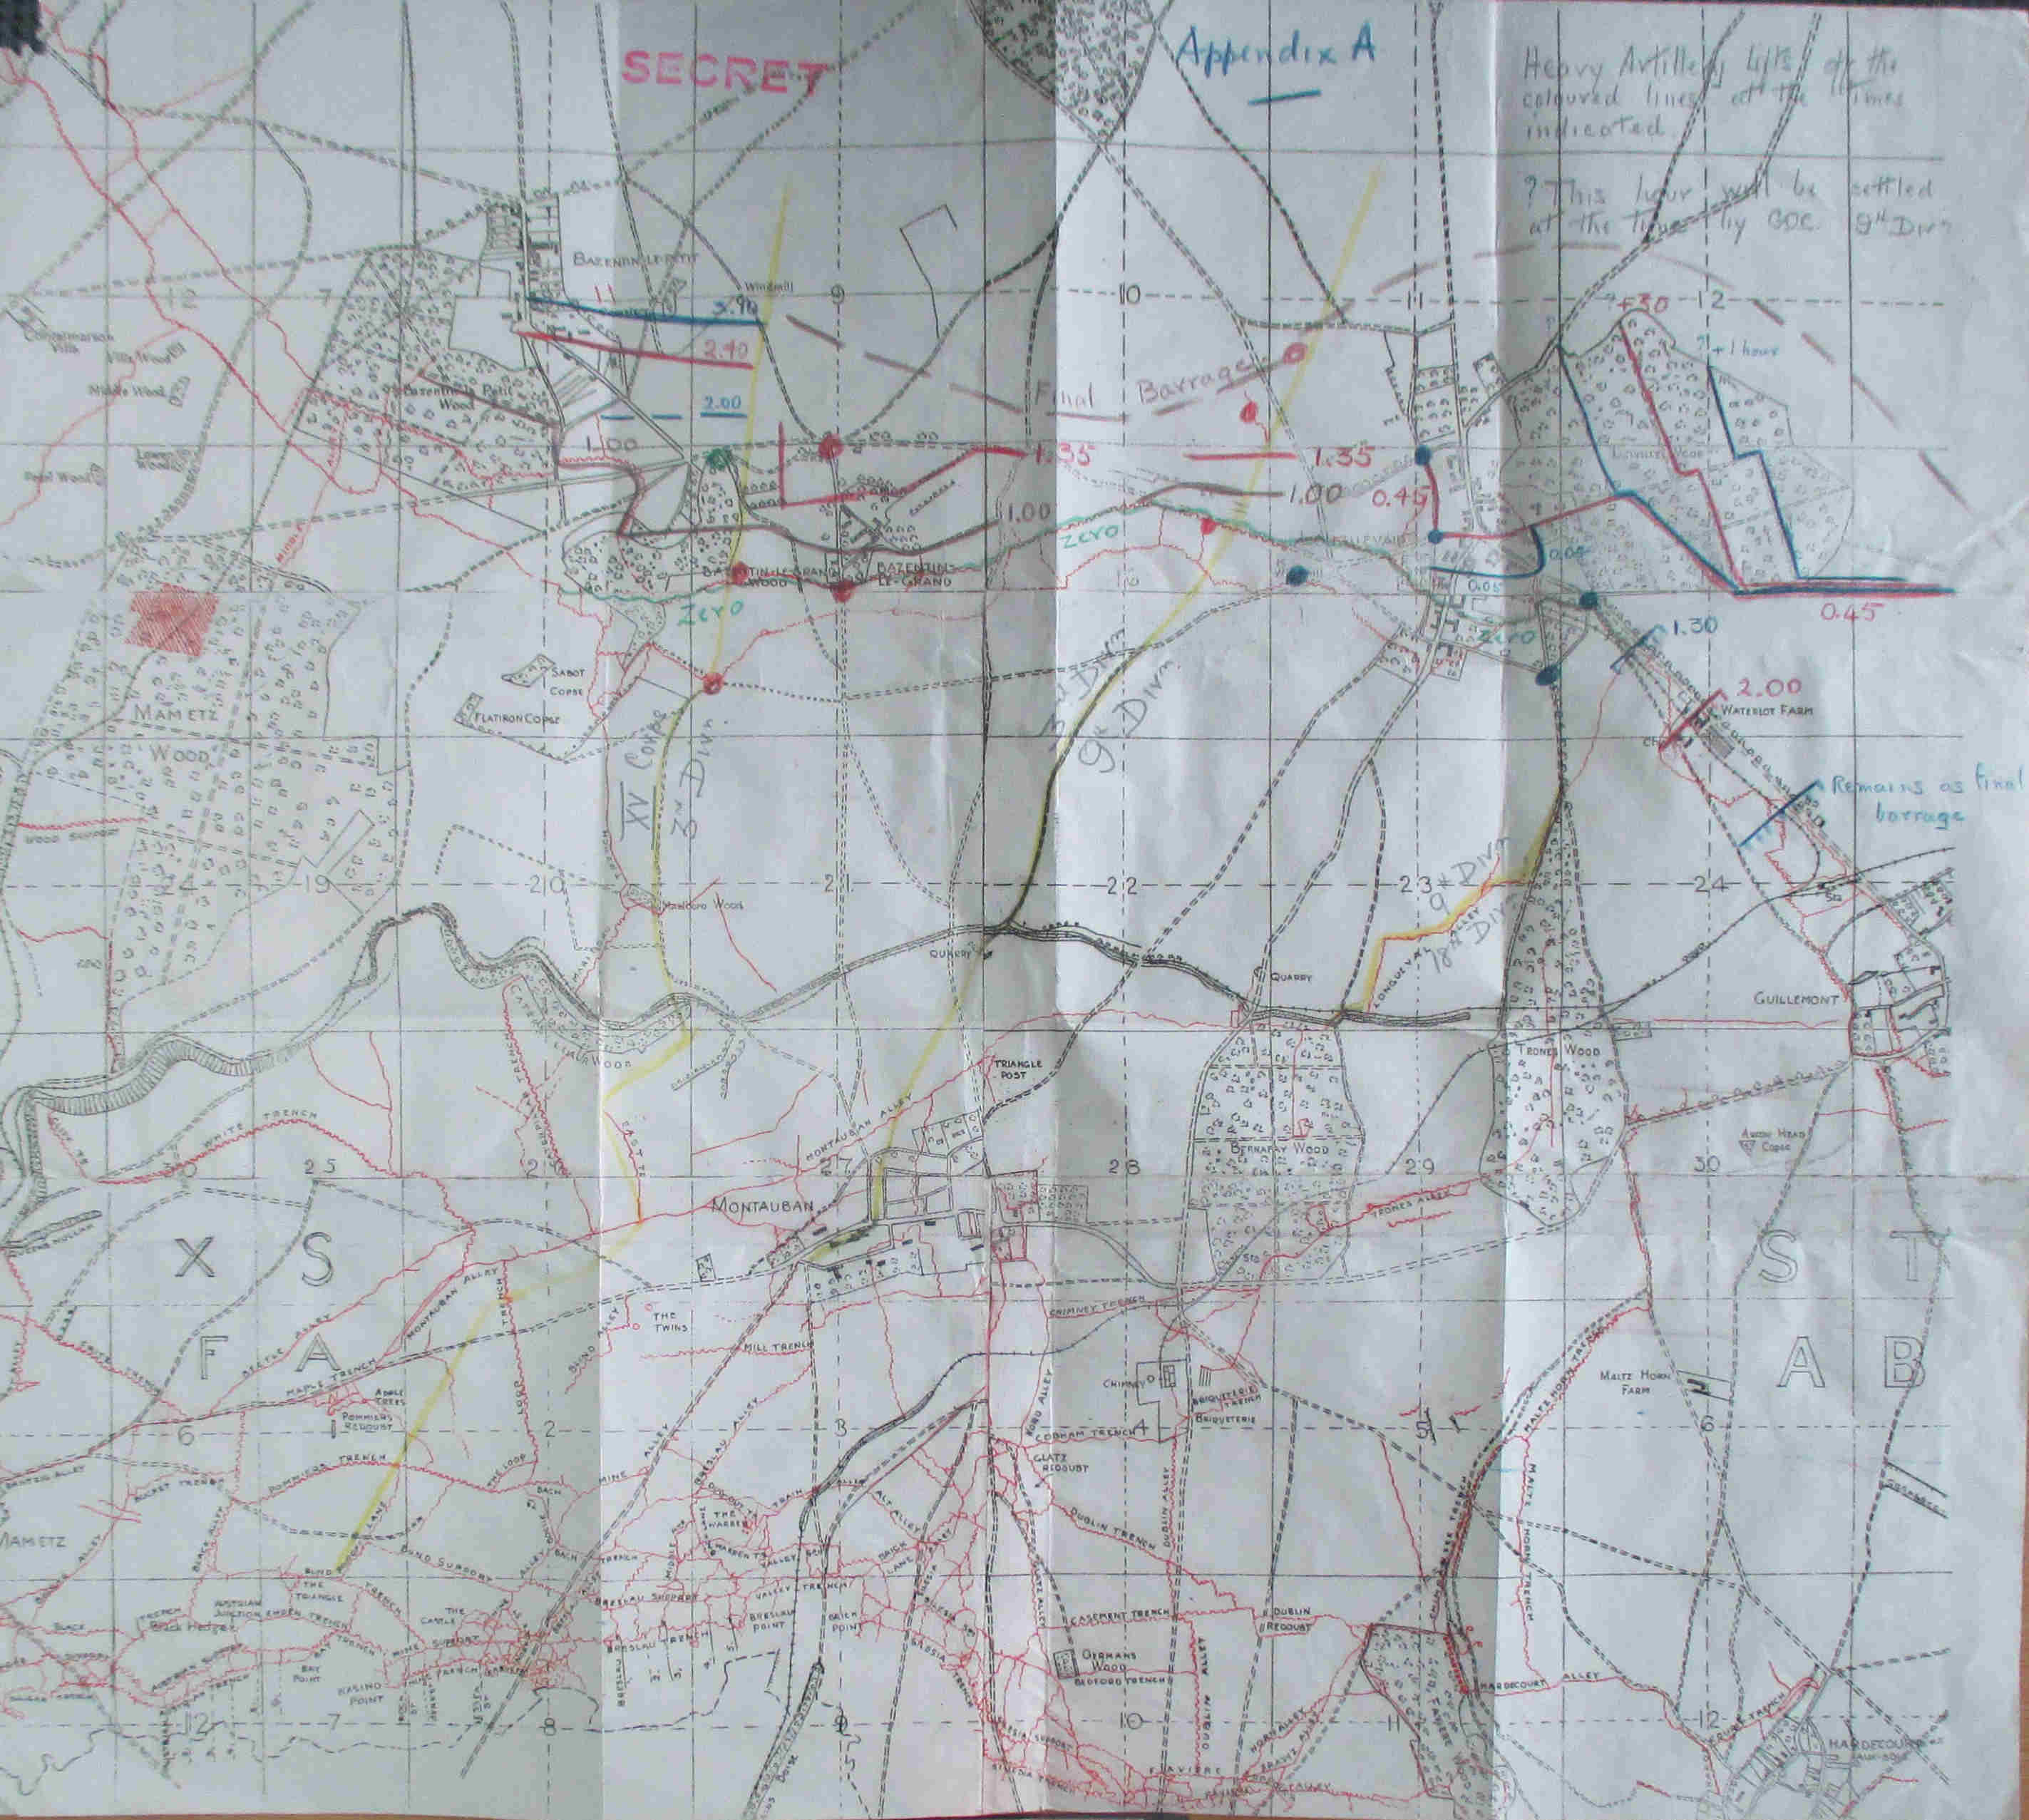
There wasn’t quite as many guns or ammunition as there was on the first day, but all of it was concentrated ion the German defences along Bazentin ridge and the German guns behind it. One the 1st of July there was one gun to every 20 yards of front – spread over two defensive lines and the preparation lasted for a week, firing 1.5 million shells . On the 14th there was one gun for every 6 yards and the preparation lasted for 48 hours, firing just under half a million rounds.
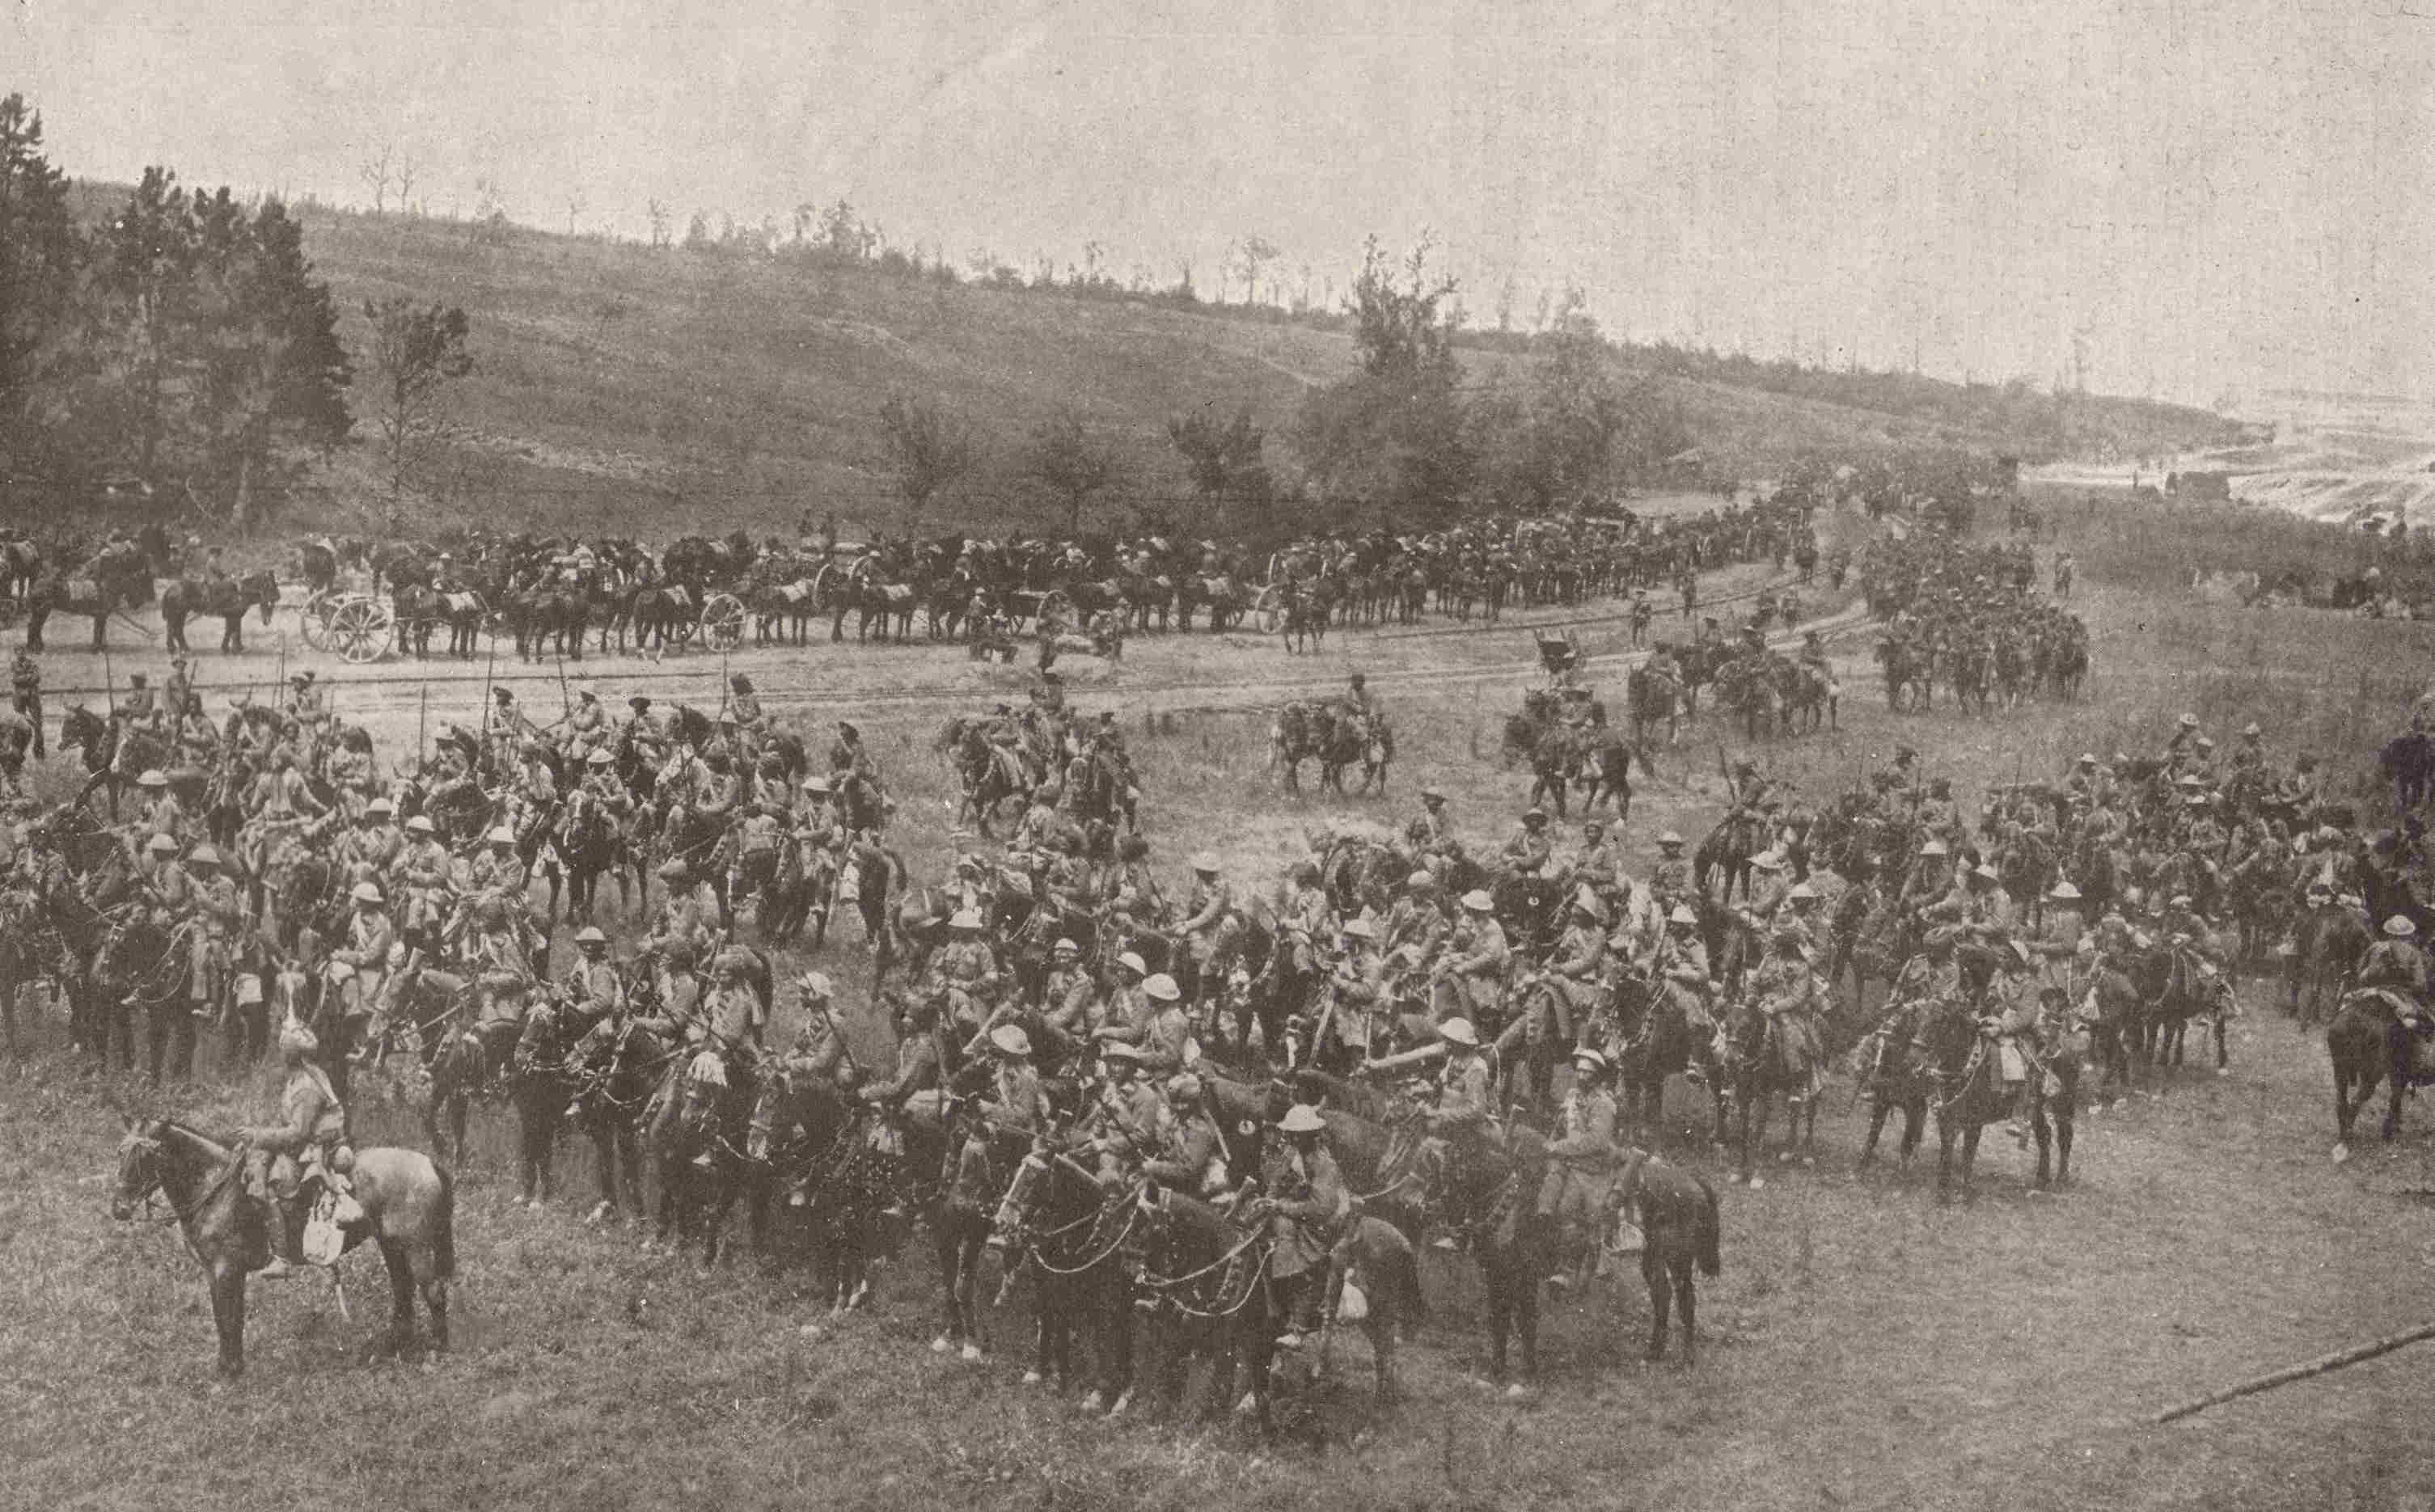
The Deccan Horse photographed on the Somme 1916. I wonder if any of the limbers on the road are from N Battery?
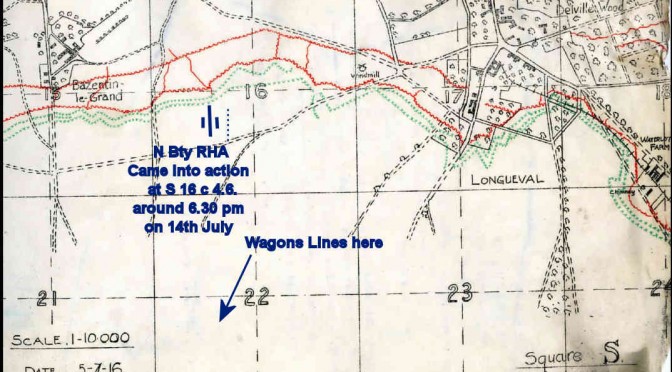
H Hour was 03.25 at dawn. The infantry of five divisions moved out into no mans land at night, and guided by mine tape deployed quietly a few hundred yards from the German front line. It was a great success and about three miles of German trenches were taken and a gap wide enough to launch cavalry – supported by a battery of horse artillery that still exists as N battery the Eagle Troop. However, by the time the cavalry was in action the Germans had blocked the gap.
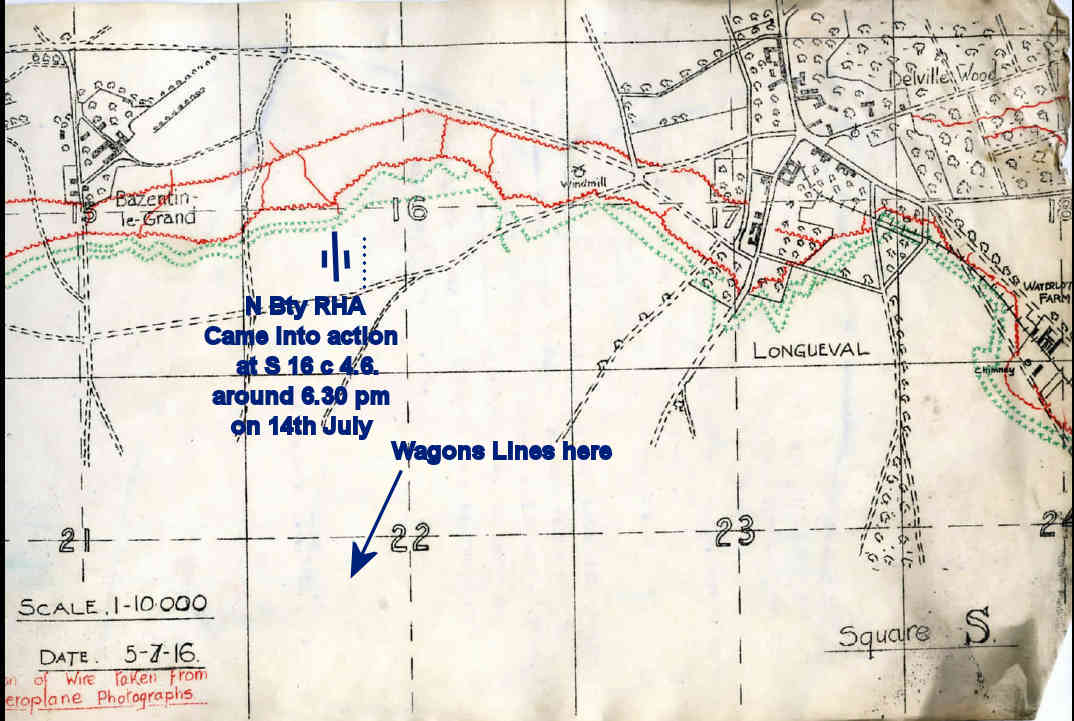
N Battery RHA came into action just short of the wire protection the 14 July German Front line
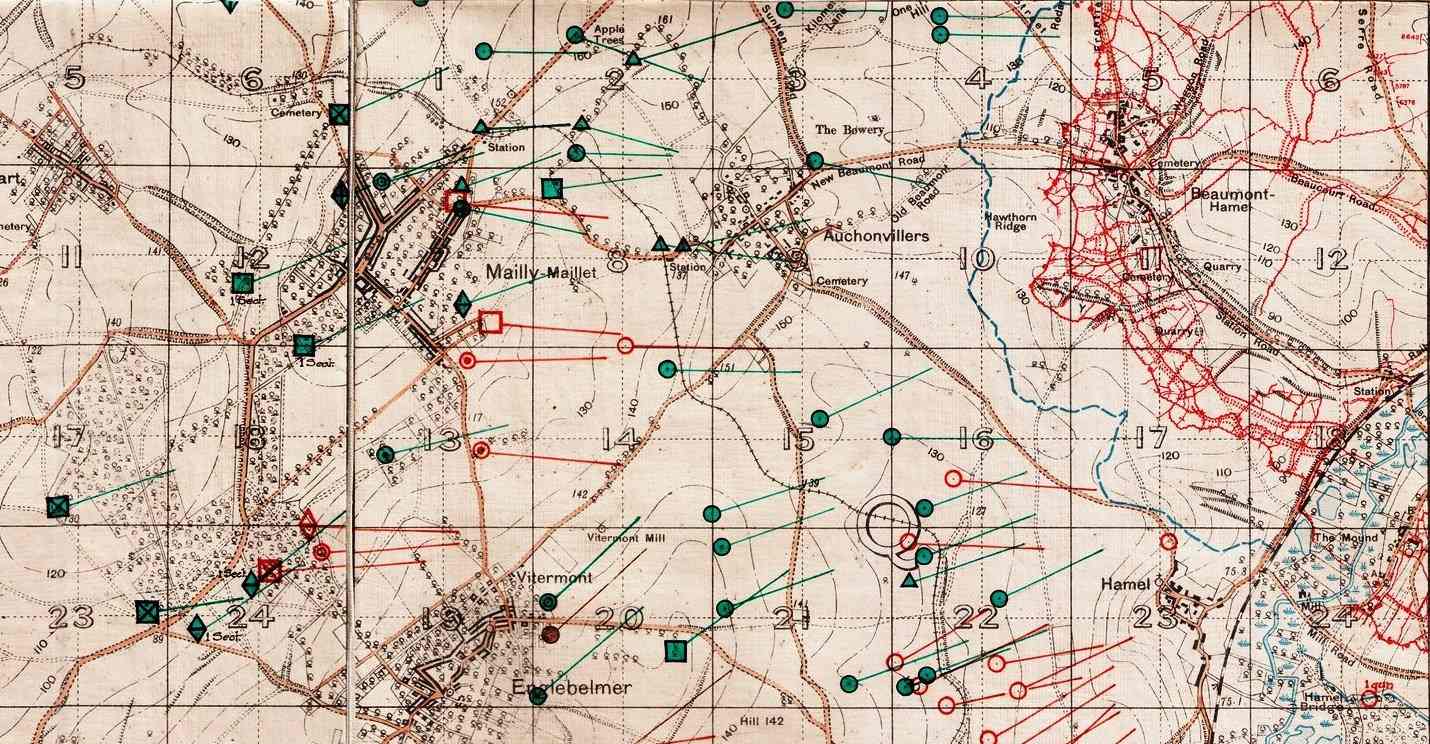
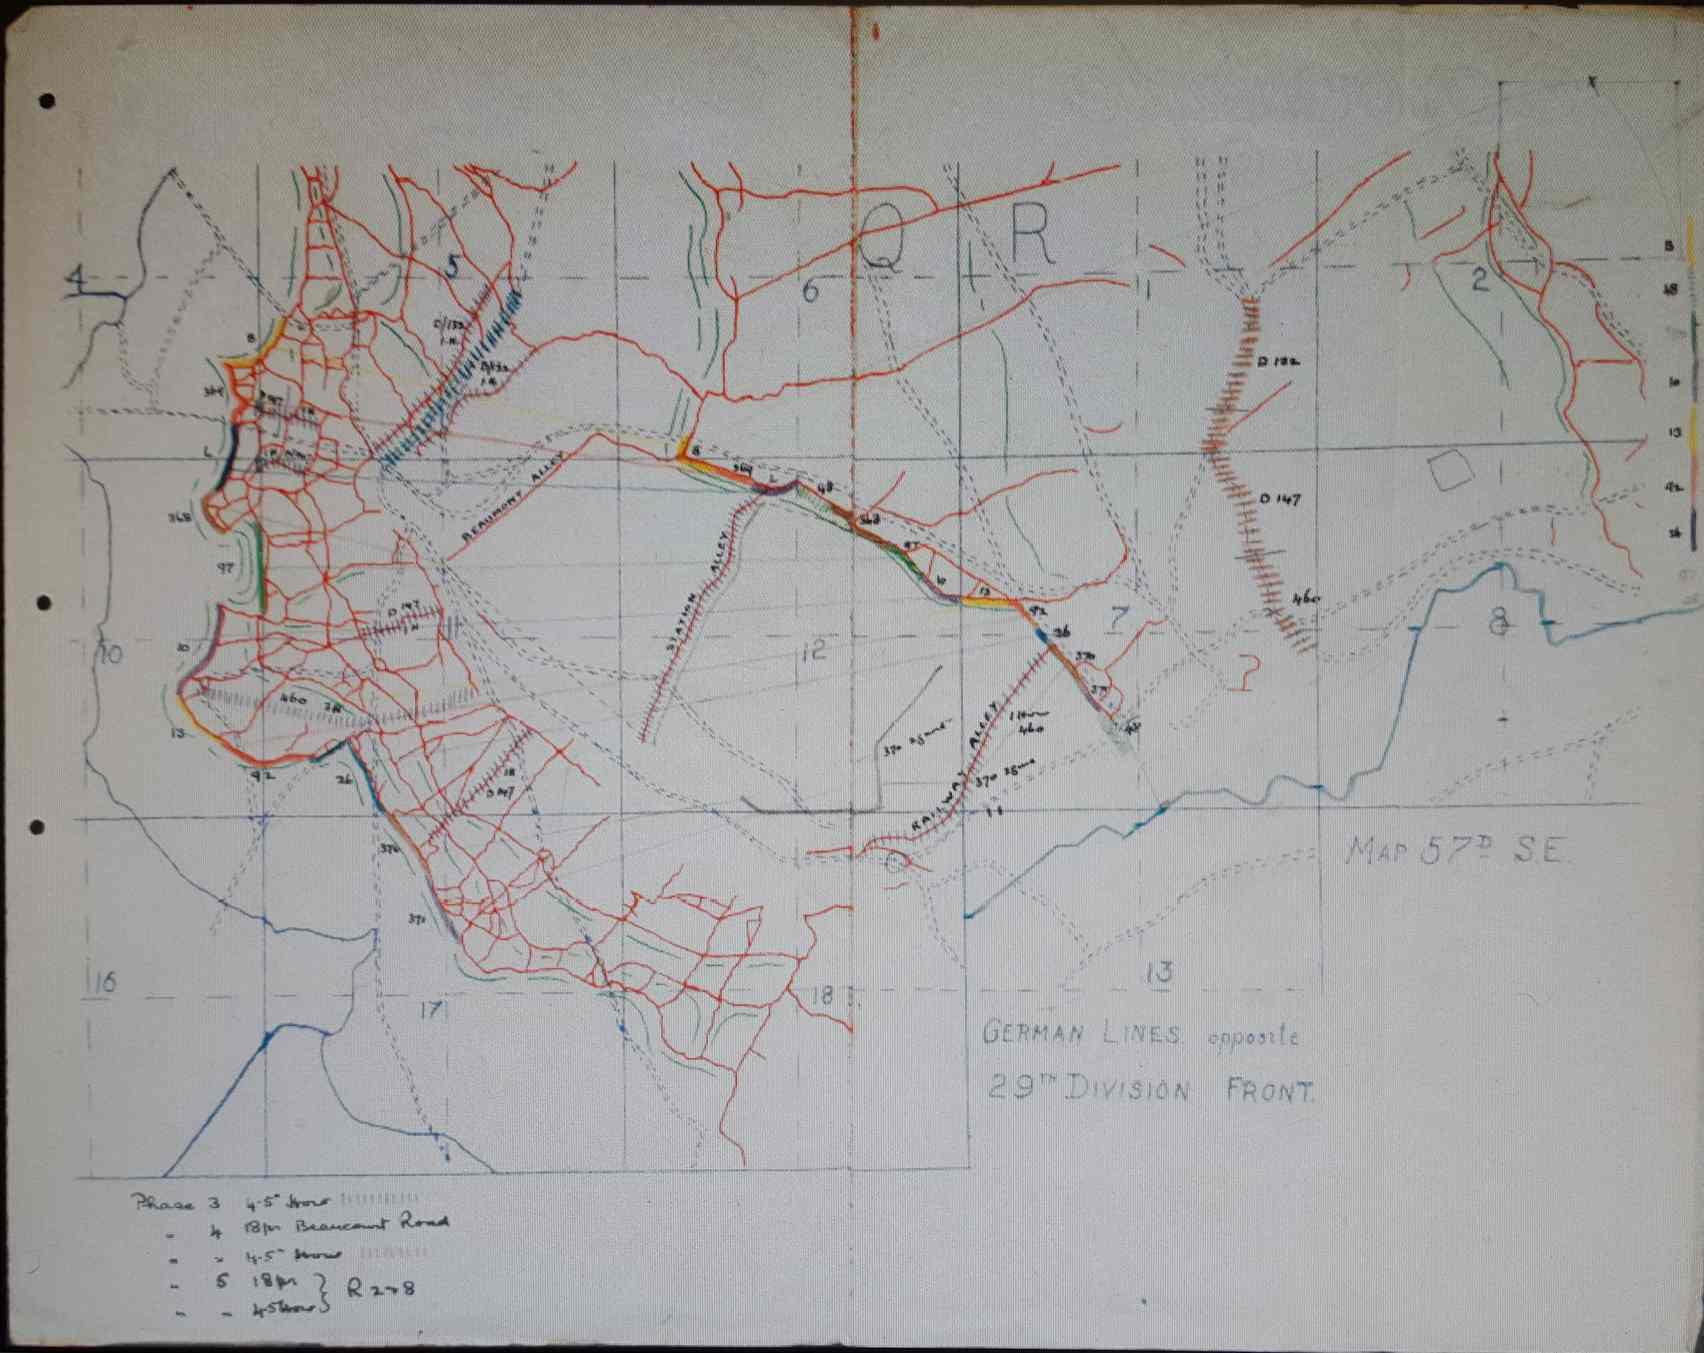
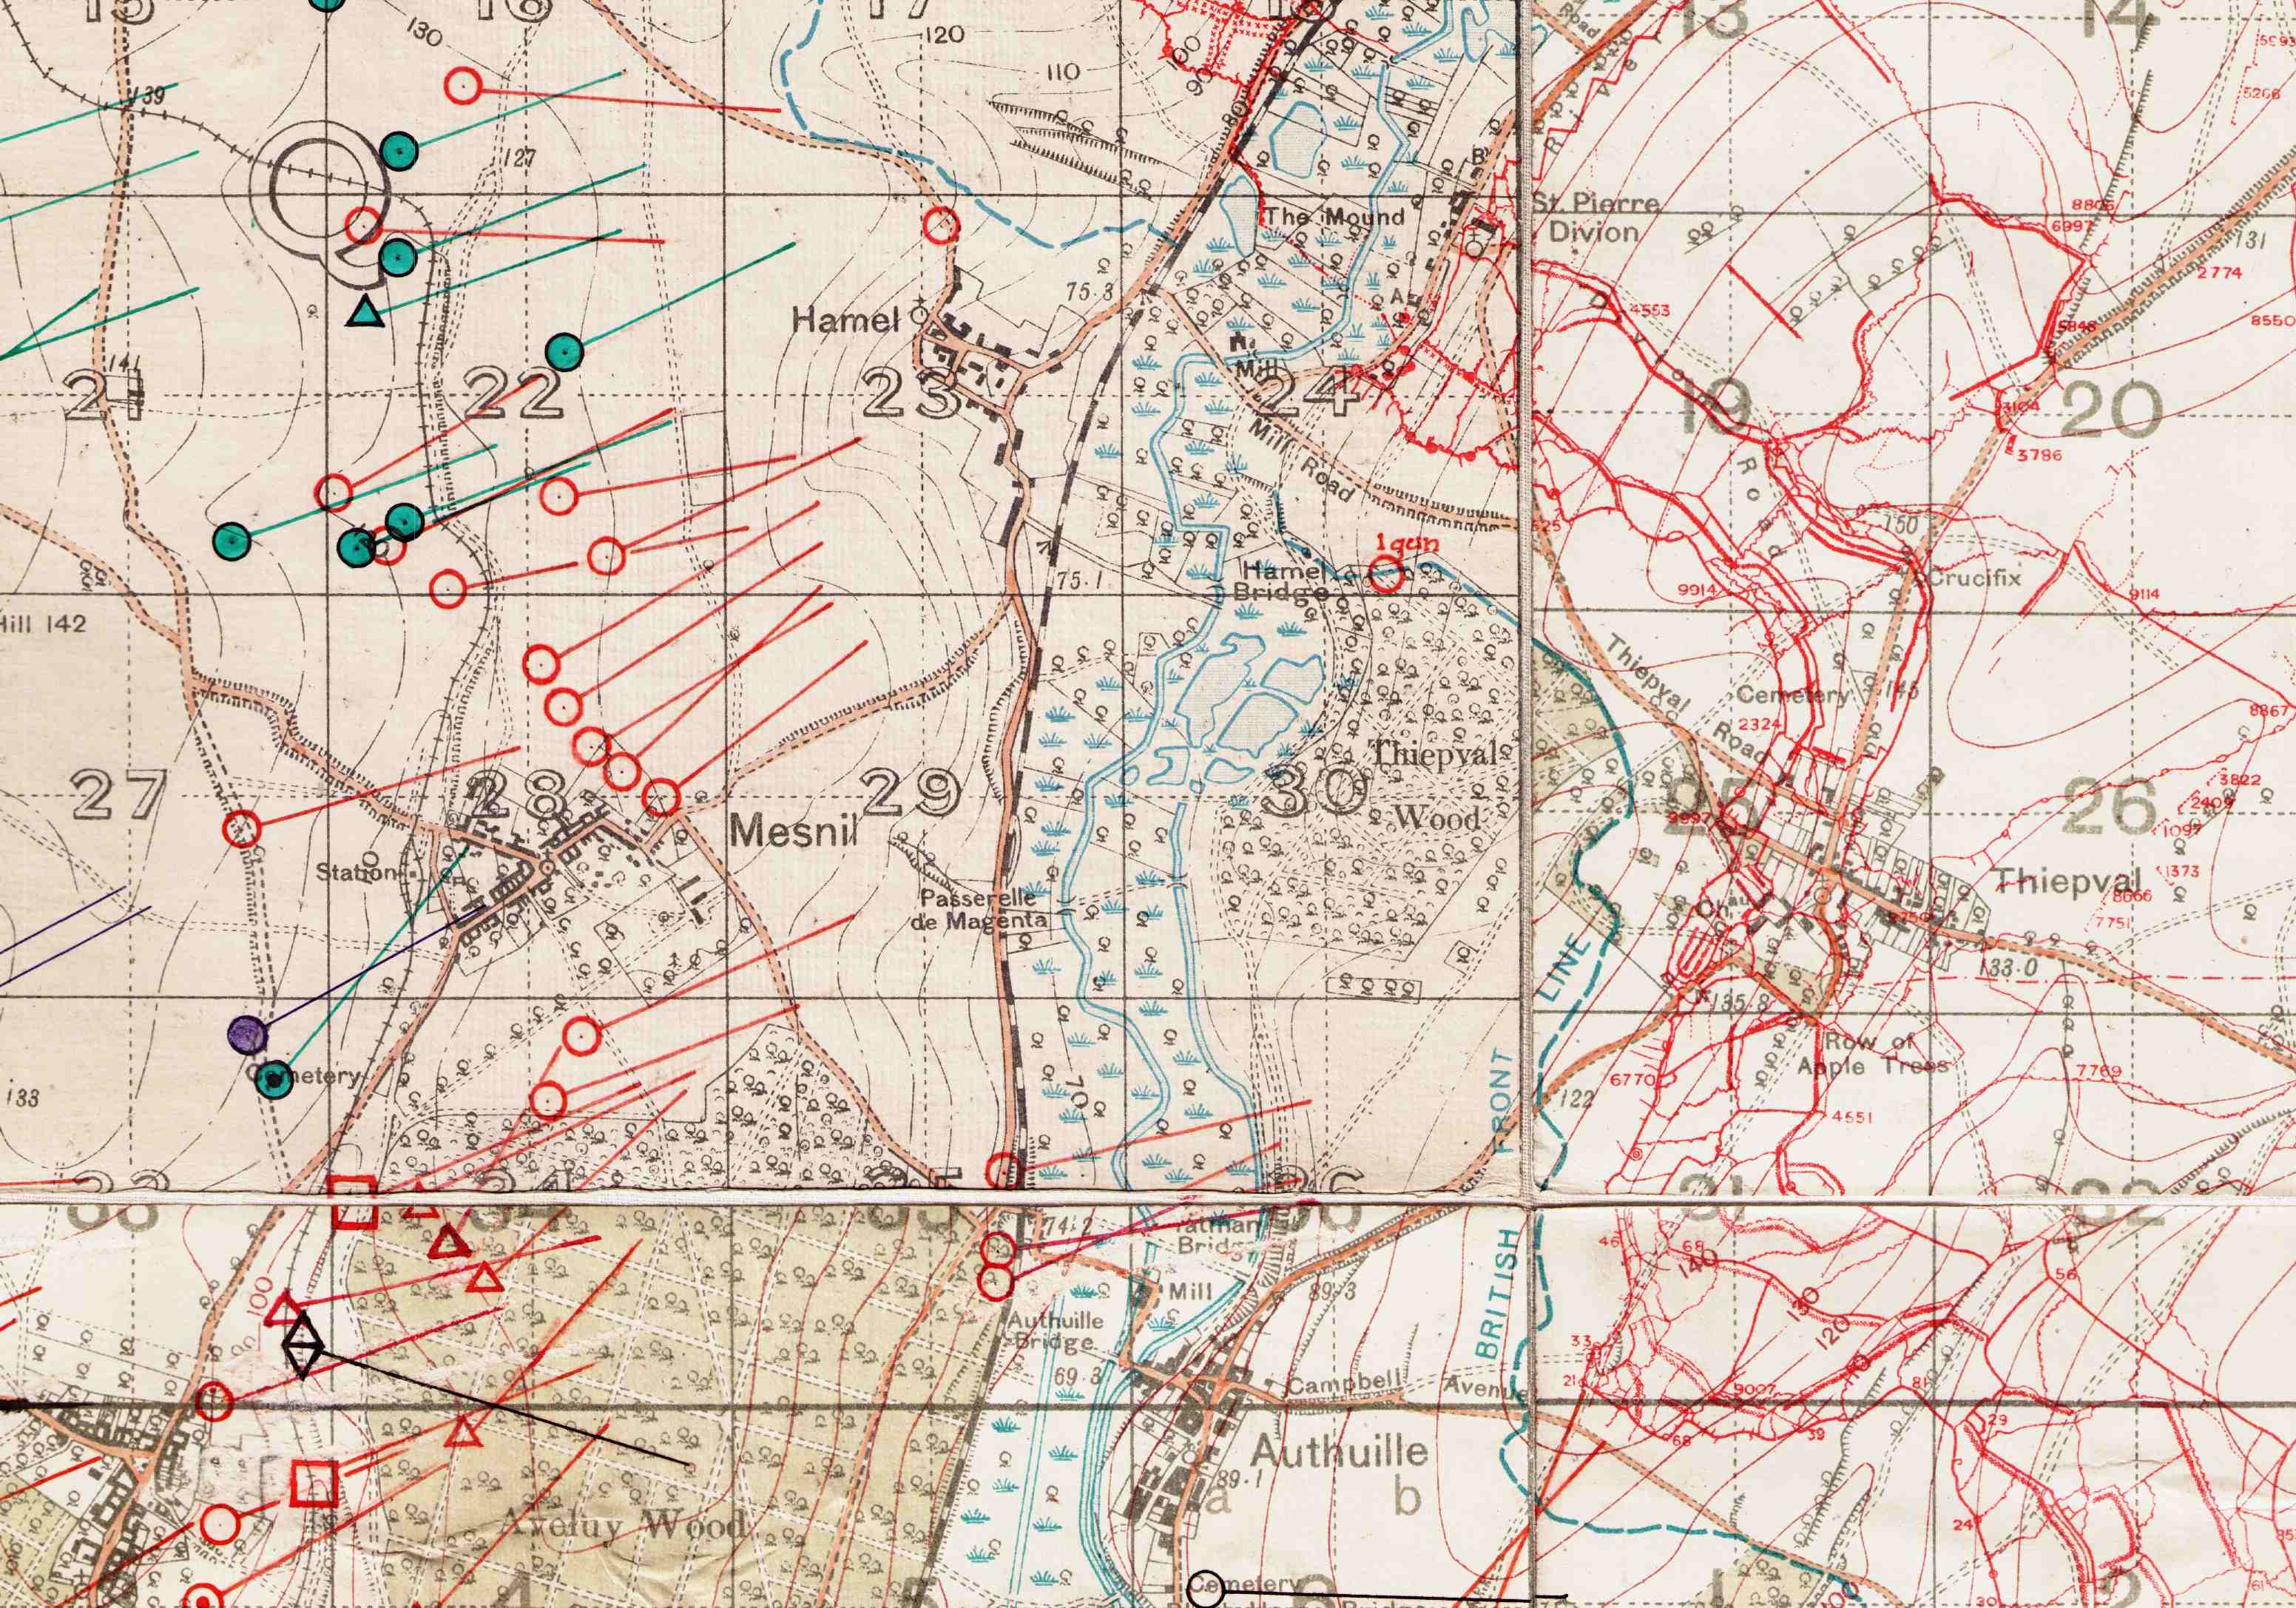
The map is the hand drawn trace for the XIII Corps fireplan for the attack on 14th July. Delville Wood is on the right hand side just below the number 12. The wood above the number 10 is High Wood. The poet and author Robert Graves was wounded in this attack at the churchyard in the village of Bazentin-le-Petit to the left of the number 9.
An abandoned German trench in much shelled Delville Wood taken September 1916 (Warwick Brooke – This is photograph Q 4267 from the collections of the Imperial War Museum)
The area between Delville and High woods was the focus for fighting for the next two months. It was calculated that seven shells a second landed on Delville Wood at times.
Two of the casualties on that day was Lieutenant Colonel Dudley George Blois DSO Commander of 84th Brigade RFA and his Trumpeter. They were riding forwards to recconoitre new positions for 84th Field Brigade of 18th Division and caught by shellfire. Blois a descendent of the royal house of Blois, is commemorated in Blythburgh Church in Suffolk.
If you are interested in visiting any of these battlefields and hearing the Gunner side of the story contact Gunner Tours.
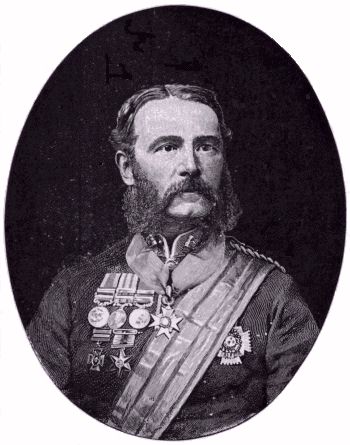
9th July is the anniversary of the action for which Captain Henry Tombs https://en.wikipedia.org/wiki/Henry_Tombs of the Bengal Horse Artillery was awarded the Victoria Cross, and became the honour title of “Tombs’ Troop” , now 28/143 battery (Tombs Troop)
Tombs was awarded the VC for coming to the assistance of one of his subalterns who had got into a spot of bother in hand to hand combat with mutineers. The citation says: “For very gallant conduct on the part of Lieutenant Hills before Delhi, in defending the position assigned to him in case of alarm, and for noble behaviour on the part of Lieutenant-Colonel Tombs in twice coming to his subaltern’s rescue, and on each occasion killing his man.”
The citation references a dispatch by Lieutenant-Colonel M. Mackenzie’s which reads:
Despatch No. 40, Lieut.-Colonel M. Mackenzie, commanding 1st Brigade Horse Artillery, to Brigadier A. Wilson, Commandant
of Artillery.
CAMP NEAR DELHI,
July 10, 1857.
SIR,—
“It is with great pleasure I submit, for the information of the Brigadier Commandant, the following account of the very gallant conduct of Second Lieut. James Hills, of the 2nd Troop, 1st Brigade Horse Artillery, and the noble behaviour of his commanding officer, Major H. Tombs, in twice coming to his subaltern’s rescue and on each occasion killing his man.
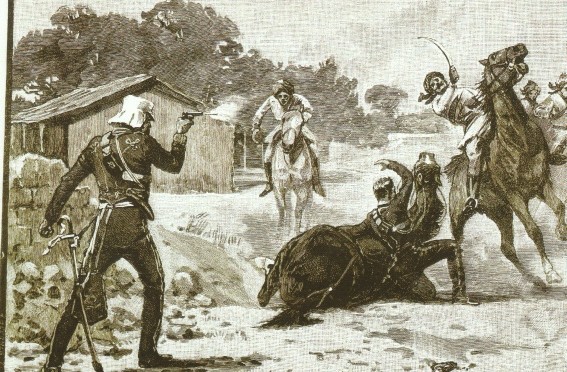
Yesterday, the 9th inst., Second-Lieut. J. Hills was on picket-duty, with two guns, at the mound to the right of the camp. About eleven o’clock a.m. there was a rumour that the enemy’s cavalry were coming down on this post. Lieut. Hills proceeded to take up the position assigned in case of alarm, but before he reached the spot he saw the enemy close upon his guns, before he had time to form up. To enable him to do this, Lieut. Hills boldly charged, single handed, the head of the enemy’s column, cut down the first man, struck the second and was then ridden down, horse and all.
On getting up and searching for his sword, three more men
came at him (two mounted). The first man he wounded with his pistol, he caught the lance of the second with his left hand, and
wounded him with his sword. The first man then came on again and was cut down; the third man (on foot) then came up and
wrenched the sword from the hand of Lieut. Hills (who fell in the struggle), and the enemy was about to cut him down when Major Tombs (who had gone up to visit his two guns) saw what was going on, rushed in and shot the man and saved Lieut. Hills. By this time the enemy’s cavalry had passed by, and Major Tombs and Lieut. Hills went to look after the wounded men, when Lieut. Hills observed one of the enemy passing with his (Lieut. Hills’) pistol. They walked towards him. The man began flourishing his sword and dancing about. He first cut at Lieut. Hills, who parried the blow, and he then turned on Major Tombs, who received the blow in the same manner. His second attack on Lieut. Hills was, I regret to say, more successful, as he was cut down with a bad sword-cut on the head, and would have been no doubt killed had not Major Tombs rushed in and put his sword through the man. I feel convinced that such gallant conduct on the part of these two officers has only to be brought properly forward to meet with an appropriate reward. Major Tombs was saved from a severe sword cut on the head by the wadded head-dress he wore.
“(Signed) M. MACKENZIE,
“Lieut.-Colonel.”
The Tombs claimed that his folded military cloak saved his life from the sword thrusts of his opponents.
There was a lot more to Henry Tombs than this act of gallantry. Here is what Field Marshal Lord Roberts of Kandahar had to say about him in his autobiography “Forty One Years years in India”
I longed to meet and know the men who names were in everyone’s mouth. The hero of the day was Henry Tombs, of the Bengal Horse Artillery, an unusually handsome man and a thorough soldier. His gallantry in the attack on the Idgah (a Mahomedan place of worship and sacrifice) and wherever he had been engaged was the general talk of the camp. I had always heard of Tombs as one of the best officers in the regiment, and it was with feelings of respectful admiration that I made his acquaintance a few days later.
Jemmy Hills, one of the subalterns in Tomb’s troop, was an old Addiscombe friend of mine; he delighted in talking of his Commander, in dilating on his merits as a soldier and his skill in handling each arm of the service. As a cool, bold leader of men, Tombs was unsurpassed ; no fire, however hot, and no crisis, however unexpected, could take him by surprise ; he grasped the situation in a moment and issued his orders without hesitation, inspiring all ranks with confidence in his power and capacity. He was somewhat of a martinet, and was more feared than liked by his men until they realized what a grand leader he was, when they gave him their entire confidence and were ready to follow him anywhere and everywhere.” Page 175.
And:
On the 17th (September, 1857) we were attacked from almost every direction— a manoeuvre intended to prevent our observing a battery which was being constructed close to an Idgah situated on a hill to our right, from which to enfilade our position on the Ridge. As it was very important to prevent the completion of this battery, Barnard ordered it to be attacked by two small columns, one commanded by Tombs, of the Bengal Horse Artillery, the other by Reid. Tombs, with 400 of the 6oth Rifles and 1st Bengal Fusiliers, thirty of the Guides Cavalry, twenty Sappers and Miners and his own troop of Horse Artillery, moved towards the enemy’s left. . . . Tombs drove the rebels through a succession of gardens, till they reached the Idgah, where they made an obstinate but unavailing resistance. The gates of the mosque were blown open and thirty-nine of its defenders were killed. Tombs himself was slightly wounded and had two horses killed, making five which had been shot under this gallant soldier since the commencement of the campaign.” Page 169.
Henry Tombs was a veteran of dozens of campaigns over twenty years of service and his military career is the story of the British Army in India. As a twenty year old Subaltern he was ADC to Sir Harry Smith, who had stormed Badajoz in the Peninislar war under Wellington. Tombs was promoted to major general at the age of 42, but died aged 49 of sickness.
However, James Hill, http://www.britishmedals.us/people/hills.html the subaltern Tombs saved, and awarded the VC for the same action lived to the age of 85 and died in 1919 as a Lieutenant General , living through the first world war. He maintained his friendship with Lord Roberts choosing to spend some of his retirement on campaign in South Africa during the Boer War serving in a private capacity on Lord Robert’s staff. (Is this an extreme form of battlefield tourism?)
The battery that he had served in fighting with sword and revolver had become 56th Howitzer battery RFA which served on the Western Front throughout the First World War and took part in the battle for Delville Wood on the Somme 100 years ago this month in late July 1916.
To visit the battlefields of the Royal Artillery for battlefield tours, staff rides and battlefield studies contact Gunner Tours info@gunnertours.com
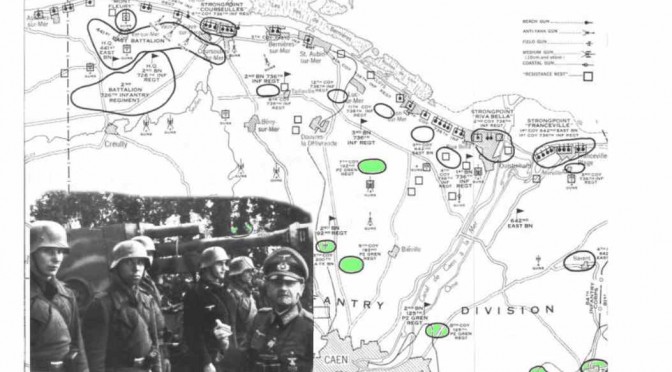
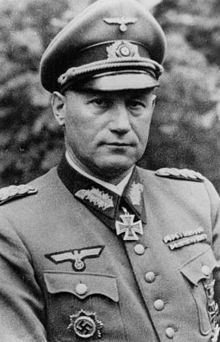
Edgar Feuchtinger was a German General who commanded the 21st Panzer Division defending the French city of Caen against the British Army in Normandy in 1944. He was awarded the Knights Cross and promoted for his success. Yet he has also been described as the worst ever Panzer General. An artillery officer, he owed his position to political favour, and abused his time in command indulging personal pleasures, a South American exotic dancer. Condemned to death by the Nazi regime for corruption and cowardice he also betrayed the new Federal Republic spying for the Soviet Union.
It is easy to sneer at Feuchtinger but the answer to why he was in command of a Panzer Division is simple. Feuchtinger commanded the 21st Panzer Divison because he built it as his private army, using every political lever he had at his possession. It would not have existed but for his protégé, Major Becker’s genius for improvising self propelled guns from scrap French army AFVs, and for Feuchtinger’s skills in playing the system. Feuchtinger developed an organisation to man these weapons in OB West. First as a Schnelle Brigade West of two regiments of mobile artillery. Then in 1943 half of these were parceled among the static divisions, while the remainder were the artillery group for 21st Panzer Division, which Feuchtinger was uniquely placed to command.
Rommel inspecting some of Major Becker’s SP guns before the invasion.
21st Panzer Division emerged having been constructed like the tramp’s stone soup. It had its own organisation table which reflected the equipment Becker had built. It was lavishly equipped with SP guns and APCs and a range of unique SP multiple rocket launchers and mortars . It was weak in armour, lacking a Panther battalion and less than the full establishment of two Pz IV Bns. Much of the manpower was from the cast offs from the static artillery formations and lacked the desirable martial qualities. All in all a formation better suited to defending Caen than driving anyone into the sea.
Feuchtinger was a sleazy individual who could have been from Catch 22 or one of Karst’s Gunner Asch Books. When the police eventually turned up on News Years day 1945 to arrest him for absence from duty on 5/6th June he was again absent – with his girlfriend in Celle, near Hannover. He was an East German spy and died “of a heart attack” at a meeting with his handler in East Berlin.
Major Becker (left) and Feldmarschall Rommel (centre) and Generalmajor Feuichtinger (right)
However, for all the multitude of his faults Feuchtinger picked some good, if flawed, subordinates. He used his connections to obtain experienced panzer officers, Hans von Luck, and Ritterkreutztrager von Oppeln-Bronikowski. The former had less than perfect Nazi credentials included his own half Jewish mistress, and the latter had had a reputation for drunkenness. Feuchtinger commanded the Division from some distance in the rear, allegedly accompanied by his exotic dancer mistress, and let his subordinates get on with it.
Hans–Ulrich Freiherr von Luck und Witten
Why was Feuchtinger decorated for his actions? He played the system well. He was effusive in praising his subordinates and recommended them for decorations. von Oppeln-Bronikowski: Oak leaves (28/7/44) v. Luck Ritterkreutz (8/8/44) How could the modest divisional commander in whose regime these men had flourished not be awarded some decoration himself? If you want a mention in the honours list – write up your subordinates and get them a gong!
Hermann Leopold August von Oppeln-Bronikowski
Regardless of his personal integrity or leadership style, his formation had been in continuous action since D Day, defending Caen tenaciously, giving little ground against overwhelming fire-power. For all of Feuchtinger’s personal failings as a commander or officer, it is not easy to see where he could be blamed for taking the wrong action or failing to make a decision, or where another commander could have played a decisive role.
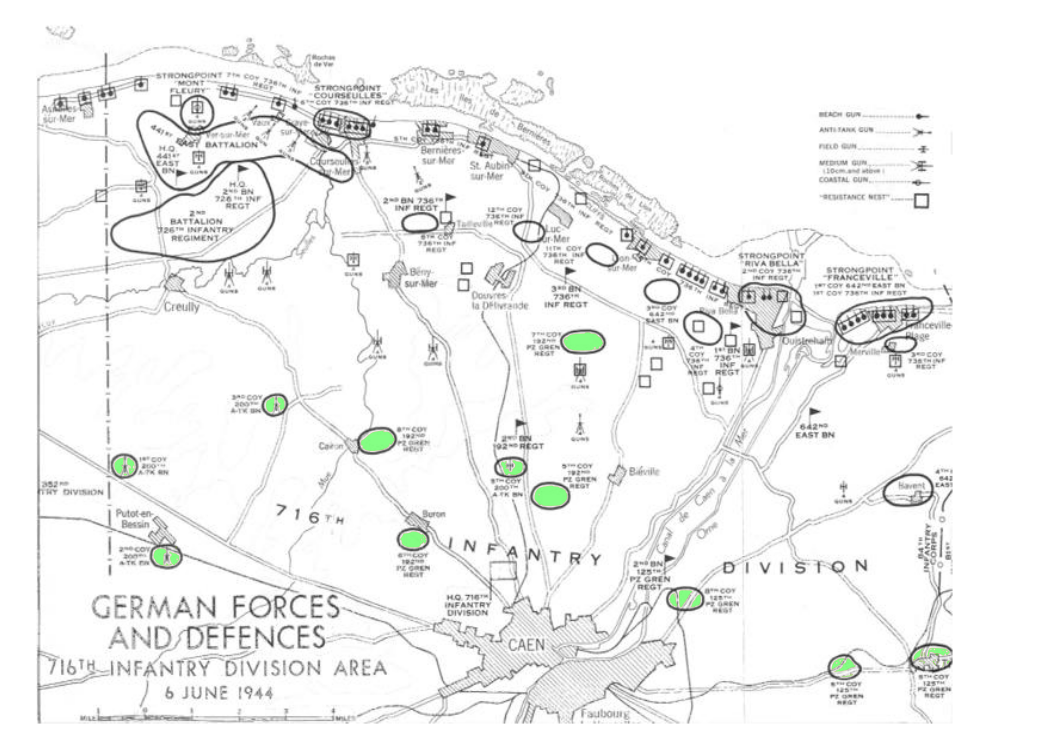
It was inevitable that the units of the 21st Panzer Division units shown in green, would become embroiled in the D Day fighting for Caen waged by the 716th Infantry division.
1. A slice of the division was quartered in area of the infantry division responsible for defending the coast: the 716 Division and in varying degrees under its command. 7./192 seems to have been under 716 Div command, while the anti tank battalion and one battalion from PGR 125 and PGR 192 were deployed so far into the 716 Div area that it was almost inevitable that they would be caught up in any landing on either side of the Orne Estuary. One artillery battalion I/155 was also deployed in support fo 716 Infantry division. (Source: Ethint interviews with Feuchtinger and Richter).
This image of shows how the improvised gun mountings of the 75mm guns overhang the French tank chassis. Not very elegant but quite effective
2. The German defensive doctrine, based on the WW1 techniques, placed counter attaching forces under command of the formation responsible for the defence of that sector. The thinking being that the local sector command would know the ground and the current situation. Thus any troops committed to the Orne sector would be under command 716 Division and not 21 Pz Div Command. The counter-attack on D Day was planned at HQ 716 Div (now Caen memorial museum), by the Corps Commander and with Richter GOC 716 and Feuchtinger GOC 21 Pz Div. The IA of the division was the panzer trained officer and he remained in HQ 21 Pz Div, all of which made it harder to plan the counter attack on D Day. (Source Geyr Ethint B466)
3. The decision to deploy the 21 Pz Div against 6 AB Division and against their orders to wait for release by Rommel, was taken on the accepted German -principle that action is better than inaction. No one seems to have been blamed when this made it harder to concentrate most of the Division on the West of the Orne. This was Hitler’s fault for instituting a Byzantine command structure and failing to rehearse commanders and staffs and war game how the system should respond to the reports of a landing to ensure that the correct actions were taken on the “Longest day”.
This 105mm self propelled howitzer is being inspected by Rommel
It may be that Feuchtinger was so utterly useless, and self centred that everyone just compensated. Feuchtionger may have been sufficiently self aware that he was never tempted to be that most dangerous of men driven by ego to be “stupid and active.” As long as he was left along with his mistress and no none bothered him, he did not feel any urge to exert his ego and screw up the plans of those better fitted for command.
Feuchtinger could not have existed in the British or US Armies. He would have been rumbled. That he did, is evidence of the ramshackle reality of the Nazi regime which was at odds with the impression given that in Germany “Alles in Ordenung”. This is a consequence of Hitler’s corrupt regime, where someone with no talent but party connections could build themselves a secure position for their own personal convenience.
To visit the battlefields of Normandy and hear some different stories contact Gunner Tours www.gunnertours.com
The Battle of the Somme was the largest, most bloody battle fought by the British Army. The popular image in Britain is of waves of foot soldiers going over the top into a hail of shells and bullets. But whether they succeeded often depended on how well the Gunners had breached then barbed wire, damaged defences, neutralised enemy batteries and neutralised enemy in the path of the infantry, and whether the infantry used the barrage.The Somme was an artillery battle, the first of its scale waged by the Royal Regiment. The artillery plan for the 1st of July assault was the first army wide artillery instruction. Within common principles and guidelines each corps developed its own fire plan. In one sense the First Day of the Somme was a very big experiment with each Corps trying out a different technique for supporting the infantry.
The verdict was clear by the end of the day and the tactics used by the XV and XIII Corps, of heavy counter battery fire and a creeping barrage became the norm for future attacks.
The majority of the BEF’s troops were “Kitchener’s” New Army Volunteers, raised for the duration of the war.However, many of the regular and territorial units which fired in the opening barrage and on the first day of the Somme are still part of the Royal Artillery.
VII CORPS
The northern most corps, VII Corps of the 3rd Army was made by two Territorial Divisions, the 46th (North Midlands) and the 56th (London). 210 (Staffordshire ) Battery can be considered the descendants of the CCXXXI (231)and CCXXXII (232) (II and III North Midlands Brigades) recruited from Staffordshire
This picture shows a QF 4.7″ gun on the III Corps front later in July 1916. The Territorial Heavy Batteries were each armed for four of these obsolescent guns, retained in service because of the shortage of modern long ranged artillery. AWM)
265 (Home Counties) battery might consider themselves associated with the territorial artillery brigades of the 56th (London) Division at Gommecourt. The Home Counties Territorials also formed the 1/1 (Kent) Heavy Battery with four 4.7” Guns, part of the 48th Heavy Artillery group supporting the VIIth Corps at Gommecourt, as was the 1/1 Lowland Heavy battery, raised from the recruiting area of 207 (City of Glasgow ) Battery.
VIII CORPS
The VIIIth Corps, was the Northernmost army corps in the Fourth Army. One of its infantry divisions, the “Incomparable 29th Division” formed from regular units serving across the world. This division fought in Gallipoli and in all of the major battles on the Western front from the Somme onwards. The part of the battlefield over which the 29th Division advanced is includes the preserved battlefield of Newfoundland Park, one of the most visited and photographed. One regiment and four current day batteries have antecedents which served with the 29th Division on the First Day of the Somme.
This photograph taken after the first day shows an 18 pounder gun, its crew stripped to the waist in the sunshine, firing a barrage from the Carnoy Valley south east of Montauban. This was the equipment used by the field batteries that have survived to modern times.
The XVII Field Brigade is still part of the Gunners, being renumbered 19 Regiment after the Second World War. One of XVII Field Brigade’s batteries, numbered 13 Battery in 1916 is still part of 19th Regiment, having been renumbered as 28 battery in 1947. According to the fire plan, this battery fired the artillery support for the doomed attack across Newfoundland Park.
B and L Battery RHA also were part of the 29th Division and fought on the first day of the Somme. XV Brigade RHA was formed from RHA units, but was equipped with the 18 pounder field gun and carried out the same function as a divisional field artillery battery. B Battery sent an OP party forward to support the capture of the Hawthorn ridge crater caused by the much photographed mine.
10 Battery RFA, now 25/170 (Imjin) HQ Battery of 12 Regiment served in 147 Field Brigade, also part of the 29 Divisional artillery group.
The heavy artillery of the VIII corps included 1/1 Highland Heavy Battery, part of 1st heavy Artillery group raised from the recruiting area of 212 (Highland) Battery, and 1/1 Welsh Heavy Battery, raised in Carnarvon. Both territorial batteries were equipped with four 4.7” guns.
X CORPS
The South African war vintage BL 6 inch 30 cwt Howitzer equipped several batteries for the Somme, including 17 Siege Battery.
To the right of VIII Corps was X Corps, which attacked the dominating ground around the village of Theipval. None of the field batteries of its new army and territorial had survived to the current day.
However, 17 Siege Battery RGA, the
BL 6-inch howitzer and a four wheel drive tractor
recently disbanded 52 (Niagra) Battery was part of 40 Heavy Artillery Group which was the Northern Group supporting X Corps. The battery was equipped with four 30 cwt 6” Howitzers and fired on targets in the sector attacked by the 36th Ulster Division and commemorated by the Ulster Tower memorial.
III CORPS
The III Corps attacked either side of La Boiselle on the Albert-Bapaume road. This was the point of main effort of the Fourth Army. North of the road, the 8th Regular Infantry Division attacked towards the village of Orvilliers. Its artillery group included V Brigade RHA, now 5 Regiment, and XLV Brigade RFA renumbered as 14 Regiment in 1947.
This photograph of a 60 pounder Gun is from 1918 rather than 1916. 90 Siege Battery, the antecedents of 38 Battery, were equipped with four of these long ranged guns.
As with XV RHA, V RHA Brigade, was equipped as a field brigade, there being a greater need for field rather than horse artillery in trench warfare. V Brigade RHA’s batteries included was O and Z batteries RHA.
XLV Field Brigade, which became 14 Regiment and three of its batteries have also survived. 1 Battery as “The Blazers”, 3 Battery RFA as 13 (Martinique) Battery and 5 battery as 5 (Gibraltar 1779–83) Battery. This divisions attack just north of the Albert Bapaume road towards Orvilliers also failed with heavy casualties
The Heavy Artillery of III Corps included:-
1 Siege Battery equipped with four 6” howitzers, part of 27th heavy Artillery group. This became 73 battery, now part of 4/73 (Sphinx) Battery.
90 Heavy Battery RGA, equipped with four 60 pounder guns. part of 22 Heavy Artillery Group became the current day 38 (Seringapatam) Battery.
1/1 London (Woolwich) Heavy battery was part of 34 Heavy Artillery Group RGA, equipped with four 4.7” guns.
XV CORPS
Man handling a BL 6 inch 26 cwt howitzer near Pozieres 1916.
XV Corps was to the right of III Corps. One of its two assaulting infantry divisions was the regular 7th Infantry Division. The artillery group included XXXV (35) Brigade RFA, which still survives as 29 Commando Regiment, as does one of its batteries 12 Battery RFA, now 8 Alma Commando Battery as do F and T Battery RHA which served as part of XIV brigade RHA. The attacks by the 7th Infantry division were among the most successful of the day, due in part to the innovative creeping barrage fired by the artillery of the corps.
1/2 Lancashire Heavy Battery, based in Sefton Barracks Liverpool, in the current day 208 battery recruiting area was part of the 18th Heavy Artillery Group equipped with four 4.7” Guns
XIII CORPS
The attacks by the two New Army Divisions of XIIIth Corps were the most successful of the day.
Heavy Work. manhandling the 60 pounder on the Somme 1916
115Heavy Battery RGA, the current day 18 (Quebec 1759) Battery was also equipped with four 60 pounder guns as part of 29th heavy Artillery Group in support of the XIII Corps. This was the right hand British Corps in the attack on the 1st day of the Somme. Their counter battery fire was particularly effective, supported by additional French heavy guns and a factor in the breakthrough in the XIII Corps sector.
1/1 Lancashire Heavy Battery was part of 29 Heavy Artillery group supporting XIII Corps, This too was raised in Sefton Road, Liverpool.
The story on each Corps sector is different. There are the personal accounts of the men who served the guns. And there is the story of how the Army developed the techniques learned at a painful cost to turn the Somme into the “Muddy Grave of the German army.”
If you would like to visit these places and see what the Gunners did on the Somme, there are still places available on the Somme Centenary Gunner Tour.
The first day of the Somme is best known for 57,000 casualties suffered by the British Army; the largest in a single day, and the event that supports the idea of British generals as “Butchers and Bunglers.” Yet, paradoxically, it was concern for safety which led to disastrously high casualties and failure of most of the attacks.
Attacks on the British Sector of the Somme
The battle of the Somme originated from a decision taken in December 1915, that the Entente powers, Britain, France, Italy and Russia would all launch an attack as soon as possible in 1916. The Somme was selected as the site of the Anglo French offensive because it was the junction between the two armies. It was originally envisaged that the French Army would take the lead. However, the German offensive at Verdun, started in February 1916 cost the French and Germans armies over 200,000 casualties each. By June 1916 not only would the British have to take the lead at the Somme, offensive but the bear This had two consequences, there were fewer French troops available which meant that the British would have to take the lead. Furthermore, the attack of the Somme was imperative to take pressure from the French at Verdun.
Sir Henry Rawlinson, commander of the Fourth Army. His initial plan for a methodical advance was rejected.
The British Army had limited experience of offensive battles, and had never planned an operation of the scale of the battle of the Somme. In March 1915 the British had launched a successful breach into the German lines at Neuve Chapelle, supported by a concentrated barrage by the artillery of the British Expeditionary Force. During other attacks in 1915 a shortage of artillery ammunition had prevented the British from repeating this level of fire support. However, by 1916 British industry had geared up to supply the vastly expanded British Expeditionary force swelled by millions of volunteers who Kitchener’s New Army recruited in 1914-15.
The largest ever British Army would be supported by the huge quantity of artillery pieces, 1072 light and 442 medium and heavy guns
GHQ issued no special instruction on the co-operation of infantry and artillery as, in the words of the official history, this main feature of the theory of the assault was well understood. In summary, towards the the close of the bombardment, shortly before Zero, the artillery would put down an intense barrage on the enemy front trenches; at Zero this would be lifted and dropped on the next trench, from which it would be lifted at a fixed time. Before each lift, the infantry under cover of the barrage was to creep to within as close assaulting distance as the barrage permitted. This was around 100 yards from the enemy’s front parapet and the infantry was to assault as soon as the barrage lifted.”
General Douglas Haig. He applied pressure to spread the artillery very thinly
It was impressed on all, at conferences by both Haig and Rawlinson that “nothing could exist at the conclusion of the bombardment in the area covered by it.” Owing to this optimism, the problem of evicting the Germans from the labyrinth of trenches was seen just as one of assault only. It was not seen as a race for the parapet between the attackers across no man’s land against the defenders in the their dug outs. Instead it was seen as something that could be done at leisure.
Not everyone shared this assumption. “Some Regimental officers suggested that the infantry might creep even nearer to the barrage, as was done later on and in at least one instance on the 1st of July. Forty yards was suggested instead of a hundred but it did not receive official approval. (1)
The race for the parapet: lethal game of rock-paper-scissors
The race to the parapet was the essence of attacking a trench. It can be envisaged as a rather deadly form of ‘rock-paper-scissors’. The defenders can either be in their dugouts or manning the trenches. The attackers can either send artillery rounds or infantrymen. Defenders lining trenches would slaughter attacking infantry but were vulnerable to artillery fire. Defenders would be reasonably safe in their dugouts, but could do nothing if the attackers were waiting at the top of the dugout steps. The key was for the assaulting infantry to be so close to the artillery barrage that the defenders had no time to react.
Infantry could advance close behind the directional shrapnel barrage.
The shrapnel shells from the British 18 Pdr Field gun were highly directional, and ejected forwards, like the blast from a shotgun. In the Boer war the British found that infantry could advance to within 50 yards with some safety. Japanese troops had also used these tactics in the Russo-Japanese War, as had the French in their costly 1915 offensive in Champagne. The “dapper and charismatic” artilleryman Robert Nivelle had developed a creeping barrage (le barrage roulant) 80-100m ahead of the leading infantry. (2)
Shell splinters for HE shells could fly hundreds of yards laterally, making it dangerous for friendly troops to approach closer than 200 metres.
The trouble with this tactic was that it had a fatal cost. Artillery rounds do not all land in the same place, but are scattered in a cigar shaped pattern, through variation in the propellant and further dispersed by variations in the wind and of temperature and human error in laying the piece. So “getting close to the barrage” inevitably meant “in a place likely to be struck by shrapnel from a shell that fell shorter than most”. Indeed the rule of thumb, later in the war, was that unless the infantry were taking casualties from their own artillery fire, then they were not close enough.
So the commanders faced a dilemma. The men lost to artillery fire would usually be far lower than the casualties suffered from the machine guns of alert defenders. However, if the artillery preparation was going to leave the defenders unable to resist then would it be right to expose the infantry to friendly fire casualties?
British (and some French) Artillery positions behind 29th Division of VIII Corps at Beaumont Hamel
To make matters worse, the gunners firing the barrage were mostly Kitchener’s Army men. Their gunners, technicians and officers had limited training and experience, and were using ammunition and guns produced by newly expanded or hired suppliers. It might have been sensible to apply nn extra safety margin. The plans for the 1st July seem to bear this out.
The fire plan for the first day of the Somme specified an artillery barrage that would lift from the German front line trenches at zero hour, even though the distance between the British and German Trenches was much wider – from 200-800 metres across most of the assault frontage. Some British units left their trenches before zero hour, and worked their way as close as possible to the German trenches. Where they did, the British succeeded in capturing the German front lines; the Ulstermen at the Schwaben redoubt, the Highland Light infantry at the Leipzig redoubt and the 30th Division near Maricourt. Elsewhere, success was more illusive and on much of the front the assaulting infantry faced fully manned trenches.
Artillery Bombardment Beaumont Hamel Somme 1916
The excessive safety distance between the starting barrage and the infantry wasn’t the only reason that casualties were so heavy and the gains so slight on the 1st July. There needed to be enough breaches in the German wire. Where the wire was intact, the advance stopped. It helped if the defenders were crushed in their dugouts or demoralised by the barrage. There were more, and heavier guns, and the dug outs were less deep south of the Albert-Bapaume. The Germans had to be prevented from bringing down their own defensive barrage preventing movement across no mans land. There were fewer German guns south of the Albert Bapaume Road, and the British could call on the more numerous French heavy guns for counter battery .
Lieutenant General Sir Aylmer Hunter-Weston By F. A. Swaine – http://www.archive.org/details/cu31924088057223, Public Domain, https://commons.wikimedia.org/w/index.php?curid=2494174
The worst losses and least success was on the frontage of the VIIIth corps where a “safety factor” played a grotesque part in the tragedy that unfolded. A number of a mines had been dug under the German trenches. Almost all were scheduled to be detonated at 07.28, on the 1st July, two minutes before zero hour. This would allow two minutes for the debris to fall before the British infantry assaulted the crater. One of these was under the Hawthorn redoubt near the village of Beaumont Hamel. The commander of VIII Corps, Lieutenant General Sir Aylmer Hunter-Weston wanted this to be fired some hours before the attack, so that the redoubt could be occupied before the assault, but sufficiently in advance that any general alarm would have died down by zero hour. This was vetoed by more senior commanders, but as a compromise the mine would be fired at 07.20, ten minutes before Zero.
Barrage map for 29th Division at Beaumont Hamel showing wire cutting tasks for 18 pdr batteries (blue) and trench mortars (brown) and preparation targets for 4.5″ Howitzers (yellow)
This allowed for a plan to occupy the crater early, but it required the heavy artillery bombardment of the redoubt and adjacent trenches to lift during the assault. However, instead of fire lifting only from the immediate area, all of the VIII Corps heavy artillery was ordered to lift at 7:20 a.m. and the field artillery to lift at 7:25 a.m. A light Shrapnel barrage fired by the divisional field artillery, was to continue on the front trench until zero hour but in the 29th Division sector, half of the guns were to lift three minutes early.
Barrage map for 29th Division Artillery showing the sections of front line trench and final lines for each battery.
This allowed the German defenders ten minutes notice of the impending assault and condemned the infantry from three divisions to heavy casualties and failure across the breadth of their front. It did not matter how well the wire had been cut or whether the infantry crept out into no man’s land. One of the attacking battalions lost all its officers before zero hour.
So why did the seemingly responsible commanders, who were professional experienced soldiers, get this decision so wrong?
7,000 shrapnel shells, enough for a divisional creeping barrage
One simplistic, but popular explanation is that the commanders were incompetent “butchers and bunglers”iii. Professor Norman Dixon in the Psychology of Military Incompetence (4) argued that there was something about military training which led to poor decision making. Indeed, the performance of General Sir Aylmer Hunter Weston is hard to describe as anything less than incompetent. “Hunter-Bunter” was a strange man with a command style reminiscent of that of the monstrous Blackadder creation General Sir Anthony Cecil Hogmanay Melchett. The disastrous decision to lift fire early across the VIII Corps front was very much in keeping with his micro-management and idiosyncratic decision-making. He had a history of over compensating for the risks of friendly fire in Gallipoli. He was found out on the first day on the Somme. Afterwards, although he retained his command, he was never entrusted with command in an offensive and only employed on quiet sectors. Could he have been removed earlier? To be fair to Rawlinson and Haig, Hunter-Weston was new to the Western Front. He had commanded the 29th Division and then the VIII Corps at Cape Helles in Gallipoli and arrived with his corps as an experienced commander and a reputation of relatively competent performance.
The Second Wave: Colonel Walford’s Impression of an attack on the Somme, following the barrage shown on the left
Elsewhere in the BEF the disastrous decision about fire plan timings resulted from agreements between groups of people, commanders and subordinates and their staffs.
In the first instance, the senior commanders were not looking at this problem. The correspondence between Rawlinson and Haig shows a focus on the problems of exploiting success. In earlier battles such as Loos and Neuve Chapelle the British infantry had taken the German first line wherever they had adequate artillery support.
The plan for the Somme was a bad compromise. Rawlinson, commander of the fourth army, put forward a plan for a phased advance, initially taking just the first German line, which he and his staff thought was within the capabilities of the resources available. Haig did not think this was ambitious enough. He rejected the plans and insisted that an attempt should be made to breach both the front line and the second line to ensure that any opportunity for a breakthrough was not missed.
Hawthorn Redoubt mine. By F. A. Swaine – http://www.archive.org/details/cu31924088057223, Public Domain, https://commons.wikimedia.org/w/index.php?curid=2494174
On this occasion Haig was able to impose his will on Rawlinson, despite reservations about the artillery being spread too thin made by the newly appointed artillery adviser at GHQ, General Birch. Birch and Rawlinson, having expressed their opinions in private, then issued orders and expressed their confidence in them.
As the Official History notes, not everybody assumed that the enemy would be flattened by the preparatory barrage. There seems to have been sufficient internal criticism for Rawlinson to include the following in the Fourth Army tactical notes;
“it must be remembered that all criticism by subordinates of their superiors, and of orders received from superior authority, will in the end recoil on the heads of the critics and undermine their authority with those below them.” (5)
The battlefield today. Part of the 29th Division sector in Newfoundland Park. The barrage on the German trenches at the far side of the patk was provided by 13 battery of XVII Field Brigade, which is still in the Royal Artillery as part of 28/143(Tombs Troop) Battery an AS 90 battery in 19 Regiment.
This was hardly the atmosphere in which to challenge the fundamentals of the plan. The late, great professor Richard Holmes remarked in the episode on the Battle of the Somme in the Western Front BBC series that the generals of the first world war were stronger in physical than moral courage.
It should be said that the BEF was very quick to learn and the next major attack, on the 14th July, less than two weeks after the first day, was conducted with a much greater concentration of artillery fire and with the infantry following a creeping barrage.
Major General J F N Birch CB, Haig’s senior Gunner argued that the artillery was spread too thin
There is a modern relevance of the battle of the Somme. This was a major high profile project into which much had been invested and expected. The resources available weren’t enough to deliver the hoped for results. At the heart of the plan were flaws that, could have been spotted and rectified but were not. The plan required subordinates to achieve “stretch targets”, “do more with less”, and “sell the party line” within an organisational culture that inhibited internal criticism.
The safety margin dilemma occurs frequently across all walks of life. If anything, the compensation culture makes it harder to choose to take risks. It is very hard to imagine the modern British Army willingly encroach on safety distances even if was the only way to win a battle.
We may not face machine guns and un-cut wire, but we often make important business and other decisions against a back ground of pressure from peers and superiors to agree to deliver uncertain commitments as part of a team effort. Many of us are under pressure to support decisions that have been made and face severe personal and career sanctions for whistle blowing. What is it that we can do to be more effective both as leaders in these situations and followers?
If you would like to visit the Somme and see the story of the artillery on the Somme join Gunner Tours on the Somme Centenary tour. info@gunnertours.com
The centenary of the battle of the Somme, which took place between June-and November 1916, has a special significance in Gunner history. This was the largest battle fought by the British army, costing 400,000 casualties. While public interest in the battle centres on the infantry who went 'over the top' on the first of July, the Gunner battle started a week earlier with the opening bombardment by the largest number of guns assembled.The Somme was essentially an artillery battle, with the guns the only weapons capable of clearing wire, destroying and neutralising defences and artillery. This was an awesome responsibility, and the success or failure of the infantry was down to the effectiveness of the fire plan. The story of how the Royal Artillery learned during the campaign is one of successful innovation, and a matter of pride to Gunners.It is also a human story. We will see where Gunner staff work made a difference; where Gunners went over the top with the infantry and where . Gunners worked to the point of exhaustion in the service of the guns.This tour will tell this story at the places where this largest artillery battle took place 100 years after the opening barrage was fired.
Notes:
(1) Brigadier-General Sir James E. Edmonds; Military Operations: France and Belgium, 1916, Volume I: Sir Douglas Haig’s Command to the 1st July: Battle of the Somme,, 1932
(2) Strong P and Marble S, Artillery in the Great War
(3) John Laffin;s polemic “Butchers and Bunglers of World War one” is the publication which is most associated with the term.
(4) Dixon N F, On The Psychology Of Military Incompetence, Basic Books, 1976
What did you do in the war daddy? Gunners from 113 Light Anti Aircraft Regiment could truthfully answer – “We helped to save tens of thousands of lives.”
113 Light AA Regiment Royal Artillery was originally raised as 2/5th Battalion the Durham Light Infantry, converted to a Searchlight battalion RE before the Second World war, and then to a Light AA Regiment in 1941.
In June 1944 it landed in Normandy as part of 100 AA Brigade and defended the bridges over the Caen Canal, including Pegasus bridge and the gun areas north of Caen. In September 1944 it took part in Operation Market Garden, taking over responsibility for defending the Bridge at Nijmegen. After a cold winter in the Netherlands and Belgium it provided air defence for the bridge over the Rhine at Xanten.
By 16th April 1945 German air effort was weakening and the Regiment came out of action into a concentration area near Haldern East of the Rhine. The Allied spearheads were rapidly advancing through Germansy and the Red Army had surrounded Berlin. It might reasonably expect to have little to do until demobilised. 113 LAA the Regiment’s service was not untypical of any Light AA Regiment It had done its bit.
But things changed with the orders the next day to move to administration duties at Belsen Concentration Camp (42 miles North of Hannover) under command 10 Garrison, taking over from 63 Anti tank Regiment.
Captain Pares, the Adjutant of 113 LAA wrote the following:-
“On 12 April 1945 following the break-through of Second Army after the Rhine crossing, the German Military Commander at Bergen-Belsen (Chief of Staff 1 Para Army) approached 8 Corps with a view to negotiating a truce and avoiding a battle in the area of Belsen Concentration Camp.
In occupation of the area were 800 Wehrmacht, 1,500 Hungarians with their wives and families, and certain SS Prison Guards. In the concentration camp were known to be 45-55,000 internees of whom a very large number were reported to be suffering from Typhus, Typhoid, Tuberculosis and Gastro-Enteritis. The electricity and water supply had failed: there was no bread and very little food.
The camp area consisted of the concentration camp and ½ mile North a large tank training centre with very extensive barrack buildings, a small PW camp attached in which were 800 Russians, and a military hospital.
In the interests of our own troops and the internees, and from the point of view of preventing, the spread of disease, a truce was granted on the following terms.
The German Military Authorities were to erect notices and white flags at all the road entrances, marked ‘Danger – Typhus’ on one side and ‘End of Typhus Area’ on the reverse, with a disarmed German post at each notice. German and Hungarian troops would remain at their posts armed, wearing a white arm-band on the left sleeve. The Hungarians would remain indefinitely and were placed at the disposal of the British for such duties as might be required. The Wehrmacht were to be released within 6 days and conveyed back to the German lines with their arms, equipment and vehicles. SS Guard personnel were to be removed by 1200 hrs 13 April and any remaining to be treated as PWs. SS Admin personnel would (if the Wehrmacht could prevent them running away) remain at their posts, carry on with their duties, and hand over records. When their services could be dispensed with, their disposal was left by the Wehrmacht to the British authorities, i.e. the Wehrmacht ‘sold’ the S.S.
About 50% of the inmates were in need of immediate hospital treatment. All of them had been without any food for 7 days, and prior to that living on the normal concentration camp semi-starvation scale of diet.
There were about 10,000 typhus-infected bodies, mostly naked and many in an advanced stage of decomposition, lying around the camp, both inside and outside the huts, which required immediate burial; and the daily death rate was 4/500.
The living conditions were appalling – people were sleeping 3 in a bed, mainly treble-bunk beds, and huts which would normally accommodate 60 were housing 600. There were no sanitary arrangements, and both inside and outside the huts was an almost continuous carpet of dead bodies, human excreta, rags, and filth.
There were some 50,000 persons to supply and feed, but the cooking facilities were totally inadequate. There were 5 cookhouses of varying size equipped with a number of large boilers, and the only containers available to distribute the food were a few large dustbins A large proportion of the occupants were bed-ridden, and many were incapable even of feeding themselves.
The inmates had lost all self-respect and been degraded morally to the level of beasts. Their clothes were in rags and teeming with lice; they had no eating utensils or plates, and at the time of the food distribution they behaved more like ravenous wolves than human beings.
There were 49 SS male and 26 female prison guards under close arrest and a Wehrmacht Hospital with 2,000 sick and convalescent German soldiers.
The electricity which came from Celle was cut off and the wiring sabotaged; the water supply which depended on it for pumping had consequently failed.
To prevent spread of Typhus and the other diseases it was necessary to keep all the internees within the Camp, yet the Hungarian guards were grossly lax and made little effort to prevent them from filtering out.” More of Captain Peres Account here.
Over the next month 113 LAA took over the Wehrmacht barracks at Bergan-Belsen, which would become Bergen-Hohne Camp. The typhus epidemic meant that the the concentration camp inmates could not be allowed to leave. They built cook-houses, buried the dead transferred the living to clean accommodation, guarded the SS men, and disarmed the Hungarians. Their soldiers can be seen in the newsreel shots. The War Diary entry for 26th April comments that over 8,000 bodies had been buried since their arrival in the camp. The SS Guards interviewed for the newsreel seem to have lost the SS Runes from their uniforms. These seem to have fallen into possession of the Gunners.
On VE Day 9th May the Regiment paraded through Hohne Camp,. Starling at the corner of the Belsen Concentration Camp past British, US Soviet and US Senior officers who took the salute to the sports pitch where the 54 guns of the Regiment fired ten rounds single shot and ten rounds automatic to celebrate victory and peace in Europe.
At this point their work was only half complete. The last huts of Belsen Camp were burned with as short ceremony on 23 May 1945.
Last hut burning May 1945
After the traumatic work, 113 LAA Regiment were given ten days leave beside the Baltic and issued 6000 bottles of beer.
The biggest commemorative battlefield event in 2016 will be the Centenary of the Battle of the Somme. Our tour commemorates the start of the battle, which was the opening barrage 24 June. We are also offering a proven Normandy and West Front tour that tells the Gunner side of these
The Somme Centenary, 23-26 June 2015 £469
The Battle of the Somme began on 24 June 1916 – known as U Day. It was a dull day, low cloud and heavy rain, following thunderstorms the day before.It is a myth, showing much misunderstanding of a First World War battle, to believe it began with the infantry attack on 1 July.
This wall is built from 7,000 shrapnel shell cases fired by 18-pounder field guns. This is how many shells were fired in support of a single division in an attack in August 1916.
The Battle of the Somme is an iconic event in British memory of the First World War. But the Gunner side of the story tends to be overlooked. The Gunner Tout top the battlefield will visit places ignored by many visitors and tell stories not often told. This is the story of the Royal Artillery in the Somme battles of 1916.
The main public interest in the battle is the staggering losses suffered by the volunteers of Kitchener’s Army on the first day. As one “Two years in the making. Ten minutes in the destroying. That was our history.”- the description of one Pals battalion.
This mine explosion, captured on film was followed up by an infantry attack supported by B Battery RHA, who lost two men from the FOO party whose job it was to lay line across no mans land on 1st July 1916.
The Gunners don’t come out too well from the short version of the battle of the Somme. The largest ever concentration of British Artillery firing the largest ever barrage was supposed to cut the barbed wire in front of the German trenches, destroy German bunkers, defences and guns and keep the Germans heads down while the infantry advanced. But, over about eight out of thirteen miles of the front line attacked this did not happen, resulting in tragedy. We will show you why, and something of the efforts and sacrifices made by the Gunners to deliver the impossible,.
A section of a map showing the gun positions. The 15“ BL Guns are shown as green squares.
The tour has been based on research inspired by a project started by the late Will Townsend. It is based on research from original documents in the National Archives, Firepower Archives, the Historial de la Grande Guerre Château de Péronne and RUSI. We have brought together anecdotes and stories from a wide range of published and unpublished accounts by and about Gunners. We will have fire plans drawn by the future Field Marshall Lord AlanBrooke.
Around half of the shells from these 15 “ guns did not go off, but even dud one ton projectile would collapse a German dugout.
We will look at the French and German artillery too. Few Britons are aware of how closely the British and French artillery worked. Nor is the German experience well known- even thought the most enduring German memory of the Somme was probably how their trenches were stamped into the ground by the British guns.
We are going to travel the week before the national commemoration because that is when the battle started for the Gunners, and we will have a better opportunity to get around the battlefield.
The tour is four days and three nights and for more information follow this link.
D Day Beaches and Landing Sites, 2-5 September 2015 £389
A visit over a long weekend to the D Day beaches and landing sites. There is a gunner story on each beach and landing site. We will see the strength of the German defences and see where and how the Gunners helped to overcome them. We will explore the stories of the Gunners who took part, the planners, commanders and soldiers, heroes, poets and those who fell.
£389 per person sharing single supplement £75
Details Here
BEF Western Front 10-14 November 2016 £469
Five days and four nights, covering the sites of the major battles of the British Expeditionary Force from Mons in 1914 to victory in 1918 over Remembrance day 11 November.
£469 per person sharing single supplement £110
Details here
Military history, Battlefield heritage and Touring