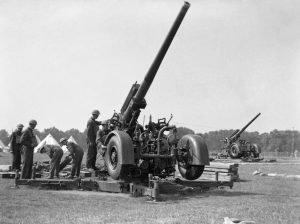
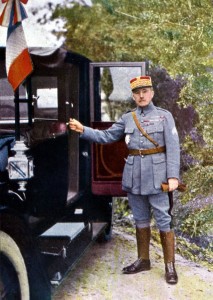
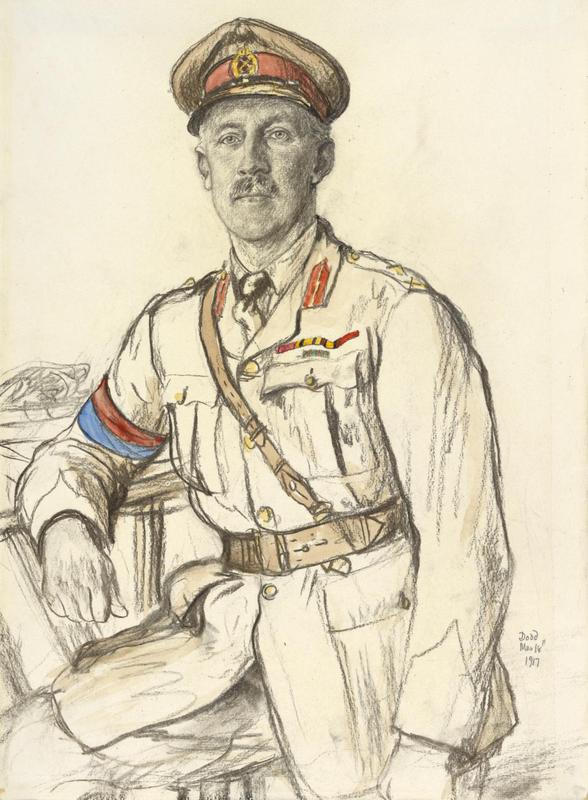
The 3.7 inch Heavy AA gun in 1939 in a London Park in its planned role – 18,000 rounds to down a bomber.
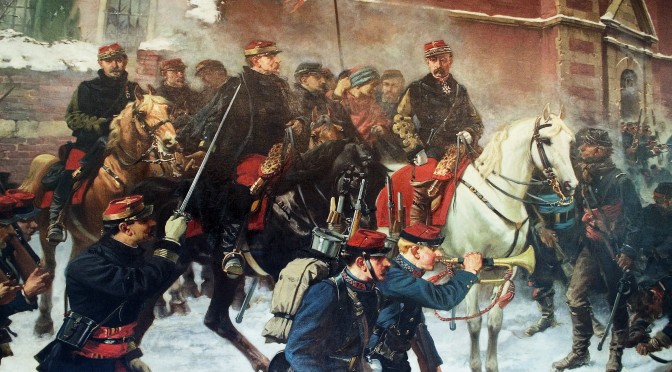
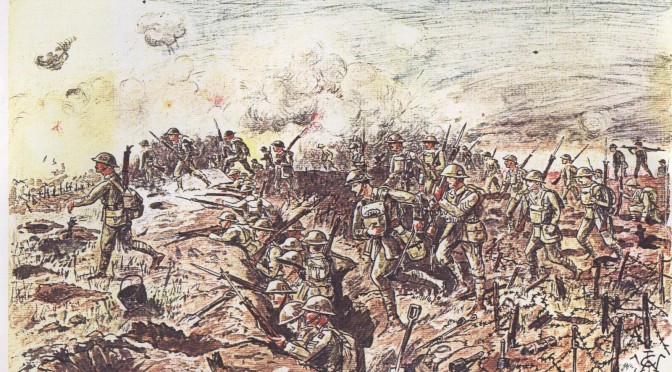
Innovation is a key factor in modern warfare. It is said, often unkindly, that every army prepares to fight the last war. Changes in technology will determine the characteristics of the next war, which will be different to the last. The side that can adapt and innovate fastest is likely to be at an advantage. The story of the 3.7 inch Heavy AA Gun is about the British Army responded to two sets of technical challenges. One is a great success story. The second a failure that has been a puzzle for 80 years.
Two big ideas emerged after the first world war that offered an opportunity to avoid the bloody stalemate of the First World War. The advocates of air power claimed that long range bombers could strike the enemy heartlands and industry avoiding the need for bloody land campaigns. Similarly tank enthusiasts argued that a highly mechanized army would cut through slow moving massed armies destroying their command control and logistics, again avoiding the massed slaughter of attrition warfare. Neither idea led to bloodless victory in the Second World War.
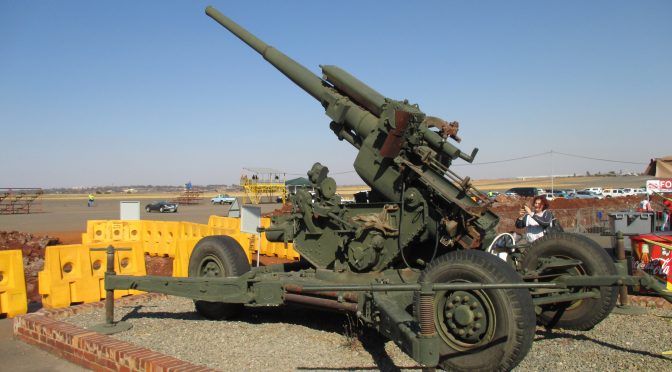
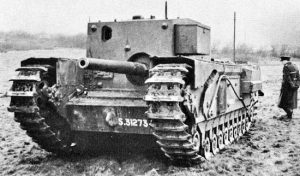
The British 3.7 inch (93 mm) Heavy AA Gun had a similar role and performance to the German 88 mm Flak 36 AA gun. However, while the German “88” was famous as an anti-tank gun and the armament for some of the most feared German tanks, the 3.7 inch AA gun was rarely used in that role. Given the reverses that the British army suffered against Rommel’s Panzers in North Africa, this, in retrospect was a mistake. There is much interest in how armies innovate. The story of how the British did not use their heavy AA Guns against Rommel in 1941-42 is a case study in innovation – how not to do it.
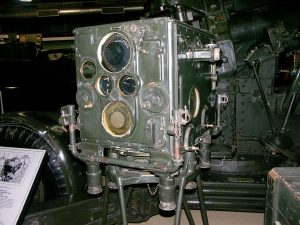
The AA Predictor No 1 Mark III – this mechanical computer provided azimuth and elevation date.
Aimee Fox Godden’s ‘Learning to Fight’ is a study of military innovation in the First World War. She referred to top down, bottom up, horizontal, incidental or external learning. She reviewed the formal and informal mechanisms that the army of 1914-1918 used to transfer learning. There is a language to explore organisational learning in warfare. There isn’t space in this piece to do justice to the topic, but the aim is to with the appetite and inspire someone with the time to carry out the research.
The 3.7 inch AA Gun as an Air Defence Weapon
Between 1915 and 1918 Britain had been the target for the first strategic bombing offensive in history. The modest capabilities of the aircraft of the first world war caused sufficient alarm and damage to force the deployment of hundreds of AA Guns and aircraft and was the catalyst for Britain to form the Royal Air Force the world’s first independent air forces to take charge of the air defence of Britain.
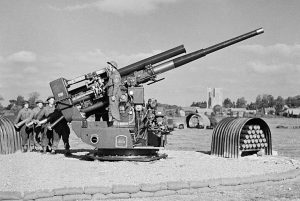
3.7 inch AA Gun in a static mount defending the UK against V1 flying bombs in October 1944. With radar fire control and fuses it took 156 rounds to down a V1 – 10,000 improvement from 1939
The air defences were swiftly cut back after 1919 as funding was reduced on an annually renewed assumption that would be no war for ten years. However, there were two developments in the 1920s. A joint RAF and Army committee examined the plans that might be needed in the event of a future threat to Britain. Anti-aircraft artillery text-book written in 1925 defined the theoretical requirements of an capabilities of air defence artillery.
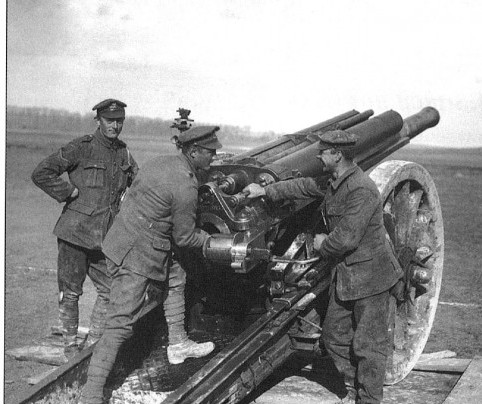
The 3.7 inch AA gun originated in a 1928 Royal Artillery Committee minute. By 1933 this had become a General Service Specification for a 3.7 inch gun weighing 8 tons capable of being put into action in 15 minutes and towed at 25 mph. The pilot model passed proof in 1936 and the first production guns were delivered in 1938. Production continued until 1945, with peak monthly production of 228 in March 1942.
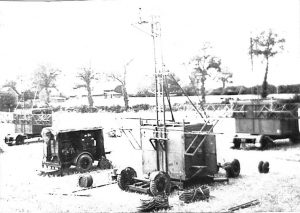
Gun Laying Radar Early Warning sets. This image, possibly taken from a Soviet Cold war recognition manual ,shows the Radar No 1 Mk II (Gun Laying II) used later as the early warning system for the radar No 3 Mk II GL MK III. The presence of highly classified radars is probably the reason why there are so few photographs of 3.7 inch Guns deployed in the field.
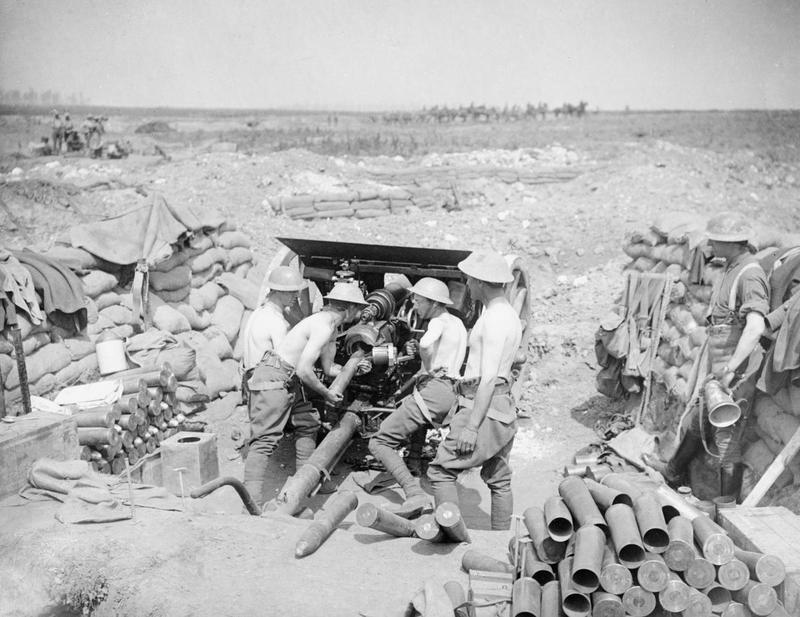
The gun was an advanced weapon for 1936, the gunners received information electronically and only needed to operate the gun controls to keep the gun pointers aligned. The 3.7 inch gun should be seen as part of a weapon system, including the ammunition, warning, detection and fire control technology. Progressive improvements in all of these greatly improved its effectiveness over the course of the war. In its original form the 3.7 inch gun fired a 28lb (12.7kg) HE shell fitted with a powder-burning Fuze Time No 199 to an effective ceiling of 23,500ft using Predictor No1 at a maximum 8 rounds per minute with manual fuse setting and loading. By the end of the war the Mk1-3 equipment firing the same shell with a proximity fuse and predictor No 11 and auto-loading had an effective ceiling of 32,000 and a rate of fire of 32 rounds per minute. In the 1940 blitz 18,500 rounds were fired for each aircraft shot down. By 1944-45 the guns averaged 156 rounds per V1 brought down, an over 100-fold, (10,000%) improvement.
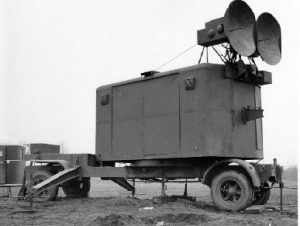
Radar No 3 Mk II GL MK II. This Centimetric radar provided accurate gun laying.
Initially targets were acquired visually, and the fire control computations made using a mechanical predictor developed in the late 1920s. The discovery of radar made it possible to consider new ways of engaging targets at night or through cloud. The first gun laying radar could only indicate a rough bearing and range, refinements enabled an indication of elevation. The invention of the cavity magnetron in 1940 at Birmingham University led to Canadian and British centimetric gun laying radar introduced at the end of 1942.At the same time fire control equipment was replaced with electromechanical predictors. The American SCR 583 radar arriving in 1943 offered outstanding performance, when used with the American Bell Telephone AAA computer. Another innovations included the Plan Position Indicating screen that showed the now familiar display with the rotating linear time base. American industry developed proximity fuses each containing a radar. These innovations enabled British HAA to play its part in defeating the world’s first strategic bombing campaign mounted by jet powered cruise missiles, the V1 Blitz.
Heavy AA Guns in the Anti-tank Role
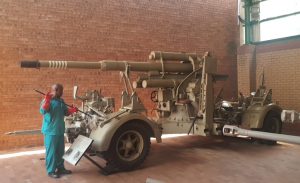
German Flak 36 8.8 cm dual purpose gun greatly feared by allied tank crews. This example is in the South African military museum Johannesburg and shows the height of the equipment.
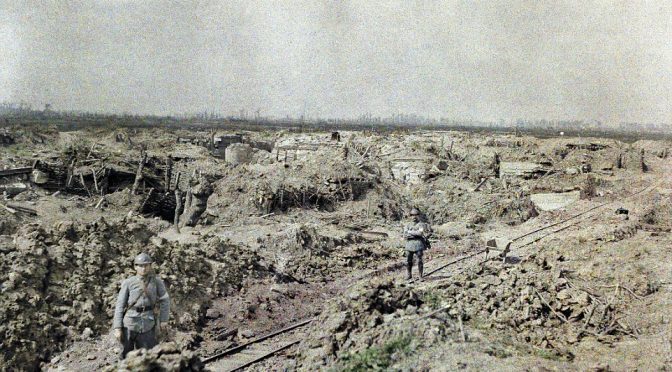
There is less credit in the British story of innovation in the face of the German armoured threat. Indeed the failure to use British Heavy AA in the anti-tank role is also a case study on innovation. Every combatant had heavy AA guns roughly comparable to the 3.7” gun, and by the end of WW2 almost all armed their tanks and anti-tank artillery with guns based on their Heavy AA Guns. The German 88, Tiger, Jagdpanther & Hornisse; the Russian 85 mm in the SU 85 & T34/85,and the US 90 mm in the M 36 tank destroyer and T26 Pershing tanks. Except for the British, who neither used their excellent 3.7” AA Gun, nor the 3 inch 20 cwt gun it replaced, as an anti-tank gun in North Africa.
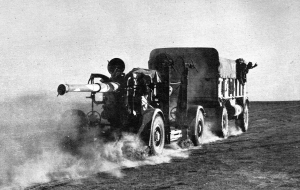
3.7 inch gun on the move in the Western Desert
Although, the British faced German armour in 1940, it was the battles in North Africa that tested the British Army against German tanks. Failure to defeat Rommel cost a succession of senior British Generals their jobs, including Aukinleck, Wavell, Cunningham, Ritchie and Corbett, and undermined the reputation of the British Army and confidence of its soldiers. Dunkirk revealed that the British army had far too few anti-tank weapons. A problem exacerbated by the loss of guns in the debacle of Dunkirk. Even by May 1942 the 8th Army in North Africa was over 100 anti -tank guns short of establishment.
This 3 inch 20 cwt AA Gun served with the South African forces in North Africa. Lacking modern fire control and with a limited ceiling it was obsolete as an AA gun by 1941. However, it was still a highly effective anti tank gun. 100 retired from AA Command were held by Home Forces in the event of a German invasion. They were not used in battle the Middle East.
German doctrine provided for AA Guns to supplement anti-tank guns. In the 1940 campaign one third of the ammunition for Luftwaffe heavy AA Guns was anti-tank shot. German tactic used tanks and anti-tank guns in conjunction. By summer 1942 more perceptive observers had noted that Germans possession of anti-tank guns that out ranged British tank guns goaded British armour to undertake costly charges to close the range. By El Alamein the Royal Armoured Corps was very wary of the presence of 88s.
There were some attempts to deploy the 3.7” Gun in the field, but only on a small scale and belatedly. Nor was there any systematic attempt to re-deploy a proportion of British heavy AA guns in the Middle East inot the desert.
By the end of the second world the 3.7 inch AA gun was used extensively in the ground role. This image shows the equipment in Australian service in Tarakan in 1945.
There was no technical reason why the 3.7 inch Gun and the 3 inch 20 cwt gun it replaced could not have been used as anti-tank guns. Besides the 3.7inch AA Gun, around 200 obsolete 3“(76mm) 20 cwt AA Guns were replaced by 3.7 inch HAA Guns. In 1940 in France at least once HAA engaged Germans tanks to great effect. In the UK HAA gun positions were laid out in order to engage an local ground attacks by parachutists and tanks. In the summer of 1941, General A F Brooke, Commander Home Forces made it his business to test the capabilities of Britain’s anti-tank weapons including HAA. By July at least one 3.7 inch HAA Regiment, 103, was tasked with a secondary anti-tank role, to tackle any German heavy tanks.
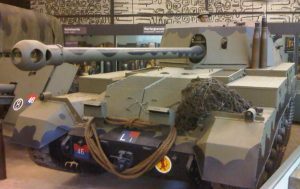
One of the fifty 3 inch 20 cwt guns mounted on Churchill tank chassis. A missed opportunity to deploy an effective tank destroyer by 1942.
Alanbrooke’s intervention also lead to a plan to assign fifty 3-inch 20 cwt AA guns to be mounted on towed carriages and fifty to be mounted on Churchill tank chassis. None of these activities led to an additional anti-tank weapons in North Africa by summer 1942. The Germans could do this. Major Becker, a German artillery officer with a background in engineering had developed a range of self-propelled guns based on captured British and French AFVs. These included 75mm anti-tank guns and 105mm self propelled howitzers sent to the Afrika Corps. It was not beyond the wit of man for the British to have mounted one of their HAA guns on an armoured chassis. But they did not do so.
What Might have Gone wrong?
The 17 Pounder Archer SP anti tank gun. It took until 1944 to deploy a British SP anti tank gun. It too mounted a 76mm gun on an infantry tank chassis, but with an open top and rear .facing gun there was no doubt that this was an artillery piece.
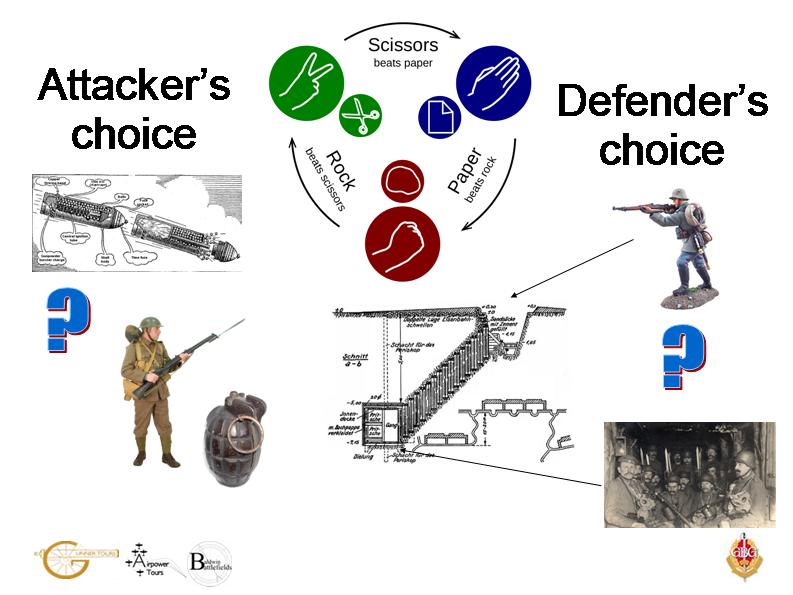
So what might have gone wrong? No one can ever be certain of cause and effect of historic events, and counter factuals are speculation. However, here are some of the factors that may have played a part in the failure to apply HAA as part of the solution to German tanks.
#1 Misunderstand the Problem.
No one at a senior level seemed to grasp the significance of German Heavy AA Guns, used first in North Africa in May and June 1941 to defeat heavy British tanks. After these battles the armoured division commander noted German tactics of luring British armour onto anti-tank guns and an artillery commander noted the Germans were using high velocity AA Guns. But the British did not put two and two together and copy these tactics. Instead, there were grumbles about the quality of British tanks, their armour and armament. Over the next year the British learned to fear the “88s”, as any and every German anti-tank gun was regarded. This wasn’t helped by the lack of common doctrine between the Royal Armoured Corps and the other arms.
#2 Ignore the Past.
Truck mounted 77mm anti aircraft guns formed the German army’s mobile anti tank reserve in the First World War. Two guns like this played engaged tanks at Cambrai in 1917.
The German Army was the first army to face massed tanks, in the First World War. They had experience of anti tan k warfare. One of their remedies was to employ any artillery in the anti-tank role. Mobile 75mm anti-aircraft guns mounted on trucks were the anti-tank reserve and rushed to the site of tank attacks. The 88mm Flak 36 used by the Wehrmacht was designed to be dual role. German army and Luftwaffe AA units were trained to operate in the ground and anti-tank role. One third of 88mm AA ammunition in 1940 was anti-tank shot. The British closed their minds to the possibility.
#3 Create Organisational Stovepipes.
During the first half of the Second World War the Royal Artillery was divided into Anti Aaircraft and Field Artillery. There was no transfer of officers between the branches. Transfer of ideas may also have been hampered by the cultural and social distinction between the field and AA branches. The AA Branches offered fewer routes to front line action for the bold and adventurous. AA Command was so far in the rear that the women of the ATS to serve in many roles. Besides professional status, there was a difference in social status between the officers of the Royal Horse Artillery, who supported the armoured divisions, and the lower status “fish and chip mob” of the Heavy AA..
#4 Set blinkered doctrine and procedures
British regulations saw no role for Heavy AA Guns in any field operation and provided no guidance for their use. Most AA Artillerymen were neither trained nor equipped to fight in the ground battle.
#5 Let Internal Politics Get in the Way.
The project to mount 3inch 20 cwt guns on a Churchill tank chassis failed to result in any AFVs in service. The official history of British Armour notes that this gun would have “proved a powerful and effective tank destroyer” but the Royal Armoured Corps and Royal Artillery could not agree who should operate the weapon. Fifty heavily armoured self-propelled guns might have made a big difference in mid-1942 in North Africa.
“1. The aerial bombardment and Naval Gun Fire failed to reduce the German fortifications and failed to neutralise enemy artillery and machine gun fire. 2. A German Infantry Division thought to have been in reserve around St Lo had moved up the beach defenses on a “maneuver” and added materially to the opposition. ….. things had not gone altogether as planned. Items 1 and 2 were chiefly responsible and particularly 1…..Those bluffs were captured and those exits opened solely through the plain undaunted heroism of the infantry the 1st and 29th Divisions and their attached engineer teams”[i]
This is an extract from the report by Colonel E G Paules the Engineer member of the War Department Observers Board after visiting Omaha Beach on D +6. Many would agree with Colonel Paules’ verdict, especially the heroism and initiative of the infantry and engineers. The same sentiments can be found in the official history. The failure of the aerial and naval bombardment to neutralise defences of Omaha Beach remains controversial. But a re-examination of critical data about D Day reveals a different interpretation of what happened on Omaha Beach on D Day.
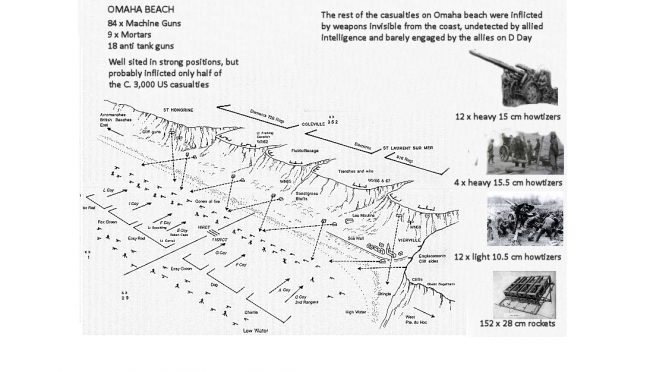
One problem in studying the story of Omaha Beach is that there is still only sketchy information about the true strength of the German defences at Omaha Beach. Some aspects are extremely well documented. The positions on the bluffs and beach have been documented in create detail over the years. We even know the names and faces of the individual German soldiers defending some positions. Much less is known or documented about the artillery support for the same defenders. Artillery was the dominant lethal arm in the twentieth century, responsible for well over half of all casualties. The US Official History made no attempt to locate artillery positions that were not on the coast or in the Op Neptune Target List. Even modern detailed studies such as Stephen Badsey and Tim Bean’s Battle Omaha Beach Zone Normandy[ii] and Peter Caddick Adams’ Sand and Steel[iii] are vague about the German guns.
TO WHAT EXTENT WAS THE D DAY AERIAL AND NAVAL GUN FIRE A FAILURE.
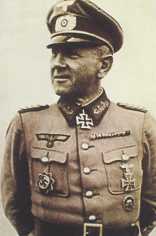
General Kraiss the commander of 352nd Infantry Division, killed in August 1944. . Much of the information we know about the German side of the battle is from the post war interrogation of his chief of Staff.
George A Harrison in the US Official History “Cross Channel Attack”[iv] described the beach drenching bombardment as “Generally ineffective”, against an enemy that was twice as numerous, unexpectedly strong and included soldiers from a different and higher quality formation than they had expected to face. Harrison mentions this faulty intelligence as a curious failing.[v]
The D Day naval bombardment plan worked – up to a point. The planners knew that the preliminary bombardment would not destroy all, or even the majority of, the German defences. Precision guided munitions had not been invented in 1944. There was nothing in the Allies armoury that could eliminate the hardened concrete bunkers and shelters which were the framework of the defences. The bombardment might destroy a proportion of the defenders weapons, as well as disrupting communications and keep the defenders heads down long enough for the assaulting infantry to close with them.
This was shared down the chain of command, and there are several accounts of briefings before D-Day with gloomy estimates of up to 80% losses by the assault troops.
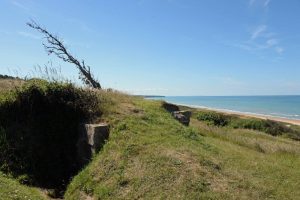
Omaha Beach from the artillery Observation post at WN62
The aerial bombardment by the heavy day bombers of the Eight Air Force was a key part of the bombardment plan. To make up for the short naval bombardment 327 B24four engine heavy day bombers were scheduled to drop 13,000 bombs on the Omaha Beach defences. However, one consequence of the decision to launch the operation in marginal weather conditions was that the heavy bombers would have to bomb blind through cloud. As a safety measure the point of aim adjusted 1000yards inland, with the hope that some bombs would fall on the defences, and the knowledge that most would not.[vi]
Harrison acknowledges that the preparatory navel bombardment did have some effect, including the detonations of minefields and destruction of enemy rockets.[vii] The testimony of one of the best-known German survivors, Franz Gockel described how the trigger mechanism for flame throwers were destroyed by the bombardment.[viii]
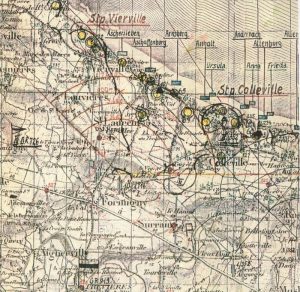
German tactical map captured by the US Army. The named blocks on the beaches were pre-registered artillery targets for which firing data had been at least partially calculated.
There is information that can help to understand more. Immediately after D Day British 21st Army Group Operations Research scientists carried out a series of studies to check the effectiveness of various allied tactics and technology- a sort of CSI Normandy. At the end of the war a study was made of the casualties and effects of fire Support on the British Beaches in Normandy, from which the authors deduced a model for casualties inflicted per weapons type using the concept of “machine gun equivalents” to compared mortars with machine guns . The study (AORG 261)drew the conclusion that the preliminary bombardment and drenching fire knocked out around 10-20% of weapons and reduced the effectiveness of machine guns by two thirds and mortars by three quarters. By comparing casualties from beaches on which no reports of mortar fire with this with a mix of machine guns and mortars they could build a best fit model, 17-19 casualties per machine gun equivalent across the three British beaches. For example, the 14 machine guns and seven mortars that could engage Sword beach should, under range conditions have resulted in 70% casualties among the assaulting infantry, but only inflicted around 22%. The German defensive fire was only one third as effective as it could have been, had no one been firing at them.[ix]
A follow up study comparing the British with Americans beaches (AORG 292 )drew the conclusion that the effects of machine gun fire had been reduced by about a half, which was less than on the British beaches because of the terrain and strength of the defences.[x] However, this analysis was flawed because it assumed that German artillery had been neutralised by the naval and aerial bombardment. We know this to be untrue from the testimony of American soldiers under bombardment and from the German records that the artillery under command 352nd Infantry Division had fired almost all of their first line stocks of ammunition.[xi]
One reason that the Omaha Beach story has missed the effects of German artillery is because the wartime fiction that the 352nd were at Omaha Beach on temporary maneuvers carried over into the post war narrative.
The Vth US Corps Plan was based on the assumptions that Omaha beach was defended by a single second rate infantry Regiment of the 716th Static division.[xii] Instead they faced soldiers under command of the 352nd Infantry Division, formed in late 1943 from around 2,0000 east front veterans and drafts of young recruits. In March 1944 Rommel, the German commander of the invasion front, had ordered the 352nd division to take over the Bayeux sector, between Asnelles and the river Vire. 352nd Division took command of the 726th (Static) Infantry Regiment and two of its three regiments of the 352 were superimposed over the existing defences, from the river Vire to Asnelles east of Arromanches.[xiii] War is a kind of democracy, the Germans had a say.
FAULTY ALLIED INTELLIGENCE
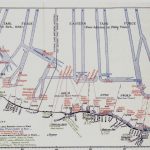
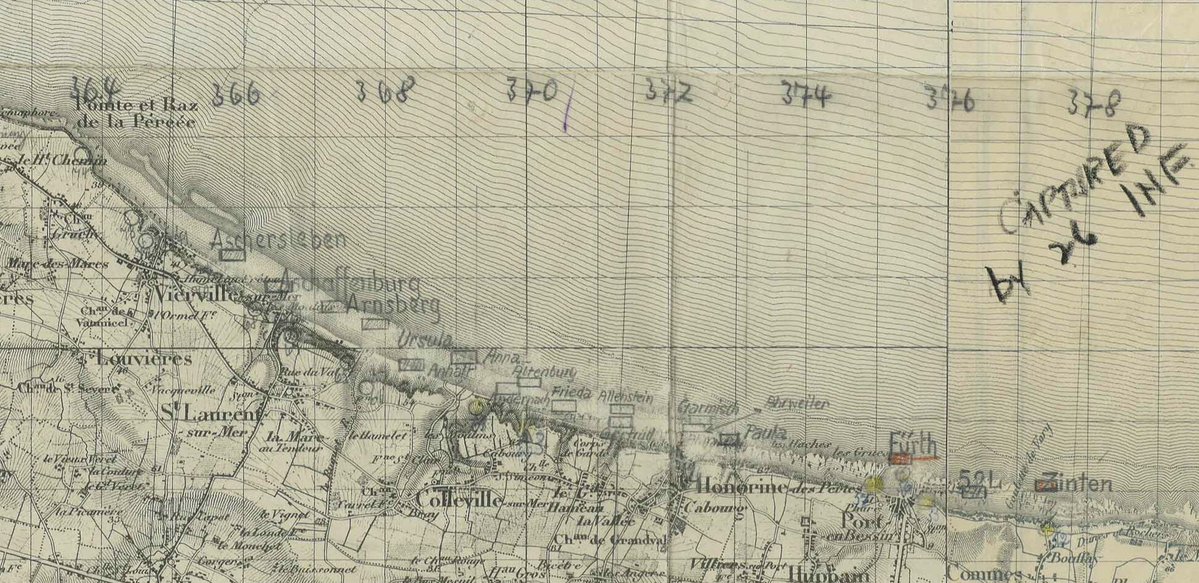
Allied plan showing faulty dispositions taken from 1945 “Omaha Beach”
Allied staffs were reluctant to admit that the intelligence picture was wrong. The highly detailed maps showing German defences and the awareness of senior commanders of Ultra intercepts gave a misleading impression of accuracy and reliability if not omniscience. However, allied intelligence was flawed. Ultra was of little help identifying details of gun pits and trenches or an enemy using line communications. It was easier to find concrete emplacements using a photo reconnaissance aircraft than camouflaged field positions. It was also hard to locate an enemy that they were not looking for. The target lists identified the positions of the 716th that they expected to find. They weren’t looking for the field positions occupied by the 352nd, and when they did find gun pits they assumed that they were for something else.
However, one explanation for disproportionate information about coastal defences is that the Germans made extensive use of French contractors to complete the fortifications on the coast, which also happened to be easily spotted by allied aircraft. The resistance may not have had the same access to the troops deploying into field positions inland, which were also much harder to spot from the air.
FIRE SUPPORT FOR THE GERMANS DEFENDING OMAHA BEACH
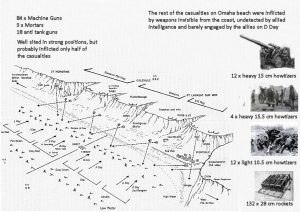
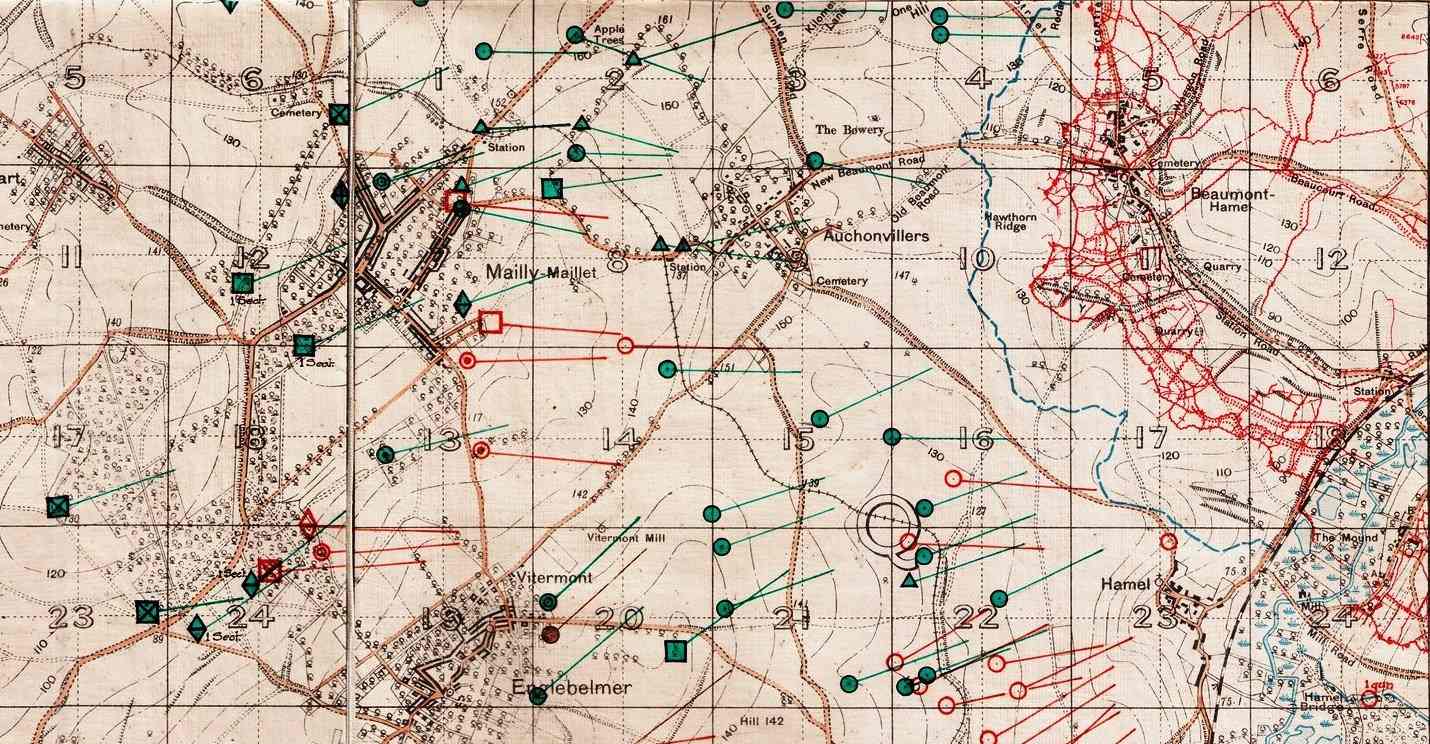
As regards Omaha beach itself, the defences were doubled, as an additional battalion deployed in the sector. The number of machine guns was doubled from some 40+ machine guns to 85. V Corps estimated that there were some 24-36 field guns “completely integrated into the strong points along fifty miles of coast,” Instead thirty-six 10.5 cm howitzers and sixteen 15cm howitzers were deployed a few miles behind the coast in range of Omaha Beach, in addition to the artillery integrated within the coastal strongpoints. There were seven batteries.
Three from 1st Battalion AR 352, (I/352) each equipped with four 10.5 cm German howitzers, marked as (1./352, 2./352 and 3./352)
Three from IVth Battlaion AR 352 each equipped with four 15cm German howitzers, marked as (7./352, 8./352 and 9./352)[xiv]
One from 10th Battery from Artillery Regiment 1716 (10./1716) equipped with four 15.5 cm (f) captured French howitzers.[xv]
Map
Map 1 This map drawn by ObserstLeutnant Ziegelmann in 1947 shows the artillery deployment in 352 divisional area. (Annex 16a to FMS 490)
1 shows the location of these batteries.[xvi] Map 2 is a German map which shows the detail of Omaha beach area and the ranges from 10./1716’s position. The map also shows the Omaha beach defences and three triangles marking the artillery observation posts on Omaha Beach. One for the 10./1716 and two from Artillery Regiment 352. The 352 Divisional signals log includes reports from observations posts from each of I and IV/352 indicating that they were observing Omaha Beach.
This map shows the positions of some of the batteries behind Omaha Beach. At he centre of the map is 10th Battery AR 1716. Its observation post is shown by the black triangle just above the number 67.
Each howitzer was about three times as lethal as an MG 42 machine gun. A machine gun firing an average of 250 rounds per minute created a beaten zone some 25 wide by 250 meters long. A howitzer shell flung thousands of supersonic shell fragments up to 250 metres. A battery of four howitzers could deny an area 50m x 200m. British world war two figures estimate that ten rounds per gun would inflict 20%+ casualties on troops in the open crossing that area. The fragments from howitzers could reach men hiding behind cover such as the shingle bank.
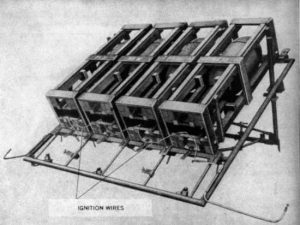
28/32cm Schwer wurfgeräte 41 Metal frame containing four heavy rockets
The Germans had a further nasty surprise for the assault troops. There were 38 pits each containing a wooden or steel frame, a 28/32cm Schwer wurfgeräte or heavy throwing equipment. Each frame held four unguided rockets, either 28cm containing 110 lb TNT high explosive or 32 cm incendiaries, containing 11 gallons of oil. These had a short range , just over 2,000 yards and were very inaccurate. A detachment of
84th Werfer Regiment are thought to have operated these at Omaha from position near the village of St Laurent.
The German 352nd Artillery Regiment fired almost all its first line ammunition on the morning of D Day. That is the best part of 225 rounds per 105cm Howitzer and 135 rounds per 15 cm Howitzer. 20 rounds per 105mm Howitzer would be enough to cause 20% casualties on a body of men caught under one of the 200m x 50m defensive barrages (according WW2 era calculations.) But each battery could fire ten such concentrations before ammunition became perilously low. By 10.00 ammunition was running low, in particular for the heavy battalion[xvii].[xviii] The Artillery Regiment commander ordered ammunition to be conserved for emergency use – three rounds per gun only to support units under immediate attack.[xix]
The 15.5cm 414 f was a French WW1 vintage howitzer. It fired a 43.61 kg (100 lb) HE shell to a range of 11.3 km (7 mi). Four of these equipped the heavy 10th battery of Artillery Regiment 1716 deployed near Formigny.
Although strongly sited on commanding ground overlooking the beaches, the Omaha Beach defences were far from perfect. Even on this most strongly held beach, the defences were spread far thinly than normal. Infantry and anti-tank guns were sited on a forward slope where they could be engaged from the sea. The fortification programme was incomplete. Only 15% of the fortifications in the 352nd Divisional area were bomb proof and 45% splinter-proof.. Many of the defenders were in field defences vulnerable to allied direct fire weapons on the beach or afloat. Furthermore, there was little depth.
Thirty eight pits like this containing wurfgerat 41 were dug in the St Laurent area behind Omaha Beach.
The big advantage the artilleryman of Artillery Regiment 352 had over the German infantrymen defending Omaha Beach was that they were not under fire. Return fire reduced weapon effectiveness by around two thirds. Over the course of D Day the number of assault troops would soon match and then outnumber the defenders and offshore naval firepower and tanks would eventually supress direct fire weapons targeting the beach. Previously hidden howitzers in the countryside up to five miles from the beach were not easy to find quickly on the morning of D Day. The gunners of Artillery Regiment 352 would not be under fire as they engaged in the industrial warfare of dispatching howitzer shells.
A REVISED MODEL OF WHAT HAPPENED
Reworking the British study referred to earlier, to include the seven batteries in range of Omaha Beach, with one howitzer equivalent to three machine guns results in a very similar figures to those modelled in the study of the British beaches.
I have assumed that all 28 howitzers fired on Omaha Beach. We know Pluskat’s I/352 were firing. IV/352 was short of ammunition by 10.00 and was not firing at Gold or Utah beaches which were out of range.
Despite the claims of total ineffectiveness, we don’t know how many of the German weapons were damaged by the aerial bombardment. Nor do we know how many of those weapons were fired. The study of the British beaches found that a proportion of weapons were serviceable but had not been fired. There is no reason to believe that the naval bombardment at Omaha was delivered less effectively than on other beaches. Nor that the soldiers on Omaha Beach were less resistant to panic or the confusion of battle.
Table 1 Percentage of casualties caused by different weapons on Omaha Beach
Proportion of weapons on beach destroyed or unmanned by preliminary bombardment
Numbers of weapons (1)
0%
10%
20%
30%
40%
Machine guns
85
45%
43%
40%
38%
35%
Mortars
6
9%
9%
9%
8%
7%
Wurfergerate 41(2)
152
2%
2%
1%
1%
1%
105mm (3)
12
19%
20%
21%
23%
24%
150cm (3)
16
25%
27%
28%
30%
33%
Total Artillery
28
46%
48%
51%
54%
58%
Casualties per MG Equivalent (4)
15.8
16.7
17.8
19.0
20.3
Notes
1. The number of machine guns and mortars are taken from AORG report 292. The number of artllery pieces is taken from Zetterling
2. The 152 Wurfergerate 41 is considered to be the equivalent of a mortar or artillery piece with 152 rounds of ammunition. The increased destructive power cancelled by inaccuracy.
3 Mortars and artillery calculated as three machine gun equivalents as per AORG 292
4. Total 3,000 casualties taken from AORG 292
The tables 1 models the distribution of casualties by weapon on D Day with assumptions of the effectiveness of the preliminary bombardment from having no effect at all, to 40% of weapons, the upper end of the AORG findings from British beaches.
There is still debate about the precise number of casualties on Omaha Beach. I have taken the figure of 3,000 from AORG 292. The leftmost figure for casualties per MG equivalent , assumes that the preliminary bombardment was totally ineffective, as is sometimes claimed. If this were so, it would mean that if all of the weapons on Omaha Beach survived the bombardment they would be on average less effective than comparable machine guns or mortars on Gold or Sword beach. It would seem more reasonable for the figure to be as high as the British beaches – which would assume that 10-20% of weapons were knocked out by the bombardment and 10-20% left unmanned – just as in the bombardments on the British beaches.
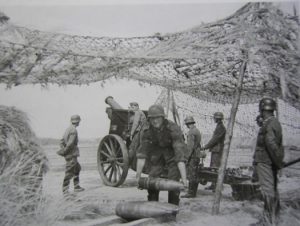
10.5 cm FH18 howitzer like these equipped the 1st Battalion of Artillery Regiment 352.. This fired a 14.81 kg (32.7 lb) (HE) to a range of 14.10,675 m (11,674 yd)
There is a rationale behind there being a similar average number of casualties inflicted by each machine gun. The allied forces on each beach landed with very similar forces, trained to a common standard using similar tactics supported by very similar forces off shore. Is it unreasonable that across all of the individual engagements on the four beaches the number of casualties that a machine gun might inflict before being suppressed is similar?
There are of course a lot of assumptions in a simplistic model. If you want to put in your own figures the model is here.
The key implication is that around half of the casualties on Omaha Beach were inflicted by artillery that had not been located before D Day; could not be engaged by the ships or armour landed on Omaha Beach. The casualties from artillery alone on Omaha Beach were probably higher than lost to all causes on any other beach.
Not as infamous as his brew-boy Hein Serveloh, Artillery Observer Bernard Ferking may have inflicted more casualties than the so called “Beast of Omaha”
The assault troops could do nothing about the rain of artillery shells until either the observation posts were captured or the Germans ran out of ammunition, which they did around lunchtime on 6th June. Allied air power did play a part, by interdicting German road movement inland.
HOW MUCH LOWER MIGHT CASUALTIES HAVE BEEN IF THE BOMBARDMENT WAS LONGER?
The bombardment on Omaha Beach lasted for a bare hour, an hour less than on the British beaches. The time of H Hour, the landings was determined by the tide, which reached low tide earlier at Omaha Beach. It has been argued that an additional hour of bombardment might have made a big difference to the number of casualties on Omaha Beach. Modelling the effect of increasing the level of damage by a further 10-20% shows a reduction in casualty numbers by perhaps 300-450, around 20% of the total historic casualties – but could have little effect on the undetected artillery.
WHAT IF THE NAVAL BOMBARDMENT HAD FOLLOWED THE PACIFIC WAR MODEL?
Some have argued that the Omaha Beach should have been prepared in the same way as the Japanese defences on the islands captured in 1944-45. A lengthy bombardment systematically demolishing the defences talking a week if necessary. This is similar to the tactics developed in the first world war and implemented at Vimy Ridge and Messines in 1917. While this would indeed demolish the beach defences, it would do little to neutralise the undiscovered artillery. Furthermore, it would give the Germans ample warning of the target area and allow them to concentrate their artillery, and deploy reserves in depth. This would risk an attritional battle on the beach itself reminiscent of Paschendaele. A mere doubling the number of defending batteries might be expected to cause an additional 1,500 casualties.
The 15 CM sFH 18 equipped the heavy IVth battalion of Artillery Regiment 352. It could fire its 43.52 kg (95.9 lb) (HE) shells to a range of 13,325 m (14,572 yd)
WHAT IF THE WEATHER HAD BEEN BETTER?
The fire plan was predicated on fine weather and good visibility. With good weather the Eighth Air Force bombers might have dropped more ordnance on Omaha Beach. On the British beaches many of the defences were further inland than at Omaha Beach.On the British beaches air attacks were considered to have knocked out 13% of defences. Had that been repeated on Omaha Beach that might have resulted in the destruction on nine machine guns and a mortar, which according to the model might have saved 193 casualties
WAS THERE A WAY TO FIND THE HIDDEN GUNS?
Locating enemy guns was a science and an art. The Allies had a range of scientific techniques for finding artillery, sound ranging wireless DF and flash spotting. Unfortunately none of these were of any use against artillery which had not previously disclosed its positions or indeed could be deployed on ships.
There was an art to finding hidden positions in aerial photographs, or for human agents to locate positions on the ground. About the only tool for locating artillery the allies had on D Day were aerial observers, artillery officers flying planes. The Senior British Artillery Officer in the Second British Army was Brigadier HJ (Hatchet Jack) Parham. He was acutely aware of the need for aerial observers on D Day. He did his best to argue for an aircraft carrier for Air OP aircraft and even the prototype Sikorsky helicopter to provide more eyes in the sky on D Day. This is perhaps the only route that might have led to the discovery and neutralization of the artillery that bombarded Omaha beach.
PARACHUTE ASSAULT
With hindsight, perhaps the best way to have prevented high casualties among the assaulting infantry on Omaha Beach might have been to land paratroops inland.[xx] This isn’t original Stephen Badsey made this point in 2004 The parachute drops on the Cotentin peninsular landed on and behind many of the artillery positions severely disrupted the German artillery which could have made Utah as fatal as Omaha beach.
TOO HIGH EXPECTATIONS
It is worth remembering that the assault on Omaha Beach was a success. The beachhead was secured and over 34,000 troops landed at a cost of around 8-10% of the assaulting force.
The balance sheet for failure in C20th battles looked somewhat different. On July 1st on the Somme the British VIII Corps lost 14,000 casualties in about 20 minutes from some 24,000 assault troops attacking a comparable frontage to Omaha Beach after the barrage lifted prematurely. No ground was gained.[xxi]
Even successful assaults on defended positions with heavy artillery support incurred high casualties. The set piece attack on the Hindenburg line 29 Sep-2 Oct 1918 cost the 27th Infantry Division 3,076 casualties[xxii] and the 30th Infantry Division 2,494 casualties[xxiii], mainly on the 29th. Between 18 and 22 July 1918, the Big Red One took part in the very successful Franco-American counter stroke on the River Aisne at a cost of 6,800 casualties over the five days.[xxiv] Three weeks before D Day the IInd Polish army corps lost 4,199 casualties in the final assault on Monte Cassino.
A little too much is made of the failure of plans to work as intended. War is inherently chaotic. There is an Anglo-American misguided belief that military commanders can impose their will on the elements and an un-cooperative enemy. Perhaps it is time to move on from hunting scapegoats for the high casualties at Omaha beach and appreciate the role of fortune elsewhere on the D Day beaches.
[i] War Department Observers Board Report No 23 report Observations on the Invasion of France and the Fall of Cherbourg. 25 July 1944
[ii] Badsey S and Bean T Omaha Beach: Battlezone Normandy (2004)
[viii] Liddle P, D Day by those who were there. (2004) pp125-130
[ix] WO 291/243 AORG report 261 Casualties and effects of Fire Support on the British Beaches in Normandy (1945)
[x] WO 291/270 AORG Report 292 Comparison of British and American areas in Normandy in terms of fire support and its effects. (1945)
[xi] FMS B432 352d Infantry Division (5 Dec 1943-6 Jun 1944). By Oberstleutnant Fritz Ziegelmann (1946). Organization and fighting on D day in Normandy.
[xii] HQ V Corps Operations Plan Neptune Annex 1 G2 Estimate of the Enemy Situation 1st April 1944
[xiv] Gliderung der 352 I D Stand 1.5.44 T312,R1566 F000216 quoted in Zetterling, N: Normandy 1944 German military Organisation, Combat Power and Organisational Effectiveness (2000) p278
[xv] Gliderung der 716 I D Stand 1.5.44 T312,R1566 F000215 quoted in Zetterling, ibid p298
[xvi] FMS B490 Map 16a. This is a revised version of Map 5 in FMS B432, which was drawn from memory. Drawn a year later it corrects the identity of the battalions and adds the 10ht battery of AR 1716.
[xvii] FMS B-388 352d Infantry Division (6 Jun 1944). By Oberstleutnant Fritz Ziegelmann; 36 pp; D Day in Normandy. Extracts from the operations officer’s telephone log.
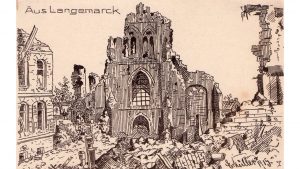
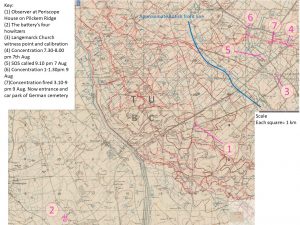
There is a small interpretation centre at the entrance to the German cemetery at Langemarck. One of the slides shows Langemarck church as a heap of rubble – with an doorway suggesting at some dug out complex in in the crypt. It’s a striking image to compare with the rebuilt church.
Sure, anything in the “strip of murdered nature” that was the battlefields of the Western Front was going to end up as rubble. But there are RGA War Diaries that record their target as “Langemarck Church” not a strong point in the church, or the village but the church itself. It was repeatedly targeted along with targets such as “trenches u.16.d.76.23- u 16 d.54.14 and “wire u 16 a.52,05 – u16 a.15.16” So why was the church such a popular target?
A week or so ago I was carrying out some research for a guided family history tour to the battlefields of where their relative Bombardier Griffiths had served in 324 Heavy battery RGA. The battery’s war diaries were available, but the diary for March 1918, the month he died , was missing. Furthermore, there was evidence that suggested that Bombardier Griffiths did not join 324 battery until january 1918.
However, the diaries were very legible and full, recording the details of each shoot, including rounds fired and the target.
6″ 26cwt Howitzers near Boesinge 1917
324 Heavy Battery was formed from 1916 conscripts and deployed to France in May 1917 equipped with four 6″ 26 cwt Howitzers. After a few weeks on the quiet sector of Bois Grenier the battery moved to Woesten, north of Ieper on 14th July 1917. From there it took part in the preliminary bombardment for the 31 St July , then stepping forwards to Elverdinge. The first day of 3rd Ypres 31st July, was successful on Pilckem Ridge, with the British line moving forward roughly along the Steenbeek south west of Langemarck.
A first world war artillery piece aimed at a target some 6km away was probably going to miss with its first round, even if the target had been plotted on a surveyed trench map. The position of the guns and the direction in which they are recorded as pointing may not be particularly accurate. Changes in the wind speed and direction will change the trajectory. An observer with communications to the guns could adjust the fire of the guns until the rounds from the guns were landing in the target area. Of course, by this the enemy will have worked out what was going to happen next and take cover.
A further problem was that the guns in a battery would not all have the same characteristics. Guns may be manufactured to different standards and might have different wear in the barrel. The WD entry for 5th August records that between 2pm and 2.30 pm 324 battery fired 30 rounds unobserved at Langemarck Church as ordered in Operation Order No 23. After this, someone,at Periscope House, probably Major William Orpen Sikottowe Sanders, the battery commander decided to calibrate the guns using the church. Firing ten rounds and watching one hit the church with others plus and minus, the unit could apply a correction for each gun. (Though ten rounds might be few to base a statistically reliable.
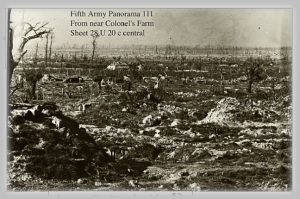
Part of a panorama. It is hard to pick out any landmarks on this devastated battlefield. Corrections from a Witness Point using a trench map might be the only way to hit targets.
It wasn’t always possible to see targets clearly. Pilckem ridge isn’t much higher than the surrounding ground and it would have been quite difficult to pick out specific targets from the ground. Furthermore, the landscape was devastated, with buildings and trees leveled and landmarks obliterated.
One technique which could help is to use a “Witness Point” This was a point some distance from a target, but accurately located in relation to it, which could be ranged without losing surprise against the target and the correction applied to data for the target. If the correction to hit the church was “left a bit and add a bit”, the same correction could ensure that targets in the same area picked off a map could be hit first time.
The entry for 7th August shows that between 3.30 and 6.30pm 324 battery fired a total of 24rounds at Langemarck Church as a Witness Point. Their next shoot 7.30pm to 8.30 an unobserved concentration on trenches straddling the Langemarck-Poelcapelle road was unobserved, but could be expected to be reasonably accurate, as might the shoot at 9pm. a response to a call for the SOS.
The targets on the 8th August were east and west of the German positions which ran through the north end of the German Cemetery at Langemarck, as evidenced by the three bunkers.
The search for the part an individual soldier played turns up some surprising detail about how the battle was fought and the reason why Langemarck Church was shelled. It also explain the rationale that supports the old military axiom to never deploy at an obvious terrain feature. Landmarks are shelled because they are landmarks .
French Map showing the phases of the battle.General François Paul Anthoine commander of the First French Army. “It is a question of national hon our. We have to keep our word we gave to the British”
One army has been almost completely absent from any mention in the commemorations of this weekend’s centenary of the start of the 3rd Battle of Ypres. This army is the French 1st Army which also took part in the battle. Although the operation was led by the British, it was an allied operation With 135,000 men and over 1000 guns the French Army that took part was larger than the Australian, Canadian or New Zealander contingents that fought. Yet their role and sacrifices have been ignored.
The French First Army’s deployment on the British left was a commitment to the alliance, despite the strikes and mutinies afflicting their army after the failure of the Nivelle offensive April 1917. Their tactics were designed around using artillery fire to destroy and neutralise defences and seizing limited objectives to minimise infantry casualties. The tactics used on 31st July were the first use of those methods that Petain would use to rebuild the confidence of the French Army.
French artillery positions and artillery supply routes. 21 July 1917French engineers building a footbridge – probably across the Yser canallFrench troops visiting positions captured on 31 July.Canadian troops visiting a super heavy French gun October 1917
The two divisions of the 1st Army attacked on a 4 km frontage. Particular attention was paid to artillery support. The artillery included 60 batteries of 75mm guns, 240 pieces, 277 pieces of trench artillery – mortars, 164 heavy howitzers, 148 long ranged guns (105- 240mm) for counter battery fire and 64 heavy guns (305mm,320mm and 370mm) to smash concrete bunkers. This artillery train was supported by aircraft detachments for heavy artillery and counter battery fire, bomber, and reconnaissance squadrons and the elite Cigognes fighter squadron.
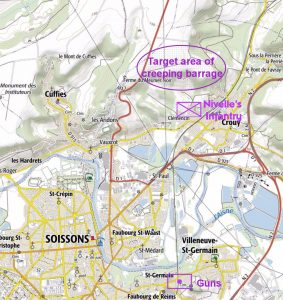
The French were faced with the problem of assaulting across the Yser canal against defences based on concrete bunkers. The French thought the concrete bunkers were less of a tactical challenge than the deep shelters capable of protecting entire platoons the Germans dug is drier country. The assaulting troops were preceded by a creeping barrage of shrapnel 150m ahead of the infantry.
On the 31st July the French First Army was tasked with protecting the Northern flanks of the British 5th Army. They succeeded in this mission, advancing 2500 metres, almost as far as the Guards division to their right. The French took part in several attacks in concert with the British , until the end of October.
The French had advanced some 10 km, capturing 1,500 prisoners. Their casualties were low, 1,625 killed or missing and 6901 wounded or taken prisoner. These are very light compared to those suffered by British formations, and raise some questions about British tactics.
The French army of Flanders was deployed to support the British led operation “as a matter of honour.” It is a shame that their gesture has not be remembered a century later.
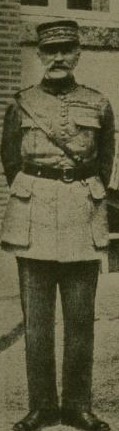
Robert Nivelle had a spectacular career trajectory. A meteoric rise from commanding an artillery Regiment in 1914 to command an Army at Verdun was followed by his appointment in late 1916 to command the French armies of the North and North East, over the heads of many more senior commanders. He fall was equally spectacular as his offensive in April 1917 failed to achieve the predicted gains, but instead cost 200,000 casualties. The story of the battle itself is here .
Nivelle was a man for whom the Peter Principle, that “Managers rise to the level of their incompetence,” might have been created. Historians and soldiers find much to criticise in Nivelle’s performance as de facto Allied supreme commander on the western front. But there is also much to admire about his performance that brought him to notice.
For a start, Nivelle was an outstanding field commander. He had already distinguished himself during the August battles. On the Marne on 6th September 1914 part of the 63e division de réserve broke and fled while attacking towards the village of Vincy . Nivelle’s 5e régiment d’artillerie de campagne was outside Puiseux close by, on a ridge behind the retreating troops. Nivelle saved the day. Rather than fall back, he took half his regiment and galloped forwards, through the retreating troops and unlimbered his guns among the French skirmish line. Their rapid fire stopped the Germans. This action alone made Nivelle a bit special as a horse gunner. Many actions of this era involving manoeuvre by horse drawn artillery ended badly for the gunners. Nivelle got away with something that ended badly for Colonel Long at Colenso and managed to avoid the fate of the British gunners at Le Cateau and Nery.
Promoted to command an infantry brigade, he did well in an otherwise failed attack north of Soissons above Crouy. His brigade, closely supported by artillery managed to reach the sites. Promotion to command the 61st Division Nivelle mounted a model operation in June 1915, the battle of Quennevieres. This introduced the form of the operations mounted at Verdun at the end of 1916 and of the Aisne in April 1917. This was based on a sudden and violent attack, supported by overwhelming artillery, followed by a lateral and forward exploitation. A rising star, he was promoted to command the 3 Army Corps in December 1915. Nivelle followed Petain to Verdun as part of his Second Army, and took over the tactical command at Verdun from Petain. It was Nivelle, not Petain who adopted the phrase “They shall not pass.” Nivelle’s aggression, optimism and tactical skill won praise. The recapture of Forts Vaux and Douamont in 1916 made him a national hero.
Nivelle was an innovative artilleryman. It is probably that the fire support he arranged for his brigade’s attack on 15th January 1915 was the first use of the barrage roulant – the creeping barrage. (1) He encouraged the scientist Hoffman to develop sound ranging. Australian Laurence Bragg would further improve on these for the technology use by the British. He also supported the development of the tank, which in France took the form of self-propelled artillery.
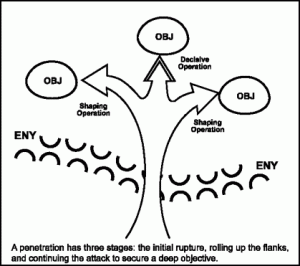
This diagram which can be used to illustrates Nivelle’s concept of exploitation to the flanks and in depth is taken from US Army FM3.0 Operations (2001)
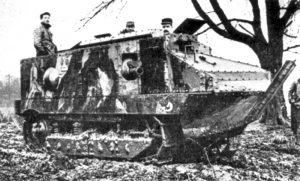
Good Idea – pity about the means. The idea of a narrow front attack spearheaded by a phalanx was a good one. The untried and flawed Schneider tanks penetrated further into the German lines at Berry-au-Bac than the British at Flers on the Somme
Nivelle’s tactical methods had many similarities with the practises that emerged in other armies, combining artillery fire with infantry movement. However, he was an exponent of the operational idea of the breakthrough battle with the aim of the destruction of the enemy army. His emphasis on lateral and forward exploitation has something in common with Liddle Hart’s influential “Expanding Torrent” ideas, and the tactics used by the Germans in 1918, and 1940. What else is lateral exploitation other than “Aufrollen?” Under his command the French introduced more weapons at platoon level, including light machine guns and a light cannon – which might also serve as a anti-tank gun. This is along similar lines to the German all as assault groups that penetrated allied positions in 1918. His ideas were consistent with the pre-war doctrine based on offensive spirit. These contrasted with the pessimistic views of Petain who advocated a long game based on firepowers. Petain’s catch phrase was,” we will get them in the end.” While Petain’s emphasis on doing what was possible was proven right by events, at the time there were many who thought that the Allies could not win by remaining purely in the defensive. Even if correct for France of 1917, it flew in the face of the principles of war. Nor was, “waiting for the Americans” a strategy palatable to the politicians, the media or a patriot public.
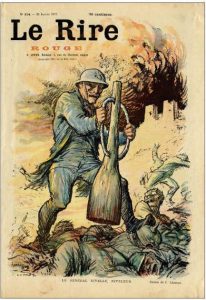
Magazine Cover January 1917. The French word Niveller means “to level”
After Nivelle’s dismissal his ideas became discredited and Petain’s methodical, “bite and hold” battle for limited objectives became the basis for French tactics for the remainder of the First World War, and their thinking after that conflict and leading to 1940. These is part of a pattern of French defeat. The pre -1914 doctrine based on offensive spirit and élan was finally discredited on the Chemin des Dames in 1917. Petain’s cautious techniques led to an army ill prepared for the German Blitzkrieg.
France might have been much better served if they had not thrown out the baby, of Nivelle’s ideas with the bath-water of his strategic command. Nivelle’s ideas were on the on the right lines for the mechanised age. A French army that tempered an appreciation of firepower with an offensive orientation might have put up a better fight in 1940.
Anyone interested in visiting these battlefields, or a talk on about them contact the OP at frank@frankbaldwin.co.uk
Gunnertours is organising a battlefield tour to the Western Front in November. Details here
Notes
1 Rolland Denis Nivelle: L’Inconnu du Chemin des Dames Imago (2012)
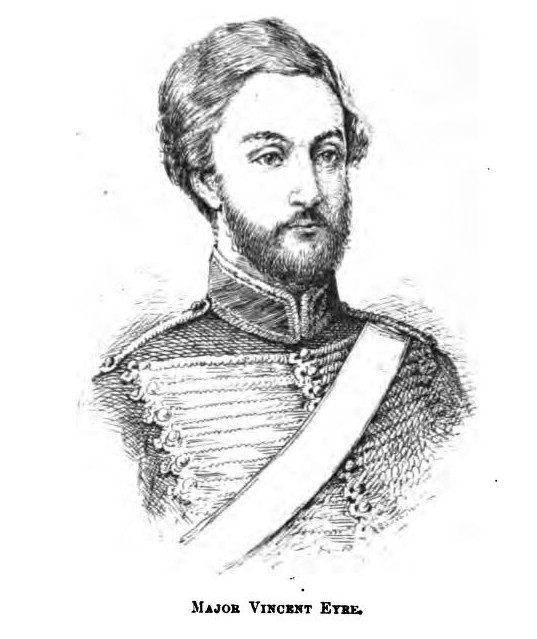
When war broke out between France and the German states in August 1870 , the 59 year old retired Major General Sir Vincent Eyre KCSI, CB happened to be in France. This was the first war to take place in North West Europe since Waterloo over half a century earlier. Since Waterloo much had changed. Telegraphs and newspapers brought home to the public the suffering of the wounded. Florence Nightingale had revolutionised nursing. The Geneva Convention of 1864 had provided for the neutrality of the medical personnel of armed forces, the humane treatment of the wounded, the neutrality of civilians who voluntarily assisted them and the Red Cross Society.
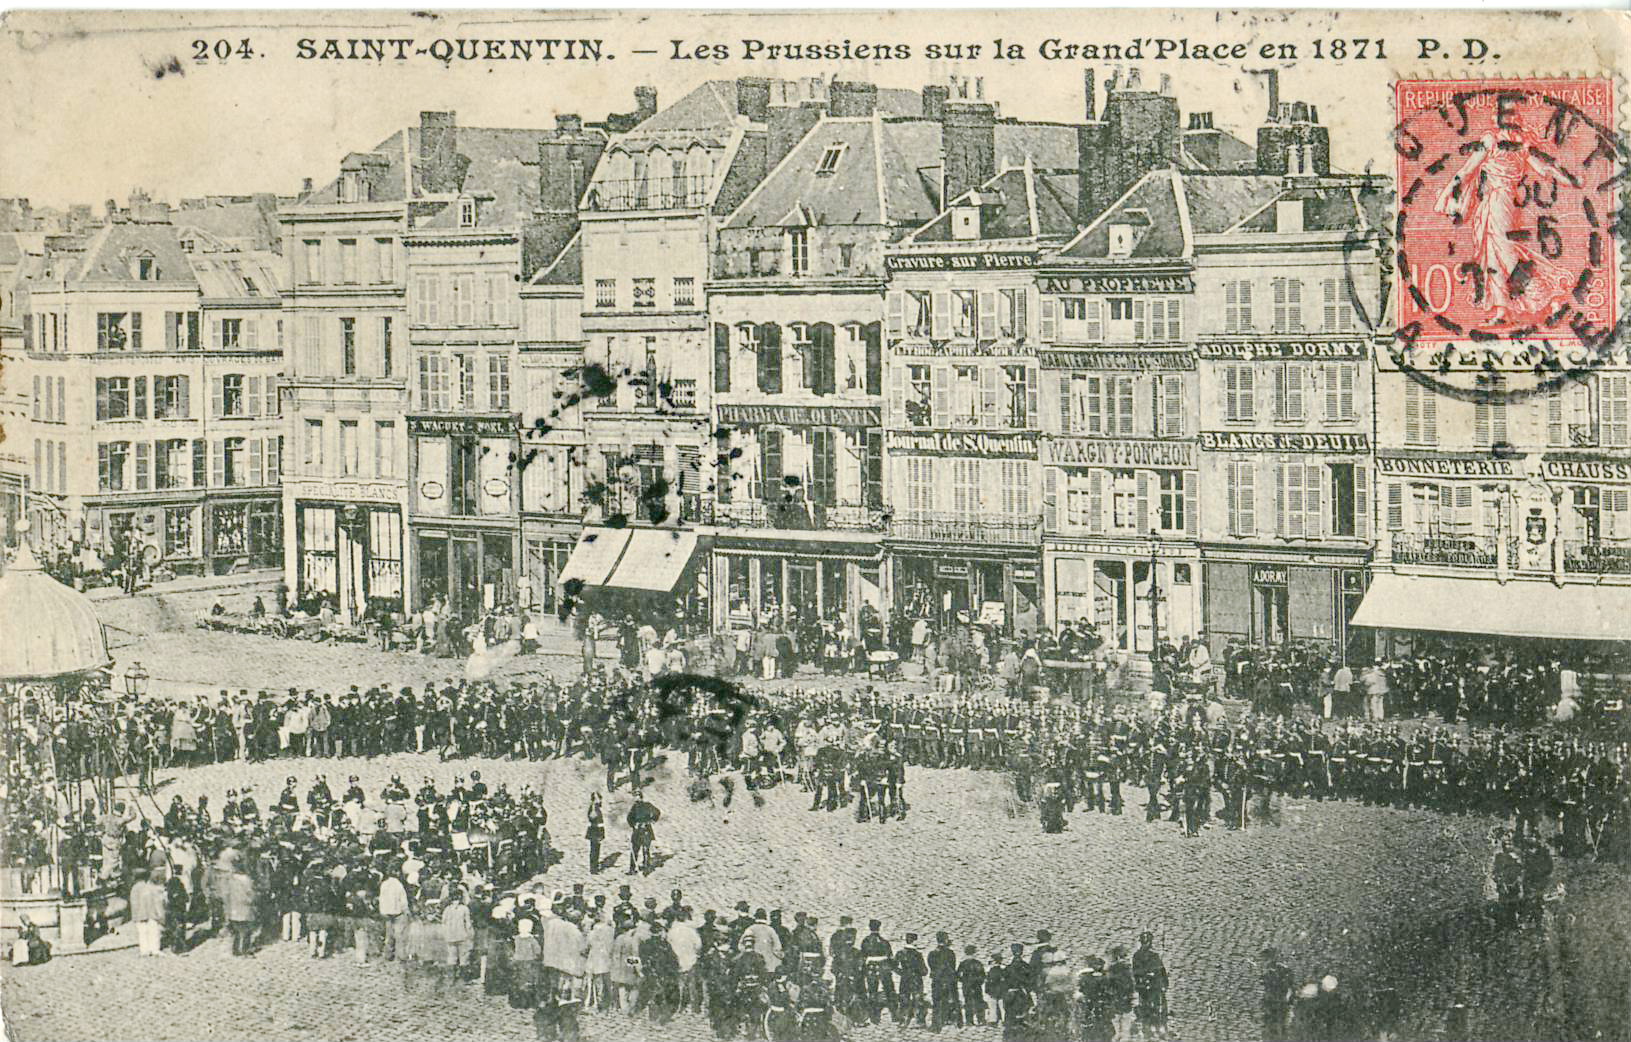
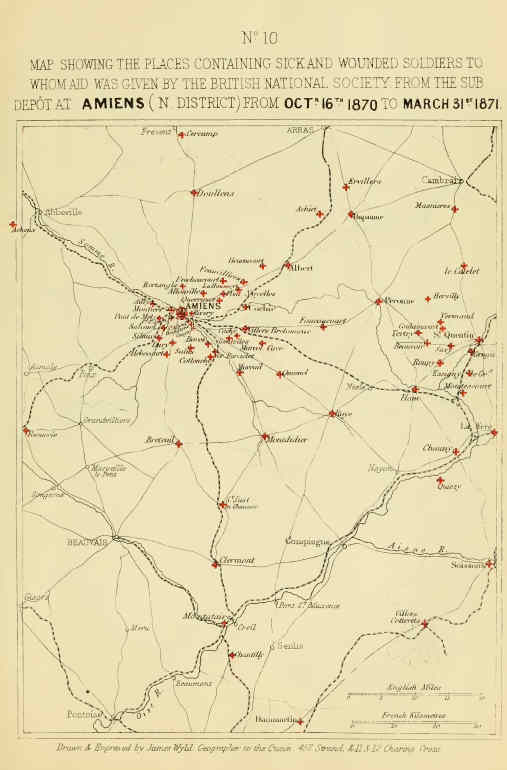
Saint-Quentin under German Occupation 1871Locations of casualties treated by the British National Society forward base at Amiens covering the battlefields of Picardy 1870-71
Sir Vincent Eyre and Lady Eyre, in the name of the English Red Cross Society formed a committee in Bolougne and raised a British volunteer ambulance service. It provided hospitals, field ambulances medical staff and vehicles to collect and treat the wounded on battlefields across Northern France including many places familiar to the soldiers of the Great War such as Amiens Villers-Brettonoux, Bapaume, Peronne and St Quentin, the Somme battlefields of 1870-1871. These were led by British military officer and nurses trained by Florence Nightingale. The British brought their Indian experience and some staff including the Pharsee wife of the surgeon at St Quentin. including some By their medical services were treating 15,000- 20,000 patients a month.(1) Eyre’s report is in The report on the operations of the British National Society for air to the Sick and Wounded in War.
The battle of Bapaume 1870 was one of the few french victories of the war. There is a monument to this battle on the Bapaume Arras road.
Vincent Eyre was born in 1811, in then Napoleonic era, four years before Waterloo. The son of a captain and educated at Norwich Grammar School. Eyre entered the Military Academy at Addiscombe when about fifteen, and passed out into the artillery of the company on 12 Dec. 1828. He was gazetted to the Bengal establishment, and landed in Calcutta 21 May 1829. After eight years he was promoted to be first lieutenant, and appointed to the horse artillery of the Company.
The Remnants of an Army 1879 Elizabeth Butler (Lady Butler) 1846-1933 Presented by Sir Henry Tate 1897 http://www.tate.org.uk/art/work/N01553 A few other stragglers and the hostages survived, but 16,500 soldiers and civilians died durign the retreat from Kabul
In 1839 Eyre was appointed commissary of ordnance to the Kabul field force and present during the 1841 rising. Eyre was in command of two guns sent out with a sally from Kabul and severely wounded. During the retreat from Kabul Eyre, still suffering from his wound, and his wife and child were surrendered as hostages. They were lucky. The dozen or so hostages were the only survivors out of some 4,500 soldiers and 12,000 civilians in retreat the column that withdrew from Kabul, and freed from being sold as slaves to the Uzbeks by a dramatic rescue.
Fifteen years later, in July 1857 Major Eyre was moving his company of the Bengal Artillery from Calcutta up into Oudh. Being the wet season of the year, when the river level was high, the gunners and their guns were usually conveyed up the river Ganges by river steamer, while the drivers and horses marched by road. While en route, Eyre heard that three Native Infantry regiments had mutinied and had attacked and besieged the civilian population at the small town of Arrah. (Now Ara)
The relief of Arrah by Modern artist David Rowlands. http://www.davidrowlands.co.uk/gallery/gal_detail.asp?varPaintCode=096
Eyre disembarked his men and guns, collected a party of HM’s 5th Fusiliers and set off for Arrah. His own horses not having arrived, he commandeered local bullocks to draw his two 9-pounder guns and one 24-pounder howitzer. His ammunition was carried in country carts. After a march of over 40 miles, he encountered an enemy force of more than 10,000 trained soldiers barring his way at Bibigunge. On the morning of 2nd August he immediately led his small body of around 225 troops into the attack, carefully supported by the fire of his guns. Two attempts by the mutineers to rush the guns were broken with salvoes of case shot. After an hour’s fighting, the skirmishers of the 5th Fusiliers turned the enemy’s right flank. The gunners poured case and shrapnel into their front, and a bayonet charge by the Fusiliers won the day. This battle raised the siege of Arrah. Eyre’s exploits were recognised by the award of the battery honour title of 58th (Eyres) Battery Royal Artillery.
Fyre played a distinguished part in the relief of Lucknow and quelling the Indian Mutiny. After the rebellion he was promoted to Colonel and retired in ill health as a Major General in 1863. His first wife died in 1851 and in 1860 he married his cousin.
Lithograph of Mrs Eyre, based on a sketch drawn by Vincent Eyre of his wife Emily while they were held captive in Afghanistan. Emily died in 1851.
Eyre was a talented artist. Whilst in captivity he made sketches of the captives which were smuggled out of Afghanistan and published. You can see some of the images here.
The 1870-71 Campaign in Picardy was the Sir Vincent Eyre’s last campaign. In 18180 he contracted a spinal disease and died the following year in Southern France. On 2nd August every year 58 (Eyres) Battery Royal Artillery remember Eyre and commemorate the relief of Arrah on their battery day. http://www.theraa.co.uk/history/battery-days
If you want to visit the sites of the 1870-71 battles or associated with the Royal Artillery contact Gunner Tours
Notes
1. RUSI Journal: Lecture by Surgeon Major F J Mouet, A visit to the Battlefields and Ambulances of Northern France Friday 21st April 1871
Everyone has heard of the first day of the Somme, famously the day on which the British Army suffered its highest casualties on a single day. Fourteen days later the British Army made its next big push. Demonstrating that occasionally lessons are learned and learned quickly, the plan was a bit different from on the 1st of July.
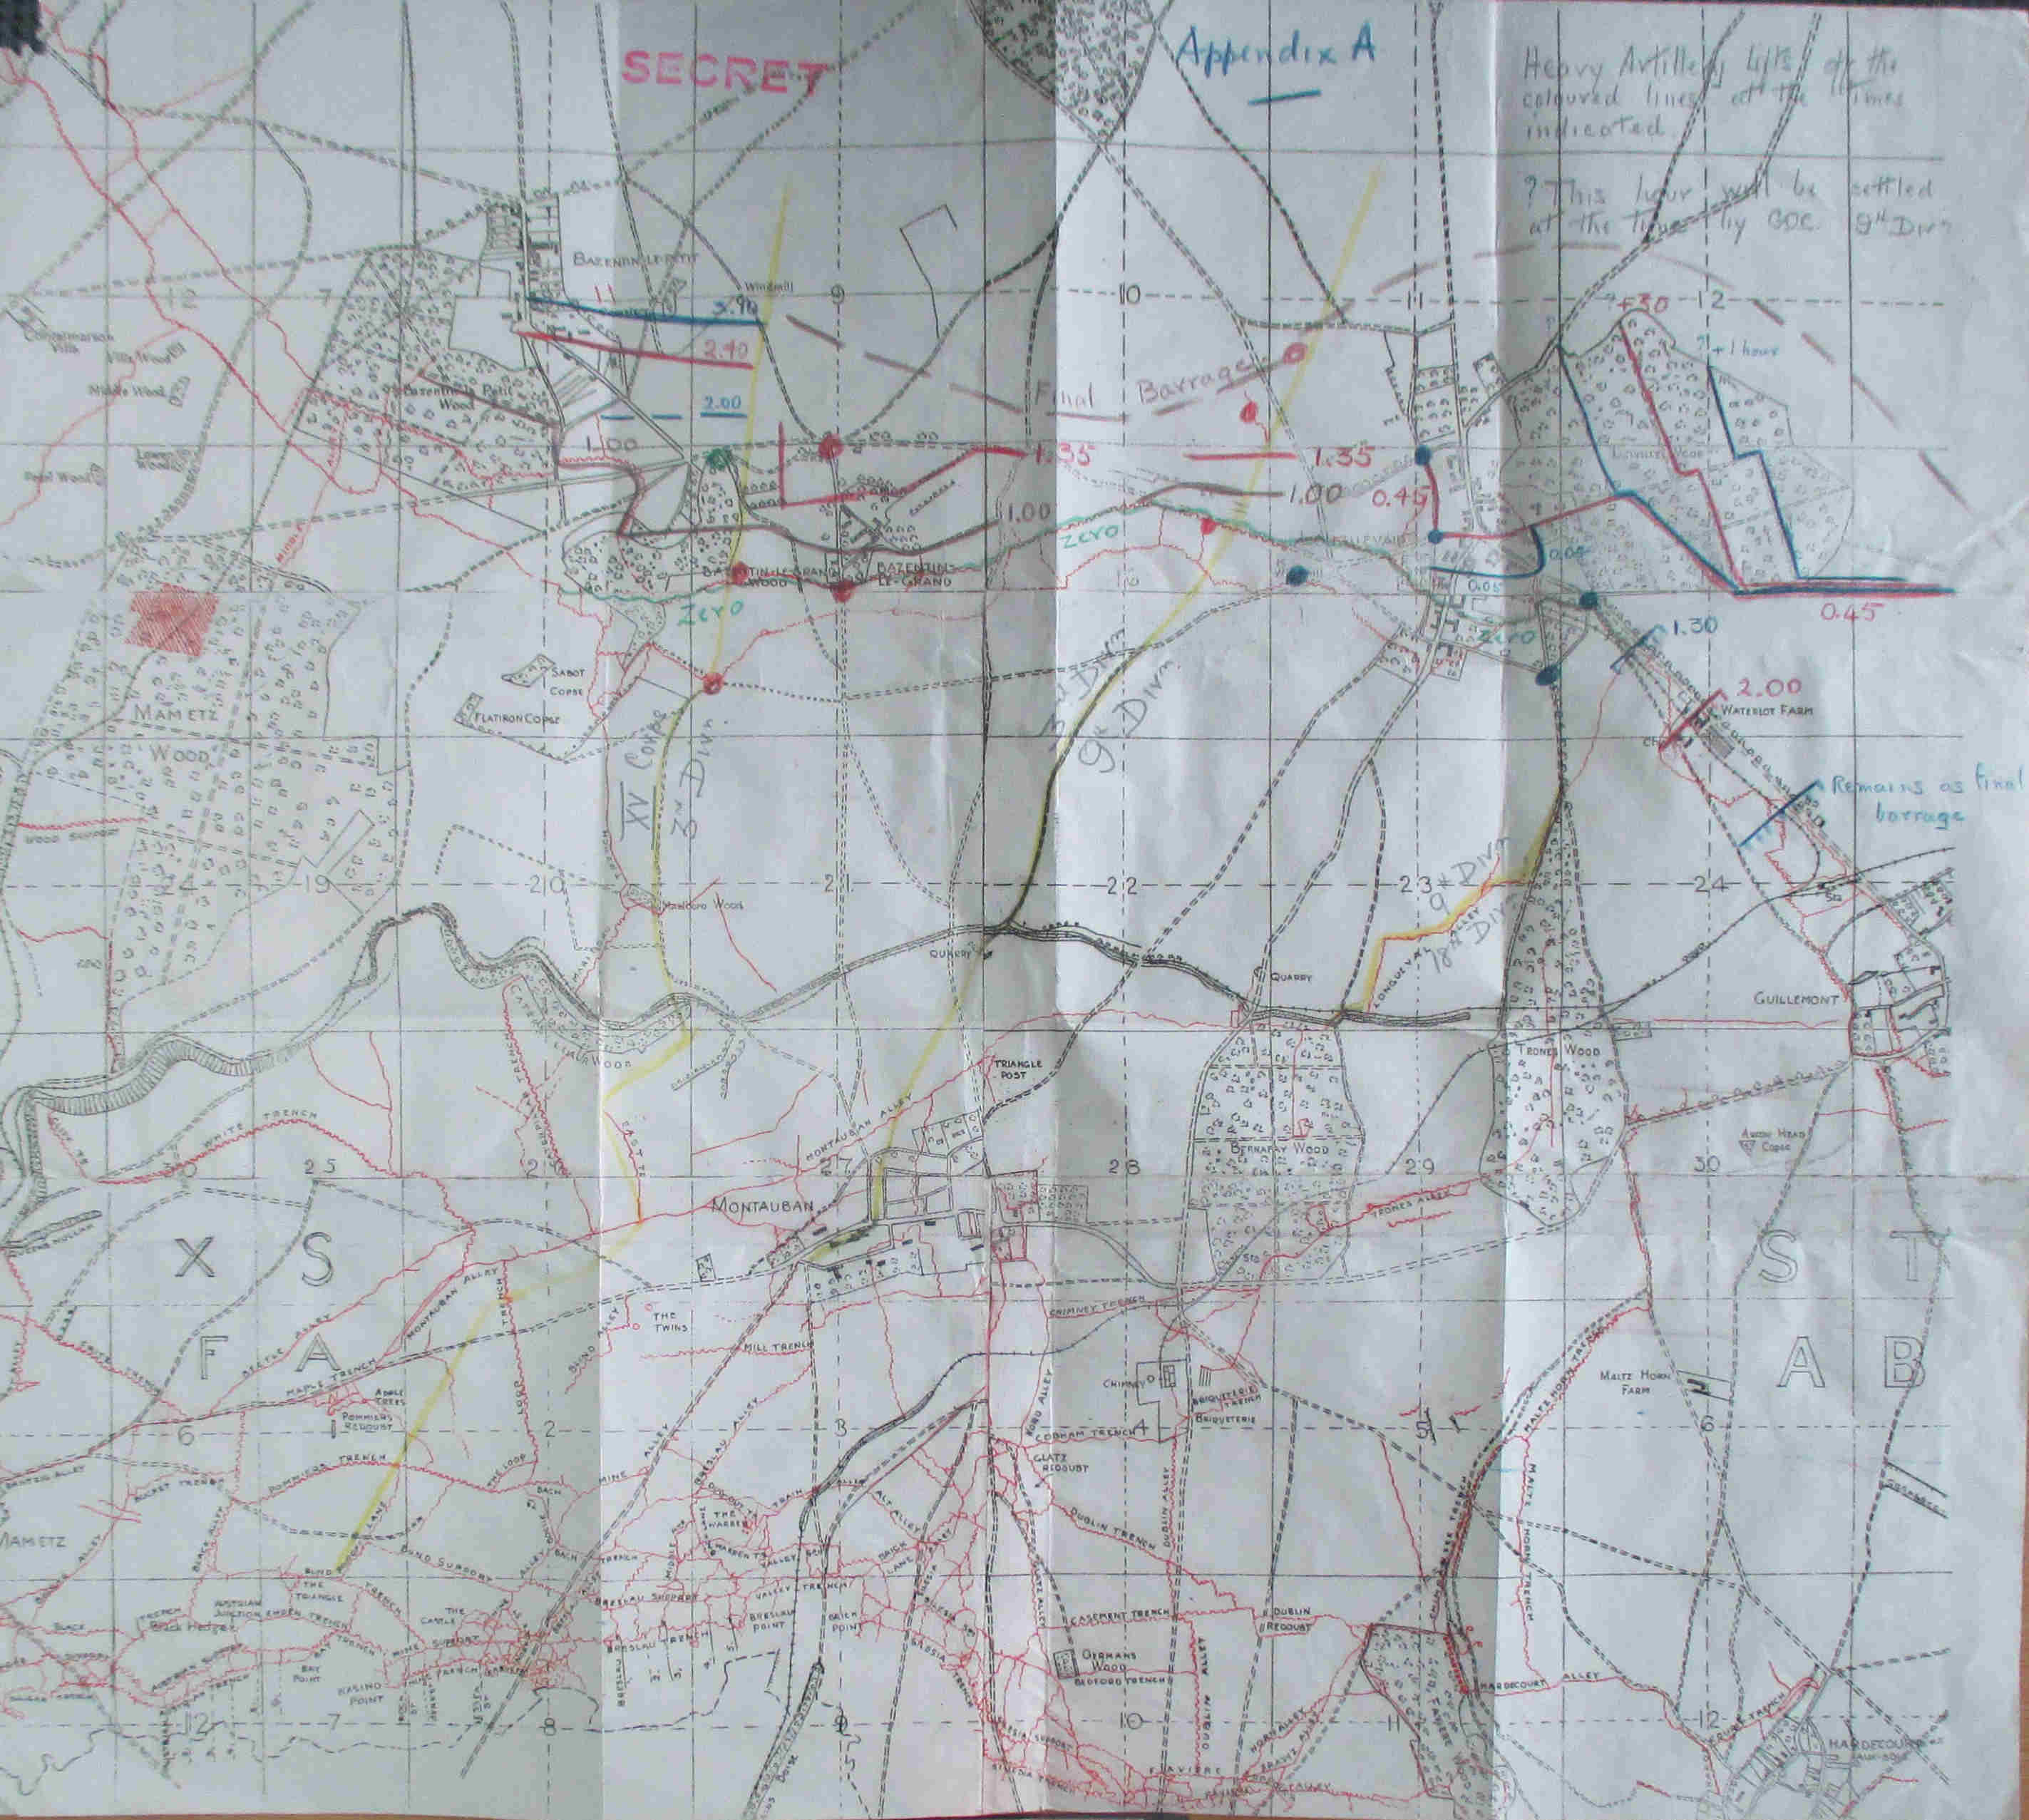
There wasn’t quite as many guns or ammunition as there was on the first day, but all of it was concentrated ion the German defences along Bazentin ridge and the German guns behind it. One the 1st of July there was one gun to every 20 yards of front – spread over two defensive lines and the preparation lasted for a week, firing 1.5 million shells . On the 14th there was one gun for every 6 yards and the preparation lasted for 48 hours, firing just under half a million rounds.
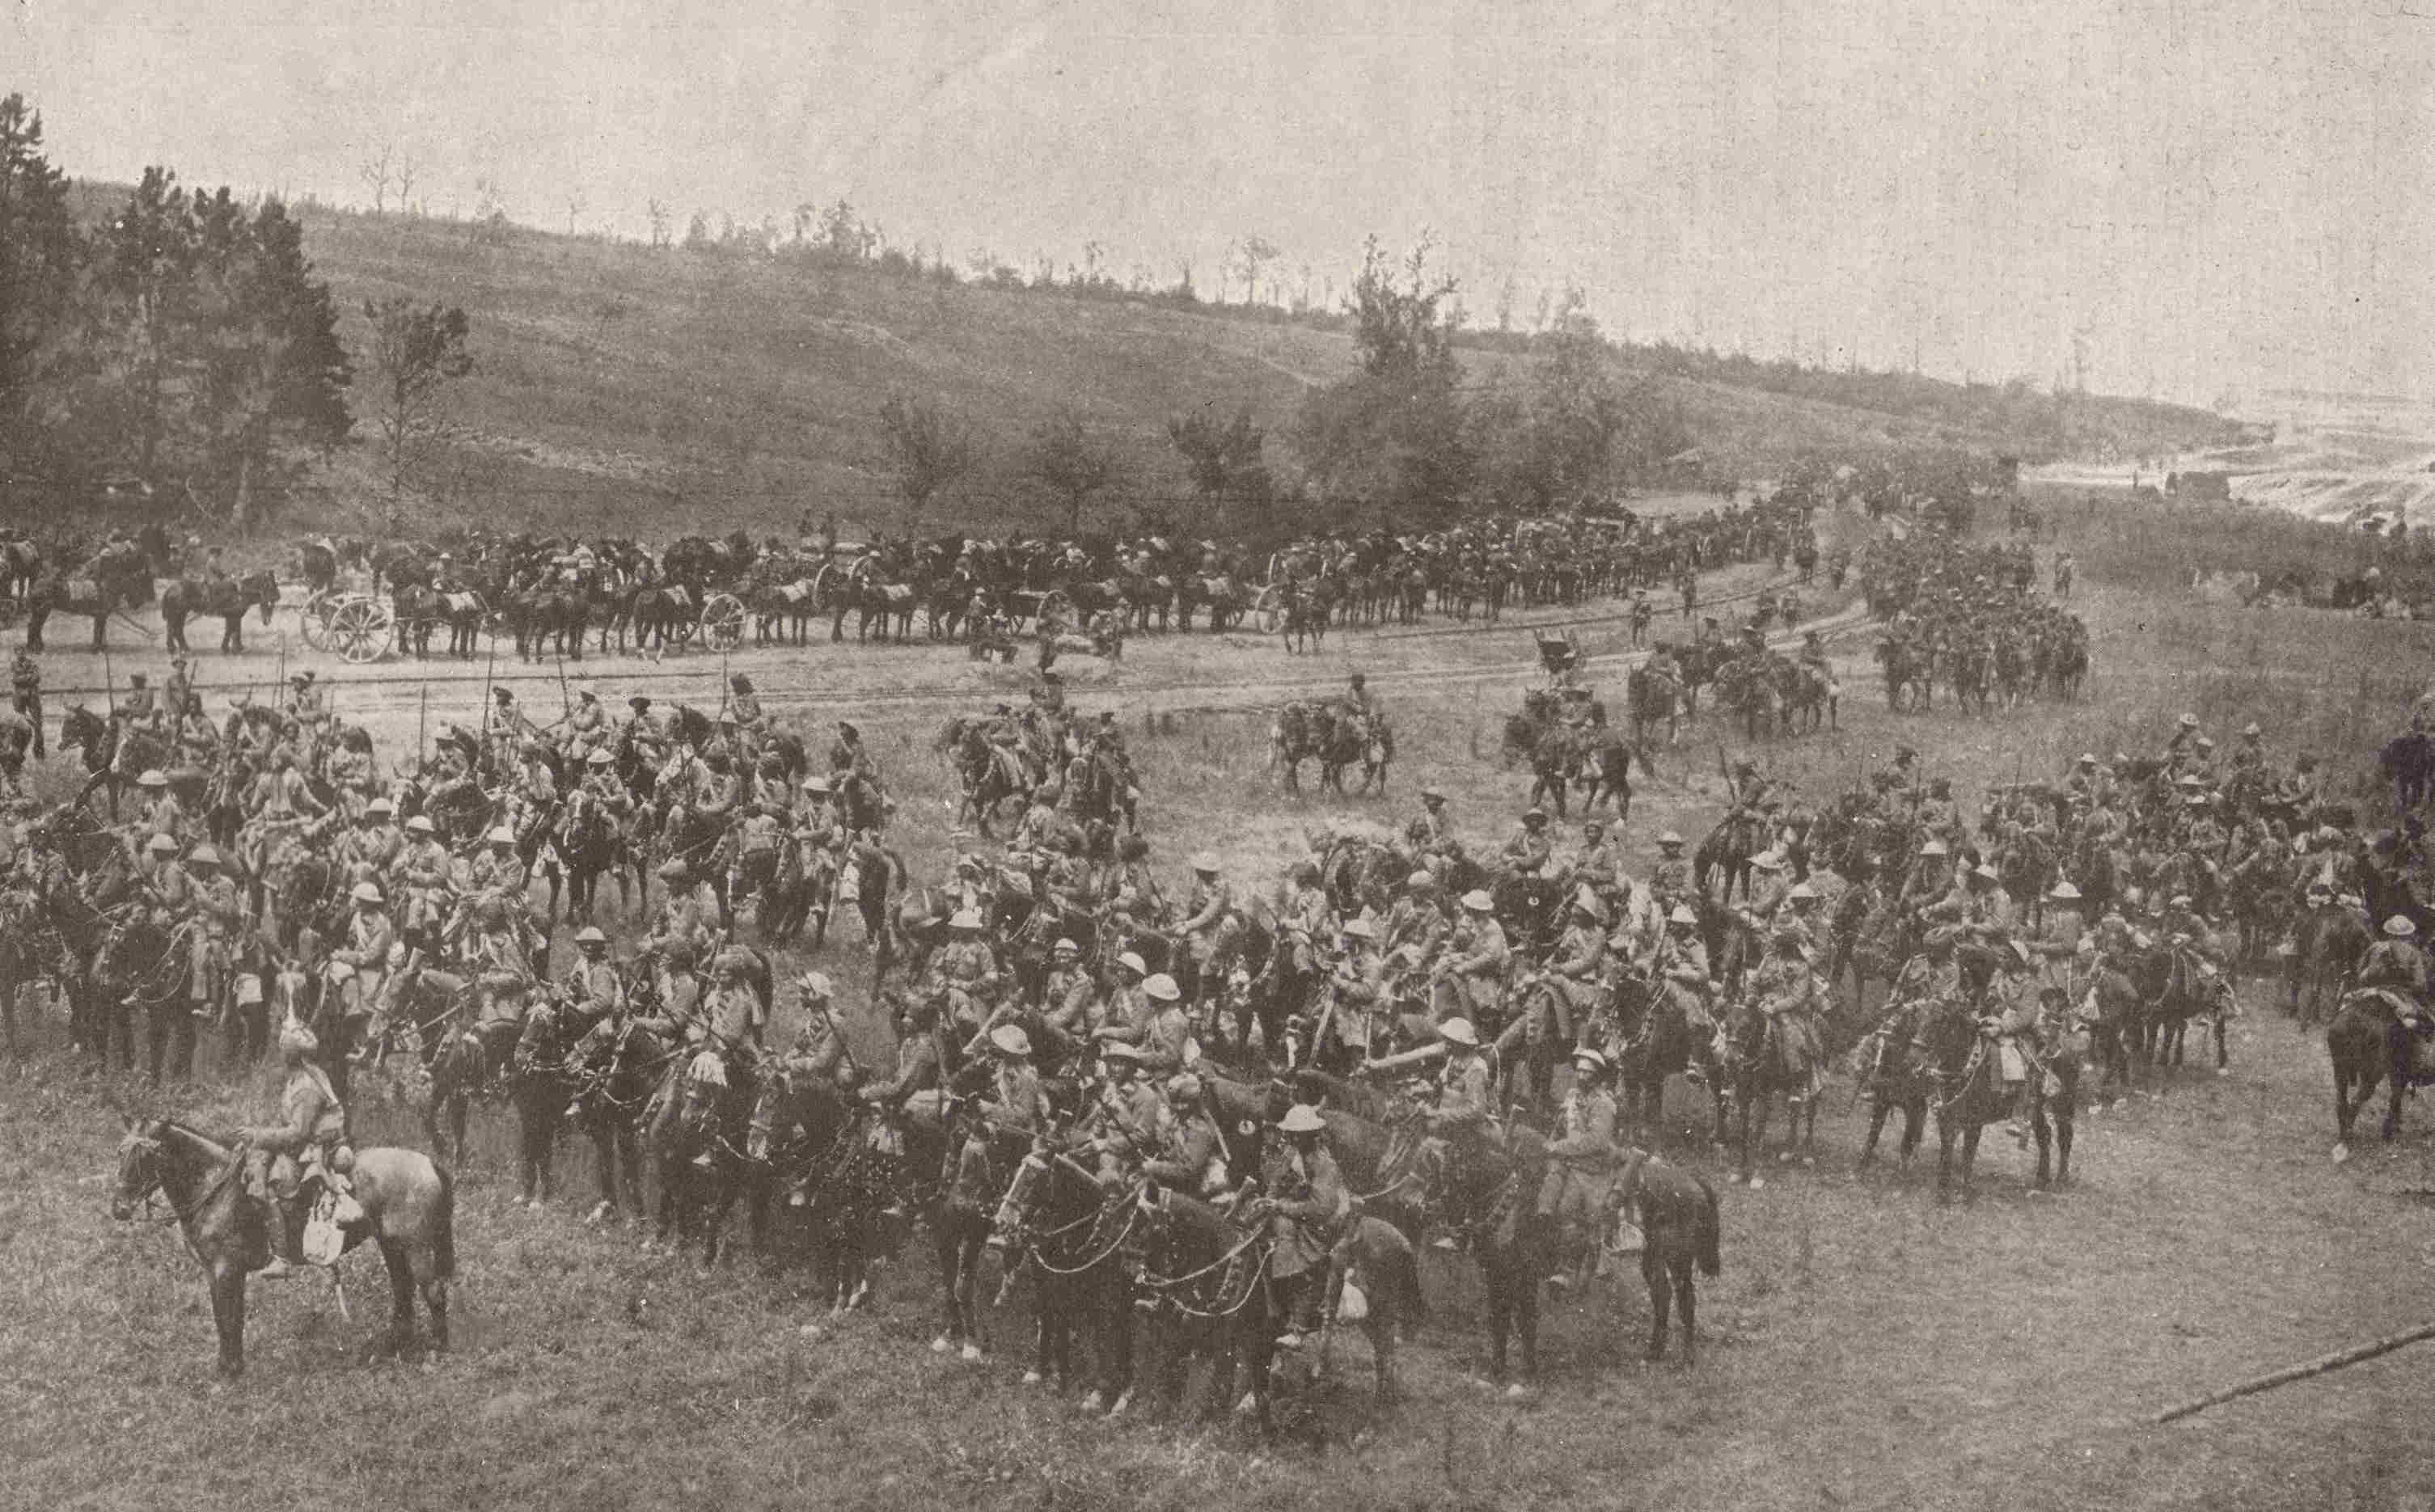
The Deccan Horse photographed on the Somme 1916. I wonder if any of the limbers on the road are from N Battery?
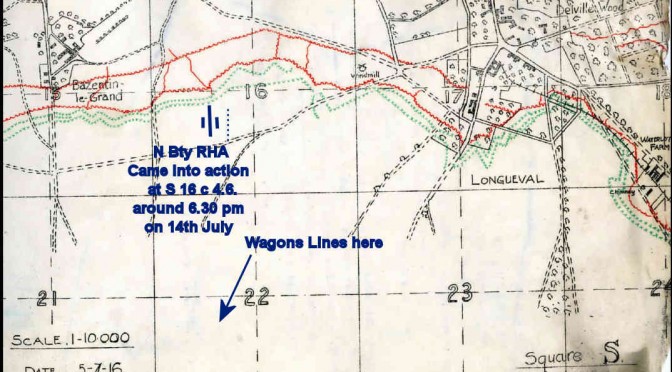
H Hour was 03.25 at dawn. The infantry of five divisions moved out into no mans land at night, and guided by mine tape deployed quietly a few hundred yards from the German front line. It was a great success and about three miles of German trenches were taken and a gap wide enough to launch cavalry – supported by a battery of horse artillery that still exists as N battery the Eagle Troop. However, by the time the cavalry was in action the Germans had blocked the gap.
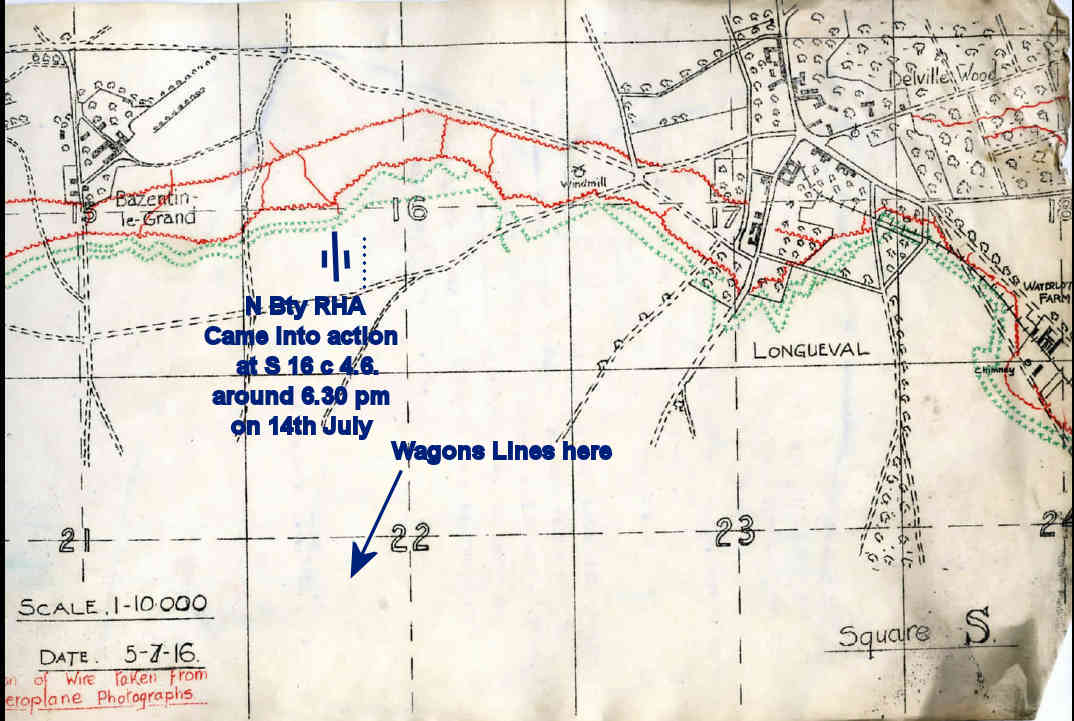
N Battery RHA came into action just short of the wire protection the 14 July German Front line
The map is the hand drawn trace for the XIII Corps fireplan for the attack on 14th July. Delville Wood is on the right hand side just below the number 12. The wood above the number 10 is High Wood. The poet and author Robert Graves was wounded in this attack at the churchyard in the village of Bazentin-le-Petit to the left of the number 9.
An abandoned German trench in much shelled Delville Wood taken September 1916 (Warwick Brooke – This is photograph Q 4267 from the collections of the Imperial War Museum)
The area between Delville and High woods was the focus for fighting for the next two months. It was calculated that seven shells a second landed on Delville Wood at times.
Two of the casualties on that day was Lieutenant Colonel Dudley George Blois DSO Commander of 84th Brigade RFA and his Trumpeter. They were riding forwards to recconoitre new positions for 84th Field Brigade of 18th Division and caught by shellfire. Blois a descendent of the royal house of Blois, is commemorated in Blythburgh Church in Suffolk.
If you are interested in visiting any of these battlefields and hearing the Gunner side of the story contact Gunner Tours.
“On ne passe pas’” (They shall not pass!) emerged from the battle of Verdun as watchwords of French. This phrase, widely attributed to General Phillip Petain has been used as a rallying cry for France since then, and an inspiration for subsequent defiance by, among others, Spanish Republicans, south American revolutionaries and the Russian Feminist group Pussy Riot. But like many national symbols and iconic events, much of the story is myth, factoid rather than fact. But the story behind the myth does reveal something about the battle of Verdun and the men who coined the catch phrase.
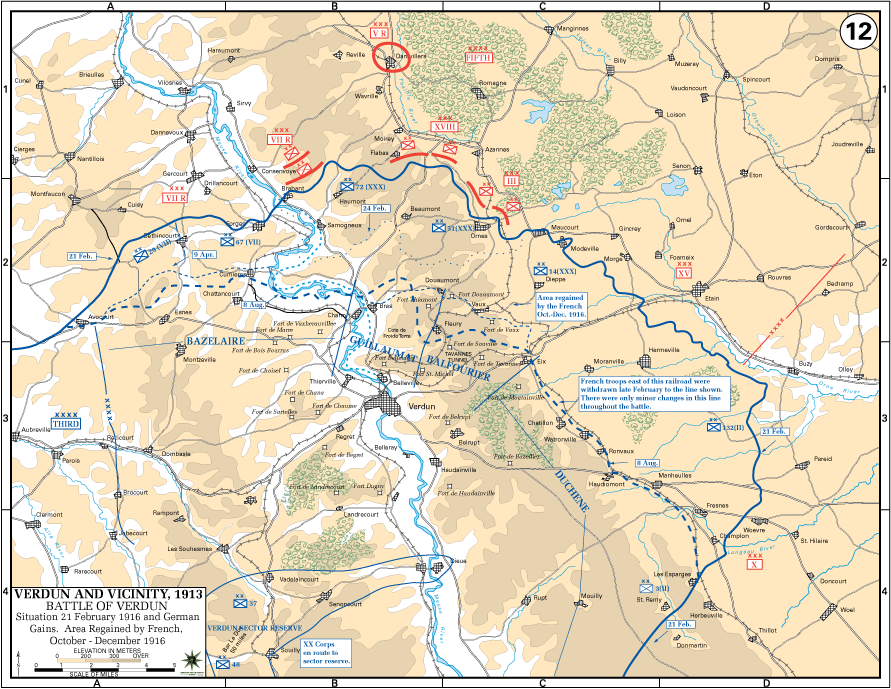
Verdun was one of the major battles of the First World War, costing the French and the Germans about a quarter of a million casualties each. The battles of Verdun and the Somme, linked inextricably, dominated the Western Front in 1916. The Germans intended to break the French Army by forcing it to fight a battle of attrition under unfavourable circumstances. The battle was launched with heavy artillery support on 22nd February 1916. Catching the French ill prepared, the offensive was initially successful, inflicting heavy casualties on the French and their forces in disarray, crowned by the capture of Fort Douamont on the 25th February.
General Henri Phillipe Petain
The same day, General Petain, commander of the Second Army, was ordered to take charge of the Verdun sector. He was chosen purely because his army was in reserve and available. Petain was an infantryman with an undistinguished pre war career only enlivened by his rejection of the pre war orthodoxy that willpower and aggression could overcome modern weapons. As an instructor at the Ecole de Guerre he preached the heresy that “firepower kills,” with the logical implication that a well organised defence would stop the Attaque à outrance (attack to excess). His rise to army command in the first eighteen months of the war had confirmed the need to “separate the real from the imaginary and the possible from impossible.”i An address to a decimated regiment illustrates this.
You went into the assault singing the Marseillaise; It was magnificent. But next time you will not need to sing the Marseillaise. There will be a sufficient number of guns to ensure your attack’s success.
Petain’s “On Les Aura” as a propaganda poster
The measures Petain took to defend Verdun were based on firepower and belief that there were no short cuts to victory. He centralised control of the artillery and massed defensive fires where it could be most effective. He organised administration and logistics and arranged for a systematic and early replacement of formations committed to Verdun, known as the “Noria” (bucket chain) or “tourniquet” (turnstile).
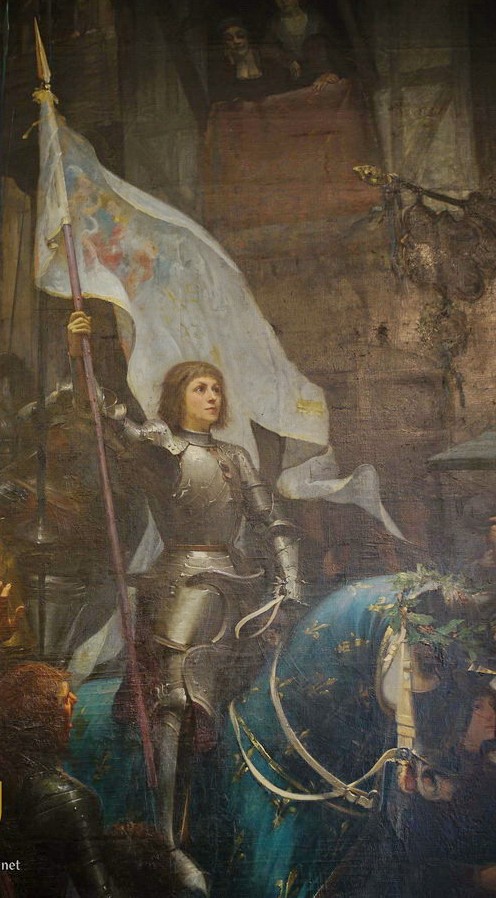
Petains Catch phrase “Courage, on les auras” was a reference to Joan of Arcs words at Orleans. “Our enemies, even if they hung in the clouds, we shall get them! And we will drive them out of France!”
On 10th April Petain issued an order of the day which ended with the phrase “Courage, on les auras” (Take heart, we’ll get them.) This was meant to stick in the memory as a catch phrase. It was a allusion to the words of Joan of Arc at Orleans. “Nos ennemis, fussent-ils pendu aux nuages, nous les aurons! Et nous les bouterons hors de France!” (Our enemies, even if they hung in the clouds, we shall get them! And we will drive them out of France!) They were a reminder of the need for patience a war that could only be won by only fighting winnable battles but might take a long time.
Petain’s realistic, pessimistic approach to value counter attacks, did him no favours with Joffre, the French commander in chief or with the politicians. On 27th April Petain was promoted to Commander of the Central Region, and replaced as commander of the 2nd Army, by General Robert Nivelle who was more to Joffre’s taste. Like Petain a mere colonel in 1914, Nivelle’s career had a meteoric trajectory. A heroic action at the Marne was followed by successful command of a brigade, divisional and corps. A whole hearted believed of the ideas of de Gradnmaison, Nivelle believed that success in battle was based on the will to win and that flawed leadership (but not his) led to “defaillance”, (weakness or breakdown). However, artilleryman Nivelle was also aware of the necessity of good infantry artillery co-operation. He was probably responsible for the most important technical development that enabled attacks to succeed, the barrage roulant – the creeping barrage.
Target areas for Phosgene bombardment 323 June 1916
On 23 June 1916 the Germans planned a major attack by their elite mountain corps. This would be preceded by “Green Cross”, chemical artillery shells containing Phosgene, a new very lethal choking agent, which the Germans thought might penetrate French gas masks.
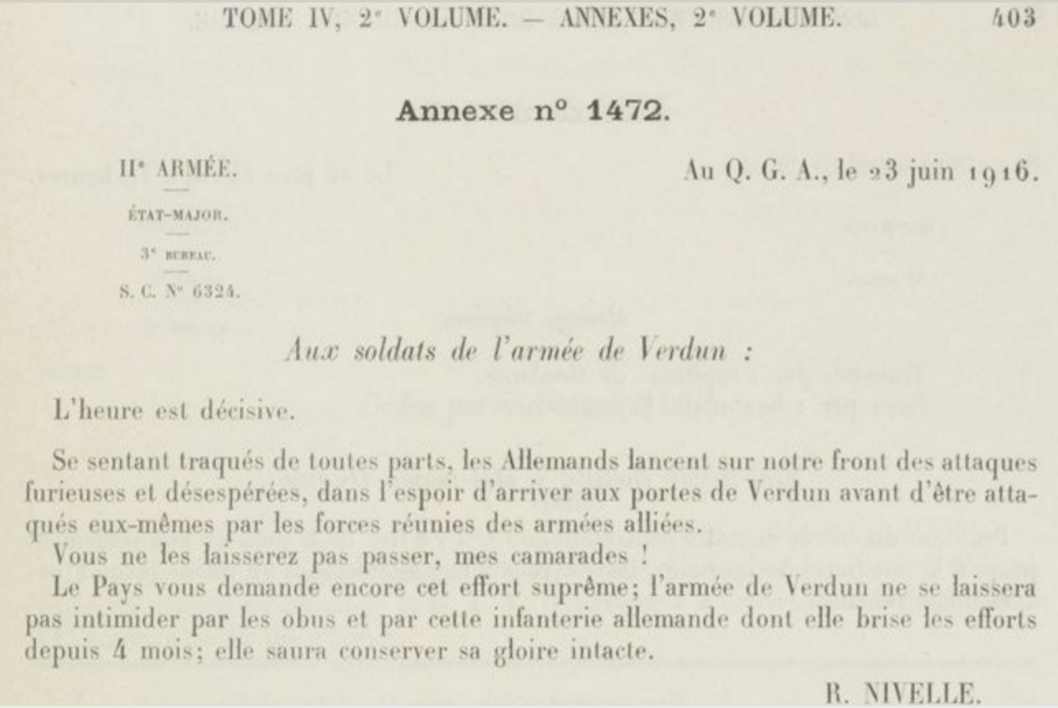
2nd Army Order of the Day 23 June 1916
The phosgene barrage caused consternation and 1,800 casualties, mainly among French gunners. By the end of the day German infantry penetrated the furthest they ever achieved towards Verdun. Nivelle issued an order of the day that included the words “Vous ne les laisserez passer, mon camadares” (“You will do not let them pass”
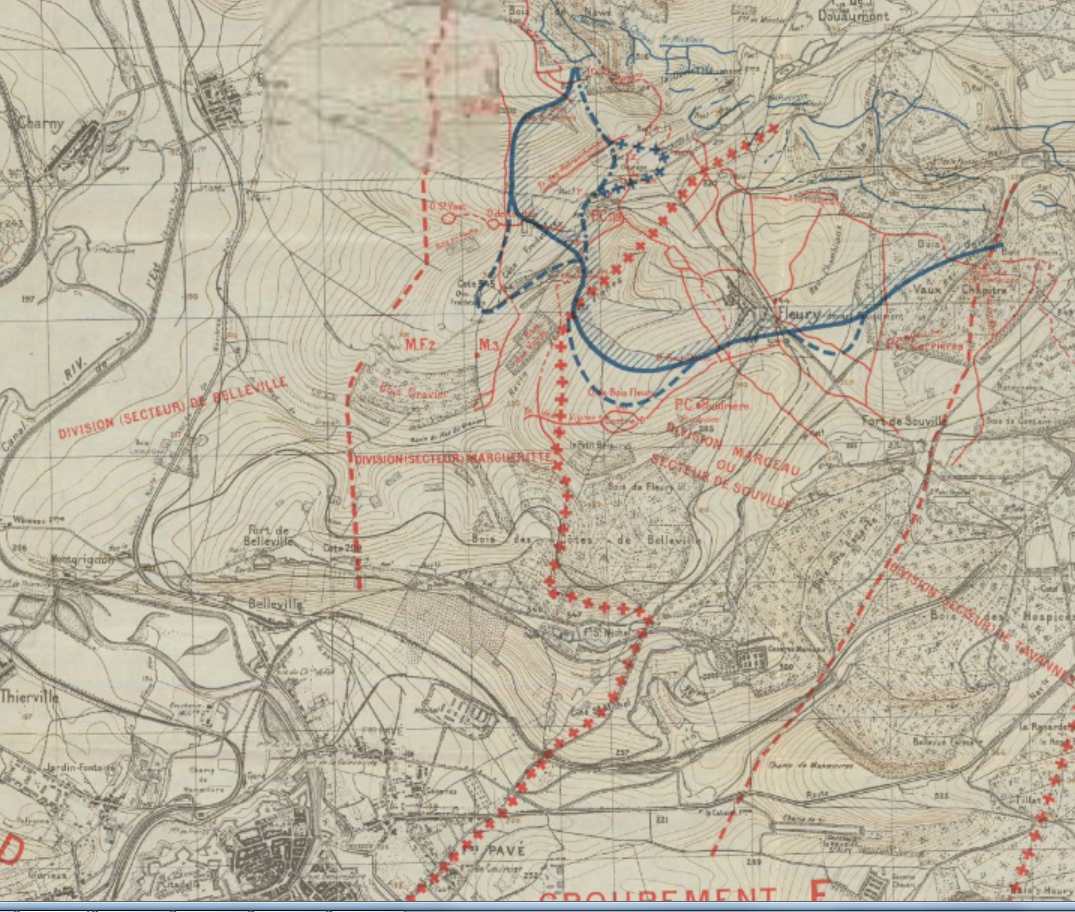
Crisis at the battle of Verdun 23 June 1916. The solid blue line shows the French line before the attack. The dashed line shows the furthest extent of the German advance and the blue crosses the positions restored by the French by 2nd July
This wasn’t an original phrase. It had been circulating among the troops for some time, but there is no evidence that Petain used the phrase himself It was an appeal drawing on ‘cran’ (guts) very much Nivelle’s style . However this was out of character for Petain whose command style was based on promises of artillery support and avoided appeals for flesh to face material or attempt the physically impossible. The crisis passed and the very next day, the preliminary barrage started on the battle of the Somme. From this moment Verdun became a secondary sector. However, throughout the remainder of 1916 Nivelle, occasionally constrained by Petain conducted a series of counter attacks which cumulated in the dramatic recapture of the Fort Douemont on 24th October. On that day the French troops advancing under a creeping barrage recaptured the ground that it had taken the Germans months to capture.
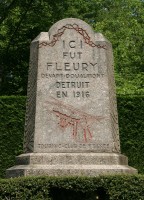
Monument to the village of Fleury close to the German attack on 23 June
At the end of 1916, the French government had lost confidence in Joffre, their commander in chief, held responsible for the neglect of the defences of Verdun and the disappointing results of the Somme offensive. On the 27th December 1916 Joffre was promoted to Marshall and removed from command, to be replaces by Nivelle, who promised a decisive victory if allowed to use his tactics on larger scale. The failure of the Nivelle Offensive in May 1917 and the subsequent mutinies led to Nivelle’s fall and replacement by Petain. Nivelle was largely forgotten and Verdun became, in the public mind synonymous with Petain.
Pussy Rioter: “they shall not pass” chic.
In the meantime he catch phrase “On ne passe pas” , to use an anachronism, went viral. It joined “Old Contemptables” “In Flanders Fields” and “over the top” evoking aspects of the war. The call for the spirit to over come material odds made it attractive for the underdog and even chic.
The difference catch phrases of Petain and Nivelle illustrate different approaches to the battle of Verdun. They were also present in the British high command. The logic of Petain’s approach leads to the “bite and hold “ school identified with Rawlinson and Plumer, while Nivelle’s appeal to strength of will has much in common with the “Harroshing” of Haig and Gough. Indeed, Haig’s “Backs to the wall” order of the day in April 1918 is very similar to Nivelle’s appeal on 23 June.
If you ever need to use this article to settle a bet, donations are always welcomed by the battlefields Trust, a UK Charity dedicated to preservation, interpretation and presentation of battlefield heritage. Battlefields Trust Just Giving
There is a lot to see at Verdun, where far more of the battlefield was abandoned after the war. Far fewer Britons visit Verdun, know as much about this battle or even its connection to the battle of the Somme. If you are interested in visiting the battlefield of Verdun or other battlefields of the Western Front contact me.
The Battle of the Somme was the largest, most bloody battle fought by the British Army. The popular image in Britain is of waves of foot soldiers going over the top into a hail of shells and bullets. But whether they succeeded often depended on how well the Gunners had breached then barbed wire, damaged defences, neutralised enemy batteries and neutralised enemy in the path of the infantry, and whether the infantry used the barrage.The Somme was an artillery battle, the first of its scale waged by the Royal Regiment. The artillery plan for the 1st of July assault was the first army wide artillery instruction. Within common principles and guidelines each corps developed its own fire plan. In one sense the First Day of the Somme was a very big experiment with each Corps trying out a different technique for supporting the infantry.
The verdict was clear by the end of the day and the tactics used by the XV and XIII Corps, of heavy counter battery fire and a creeping barrage became the norm for future attacks.
The majority of the BEF’s troops were “Kitchener’s” New Army Volunteers, raised for the duration of the war.However, many of the regular and territorial units which fired in the opening barrage and on the first day of the Somme are still part of the Royal Artillery.
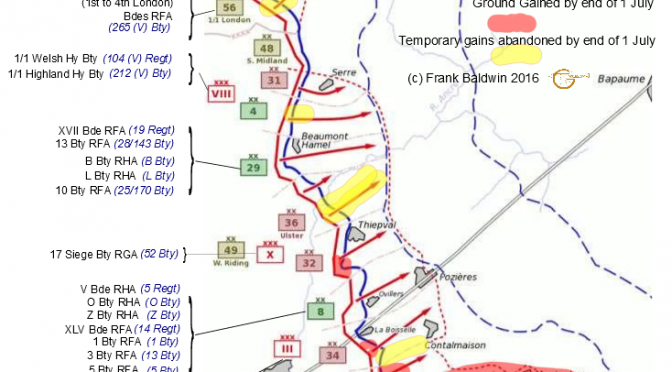
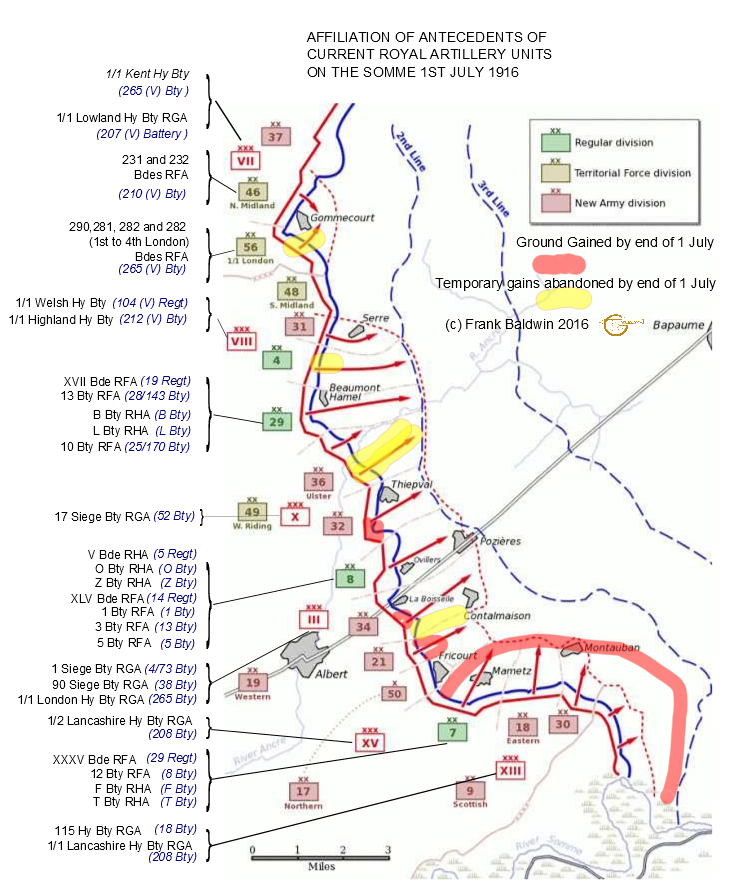
VII CORPS
The northern most corps, VII Corps of the 3rd Army was made by two Territorial Divisions, the 46th (North Midlands) and the 56th (London). 210 (Staffordshire ) Battery can be considered the descendants of the CCXXXI (231)and CCXXXII (232) (II and III North Midlands Brigades) recruited from Staffordshire
This picture shows a QF 4.7″ gun on the III Corps front later in July 1916. The Territorial Heavy Batteries were each armed for four of these obsolescent guns, retained in service because of the shortage of modern long ranged artillery. AWM)
265 (Home Counties) battery might consider themselves associated with the territorial artillery brigades of the 56th (London) Division at Gommecourt. The Home Counties Territorials also formed the 1/1 (Kent) Heavy Battery with four 4.7” Guns, part of the 48th Heavy Artillery group supporting the VIIth Corps at Gommecourt, as was the 1/1 Lowland Heavy battery, raised from the recruiting area of 207 (City of Glasgow ) Battery.
VIII CORPS
The VIIIth Corps, was the Northernmost army corps in the Fourth Army. One of its infantry divisions, the “Incomparable 29th Division” formed from regular units serving across the world. This division fought in Gallipoli and in all of the major battles on the Western front from the Somme onwards. The part of the battlefield over which the 29th Division advanced is includes the preserved battlefield of Newfoundland Park, one of the most visited and photographed. One regiment and four current day batteries have antecedents which served with the 29th Division on the First Day of the Somme.
This photograph taken after the first day shows an 18 pounder gun, its crew stripped to the waist in the sunshine, firing a barrage from the Carnoy Valley south east of Montauban. This was the equipment used by the field batteries that have survived to modern times.
The XVII Field Brigade is still part of the Gunners, being renumbered 19 Regiment after the Second World War. One of XVII Field Brigade’s batteries, numbered 13 Battery in 1916 is still part of 19th Regiment, having been renumbered as 28 battery in 1947. According to the fire plan, this battery fired the artillery support for the doomed attack across Newfoundland Park.
B and L Battery RHA also were part of the 29th Division and fought on the first day of the Somme. XV Brigade RHA was formed from RHA units, but was equipped with the 18 pounder field gun and carried out the same function as a divisional field artillery battery. B Battery sent an OP party forward to support the capture of the Hawthorn ridge crater caused by the much photographed mine.
10 Battery RFA, now 25/170 (Imjin) HQ Battery of 12 Regiment served in 147 Field Brigade, also part of the 29 Divisional artillery group.
The heavy artillery of the VIII corps included 1/1 Highland Heavy Battery, part of 1st heavy Artillery group raised from the recruiting area of 212 (Highland) Battery, and 1/1 Welsh Heavy Battery, raised in Carnarvon. Both territorial batteries were equipped with four 4.7” guns.
X CORPS
The South African war vintage BL 6 inch 30 cwt Howitzer equipped several batteries for the Somme, including 17 Siege Battery.
To the right of VIII Corps was X Corps, which attacked the dominating ground around the village of Theipval. None of the field batteries of its new army and territorial had survived to the current day.
However, 17 Siege Battery RGA, the
BL 6-inch howitzer and a four wheel drive tractor
recently disbanded 52 (Niagra) Battery was part of 40 Heavy Artillery Group which was the Northern Group supporting X Corps. The battery was equipped with four 30 cwt 6” Howitzers and fired on targets in the sector attacked by the 36th Ulster Division and commemorated by the Ulster Tower memorial.
III CORPS
The III Corps attacked either side of La Boiselle on the Albert-Bapaume road. This was the point of main effort of the Fourth Army. North of the road, the 8th Regular Infantry Division attacked towards the village of Orvilliers. Its artillery group included V Brigade RHA, now 5 Regiment, and XLV Brigade RFA renumbered as 14 Regiment in 1947.
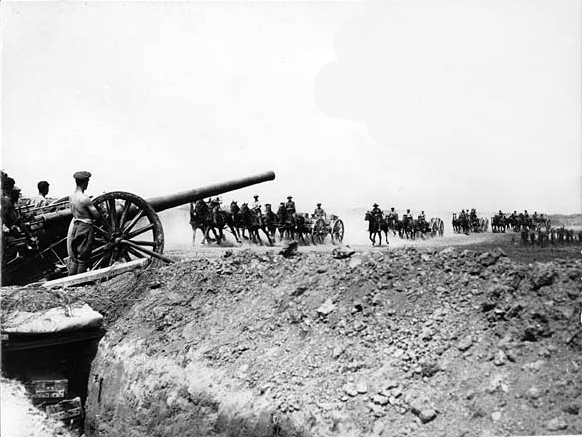
This photograph of a 60 pounder Gun is from 1918 rather than 1916. 90 Siege Battery, the antecedents of 38 Battery, were equipped with four of these long ranged guns.
As with XV RHA, V RHA Brigade, was equipped as a field brigade, there being a greater need for field rather than horse artillery in trench warfare. V Brigade RHA’s batteries included was O and Z batteries RHA.
XLV Field Brigade, which became 14 Regiment and three of its batteries have also survived. 1 Battery as “The Blazers”, 3 Battery RFA as 13 (Martinique) Battery and 5 battery as 5 (Gibraltar 1779–83) Battery. This divisions attack just north of the Albert Bapaume road towards Orvilliers also failed with heavy casualties
The Heavy Artillery of III Corps included:-
1 Siege Battery equipped with four 6” howitzers, part of 27th heavy Artillery group. This became 73 battery, now part of 4/73 (Sphinx) Battery.
90 Heavy Battery RGA, equipped with four 60 pounder guns. part of 22 Heavy Artillery Group became the current day 38 (Seringapatam) Battery.
1/1 London (Woolwich) Heavy battery was part of 34 Heavy Artillery Group RGA, equipped with four 4.7” guns.
XV CORPS
Man handling a BL 6 inch 26 cwt howitzer near Pozieres 1916.
XV Corps was to the right of III Corps. One of its two assaulting infantry divisions was the regular 7th Infantry Division. The artillery group included XXXV (35) Brigade RFA, which still survives as 29 Commando Regiment, as does one of its batteries 12 Battery RFA, now 8 Alma Commando Battery as do F and T Battery RHA which served as part of XIV brigade RHA. The attacks by the 7th Infantry division were among the most successful of the day, due in part to the innovative creeping barrage fired by the artillery of the corps.
1/2 Lancashire Heavy Battery, based in Sefton Barracks Liverpool, in the current day 208 battery recruiting area was part of the 18th Heavy Artillery Group equipped with four 4.7” Guns
XIII CORPS
The attacks by the two New Army Divisions of XIIIth Corps were the most successful of the day.
Heavy Work. manhandling the 60 pounder on the Somme 1916
115Heavy Battery RGA, the current day 18 (Quebec 1759) Battery was also equipped with four 60 pounder guns as part of 29th heavy Artillery Group in support of the XIII Corps. This was the right hand British Corps in the attack on the 1st day of the Somme. Their counter battery fire was particularly effective, supported by additional French heavy guns and a factor in the breakthrough in the XIII Corps sector.
1/1 Lancashire Heavy Battery was part of 29 Heavy Artillery group supporting XIII Corps, This too was raised in Sefton Road, Liverpool.
The story on each Corps sector is different. There are the personal accounts of the men who served the guns. And there is the story of how the Army developed the techniques learned at a painful cost to turn the Somme into the “Muddy Grave of the German army.”
If you would like to visit these places and see what the Gunners did on the Somme, there are still places available on the Somme Centenary Gunner Tour.
The first day of the Somme is best known for 57,000 casualties suffered by the British Army; the largest in a single day, and the event that supports the idea of British generals as “Butchers and Bunglers.” Yet, paradoxically, it was concern for safety which led to disastrously high casualties and failure of most of the attacks.
Attacks on the British Sector of the Somme
The battle of the Somme originated from a decision taken in December 1915, that the Entente powers, Britain, France, Italy and Russia would all launch an attack as soon as possible in 1916. The Somme was selected as the site of the Anglo French offensive because it was the junction between the two armies. It was originally envisaged that the French Army would take the lead. However, the German offensive at Verdun, started in February 1916 cost the French and Germans armies over 200,000 casualties each. By June 1916 not only would the British have to take the lead at the Somme, offensive but the bear This had two consequences, there were fewer French troops available which meant that the British would have to take the lead. Furthermore, the attack of the Somme was imperative to take pressure from the French at Verdun.
Sir Henry Rawlinson, commander of the Fourth Army. His initial plan for a methodical advance was rejected.
The British Army had limited experience of offensive battles, and had never planned an operation of the scale of the battle of the Somme. In March 1915 the British had launched a successful breach into the German lines at Neuve Chapelle, supported by a concentrated barrage by the artillery of the British Expeditionary Force. During other attacks in 1915 a shortage of artillery ammunition had prevented the British from repeating this level of fire support. However, by 1916 British industry had geared up to supply the vastly expanded British Expeditionary force swelled by millions of volunteers who Kitchener’s New Army recruited in 1914-15.
The largest ever British Army would be supported by the huge quantity of artillery pieces, 1072 light and 442 medium and heavy guns
GHQ issued no special instruction on the co-operation of infantry and artillery as, in the words of the official history, this main feature of the theory of the assault was well understood. In summary, towards the the close of the bombardment, shortly before Zero, the artillery would put down an intense barrage on the enemy front trenches; at Zero this would be lifted and dropped on the next trench, from which it would be lifted at a fixed time. Before each lift, the infantry under cover of the barrage was to creep to within as close assaulting distance as the barrage permitted. This was around 100 yards from the enemy’s front parapet and the infantry was to assault as soon as the barrage lifted.”
General Douglas Haig. He applied pressure to spread the artillery very thinly
It was impressed on all, at conferences by both Haig and Rawlinson that “nothing could exist at the conclusion of the bombardment in the area covered by it.” Owing to this optimism, the problem of evicting the Germans from the labyrinth of trenches was seen just as one of assault only. It was not seen as a race for the parapet between the attackers across no man’s land against the defenders in the their dug outs. Instead it was seen as something that could be done at leisure.
Not everyone shared this assumption. “Some Regimental officers suggested that the infantry might creep even nearer to the barrage, as was done later on and in at least one instance on the 1st of July. Forty yards was suggested instead of a hundred but it did not receive official approval. (1)
The race for the parapet: lethal game of rock-paper-scissors
The race to the parapet was the essence of attacking a trench. It can be envisaged as a rather deadly form of ‘rock-paper-scissors’. The defenders can either be in their dugouts or manning the trenches. The attackers can either send artillery rounds or infantrymen. Defenders lining trenches would slaughter attacking infantry but were vulnerable to artillery fire. Defenders would be reasonably safe in their dugouts, but could do nothing if the attackers were waiting at the top of the dugout steps. The key was for the assaulting infantry to be so close to the artillery barrage that the defenders had no time to react.
Infantry could advance close behind the directional shrapnel barrage.
The shrapnel shells from the British 18 Pdr Field gun were highly directional, and ejected forwards, like the blast from a shotgun. In the Boer war the British found that infantry could advance to within 50 yards with some safety. Japanese troops had also used these tactics in the Russo-Japanese War, as had the French in their costly 1915 offensive in Champagne. The “dapper and charismatic” artilleryman Robert Nivelle had developed a creeping barrage (le barrage roulant) 80-100m ahead of the leading infantry. (2)
Shell splinters for HE shells could fly hundreds of yards laterally, making it dangerous for friendly troops to approach closer than 200 metres.
The trouble with this tactic was that it had a fatal cost. Artillery rounds do not all land in the same place, but are scattered in a cigar shaped pattern, through variation in the propellant and further dispersed by variations in the wind and of temperature and human error in laying the piece. So “getting close to the barrage” inevitably meant “in a place likely to be struck by shrapnel from a shell that fell shorter than most”. Indeed the rule of thumb, later in the war, was that unless the infantry were taking casualties from their own artillery fire, then they were not close enough.
So the commanders faced a dilemma. The men lost to artillery fire would usually be far lower than the casualties suffered from the machine guns of alert defenders. However, if the artillery preparation was going to leave the defenders unable to resist then would it be right to expose the infantry to friendly fire casualties?
British (and some French) Artillery positions behind 29th Division of VIII Corps at Beaumont Hamel
To make matters worse, the gunners firing the barrage were mostly Kitchener’s Army men. Their gunners, technicians and officers had limited training and experience, and were using ammunition and guns produced by newly expanded or hired suppliers. It might have been sensible to apply nn extra safety margin. The plans for the 1st July seem to bear this out.
The fire plan for the first day of the Somme specified an artillery barrage that would lift from the German front line trenches at zero hour, even though the distance between the British and German Trenches was much wider – from 200-800 metres across most of the assault frontage. Some British units left their trenches before zero hour, and worked their way as close as possible to the German trenches. Where they did, the British succeeded in capturing the German front lines; the Ulstermen at the Schwaben redoubt, the Highland Light infantry at the Leipzig redoubt and the 30th Division near Maricourt. Elsewhere, success was more illusive and on much of the front the assaulting infantry faced fully manned trenches.
Artillery Bombardment Beaumont Hamel Somme 1916
The excessive safety distance between the starting barrage and the infantry wasn’t the only reason that casualties were so heavy and the gains so slight on the 1st July. There needed to be enough breaches in the German wire. Where the wire was intact, the advance stopped. It helped if the defenders were crushed in their dugouts or demoralised by the barrage. There were more, and heavier guns, and the dug outs were less deep south of the Albert-Bapaume. The Germans had to be prevented from bringing down their own defensive barrage preventing movement across no mans land. There were fewer German guns south of the Albert Bapaume Road, and the British could call on the more numerous French heavy guns for counter battery .
Lieutenant General Sir Aylmer Hunter-Weston By F. A. Swaine – http://www.archive.org/details/cu31924088057223, Public Domain, https://commons.wikimedia.org/w/index.php?curid=2494174
The worst losses and least success was on the frontage of the VIIIth corps where a “safety factor” played a grotesque part in the tragedy that unfolded. A number of a mines had been dug under the German trenches. Almost all were scheduled to be detonated at 07.28, on the 1st July, two minutes before zero hour. This would allow two minutes for the debris to fall before the British infantry assaulted the crater. One of these was under the Hawthorn redoubt near the village of Beaumont Hamel. The commander of VIII Corps, Lieutenant General Sir Aylmer Hunter-Weston wanted this to be fired some hours before the attack, so that the redoubt could be occupied before the assault, but sufficiently in advance that any general alarm would have died down by zero hour. This was vetoed by more senior commanders, but as a compromise the mine would be fired at 07.20, ten minutes before Zero.
Barrage map for 29th Division at Beaumont Hamel showing wire cutting tasks for 18 pdr batteries (blue) and trench mortars (brown) and preparation targets for 4.5″ Howitzers (yellow)
This allowed for a plan to occupy the crater early, but it required the heavy artillery bombardment of the redoubt and adjacent trenches to lift during the assault. However, instead of fire lifting only from the immediate area, all of the VIII Corps heavy artillery was ordered to lift at 7:20 a.m. and the field artillery to lift at 7:25 a.m. A light Shrapnel barrage fired by the divisional field artillery, was to continue on the front trench until zero hour but in the 29th Division sector, half of the guns were to lift three minutes early.
Barrage map for 29th Division Artillery showing the sections of front line trench and final lines for each battery.
This allowed the German defenders ten minutes notice of the impending assault and condemned the infantry from three divisions to heavy casualties and failure across the breadth of their front. It did not matter how well the wire had been cut or whether the infantry crept out into no man’s land. One of the attacking battalions lost all its officers before zero hour.
So why did the seemingly responsible commanders, who were professional experienced soldiers, get this decision so wrong?
7,000 shrapnel shells, enough for a divisional creeping barrage
One simplistic, but popular explanation is that the commanders were incompetent “butchers and bunglers”iii. Professor Norman Dixon in the Psychology of Military Incompetence (4) argued that there was something about military training which led to poor decision making. Indeed, the performance of General Sir Aylmer Hunter Weston is hard to describe as anything less than incompetent. “Hunter-Bunter” was a strange man with a command style reminiscent of that of the monstrous Blackadder creation General Sir Anthony Cecil Hogmanay Melchett. The disastrous decision to lift fire early across the VIII Corps front was very much in keeping with his micro-management and idiosyncratic decision-making. He had a history of over compensating for the risks of friendly fire in Gallipoli. He was found out on the first day on the Somme. Afterwards, although he retained his command, he was never entrusted with command in an offensive and only employed on quiet sectors. Could he have been removed earlier? To be fair to Rawlinson and Haig, Hunter-Weston was new to the Western Front. He had commanded the 29th Division and then the VIII Corps at Cape Helles in Gallipoli and arrived with his corps as an experienced commander and a reputation of relatively competent performance.
The Second Wave: Colonel Walford’s Impression of an attack on the Somme, following the barrage shown on the left
Elsewhere in the BEF the disastrous decision about fire plan timings resulted from agreements between groups of people, commanders and subordinates and their staffs.
In the first instance, the senior commanders were not looking at this problem. The correspondence between Rawlinson and Haig shows a focus on the problems of exploiting success. In earlier battles such as Loos and Neuve Chapelle the British infantry had taken the German first line wherever they had adequate artillery support.
The plan for the Somme was a bad compromise. Rawlinson, commander of the fourth army, put forward a plan for a phased advance, initially taking just the first German line, which he and his staff thought was within the capabilities of the resources available. Haig did not think this was ambitious enough. He rejected the plans and insisted that an attempt should be made to breach both the front line and the second line to ensure that any opportunity for a breakthrough was not missed.
Hawthorn Redoubt mine. By F. A. Swaine – http://www.archive.org/details/cu31924088057223, Public Domain, https://commons.wikimedia.org/w/index.php?curid=2494174
On this occasion Haig was able to impose his will on Rawlinson, despite reservations about the artillery being spread too thin made by the newly appointed artillery adviser at GHQ, General Birch. Birch and Rawlinson, having expressed their opinions in private, then issued orders and expressed their confidence in them.
As the Official History notes, not everybody assumed that the enemy would be flattened by the preparatory barrage. There seems to have been sufficient internal criticism for Rawlinson to include the following in the Fourth Army tactical notes;
“it must be remembered that all criticism by subordinates of their superiors, and of orders received from superior authority, will in the end recoil on the heads of the critics and undermine their authority with those below them.” (5)
The battlefield today. Part of the 29th Division sector in Newfoundland Park. The barrage on the German trenches at the far side of the patk was provided by 13 battery of XVII Field Brigade, which is still in the Royal Artillery as part of 28/143(Tombs Troop) Battery an AS 90 battery in 19 Regiment.
This was hardly the atmosphere in which to challenge the fundamentals of the plan. The late, great professor Richard Holmes remarked in the episode on the Battle of the Somme in the Western Front BBC series that the generals of the first world war were stronger in physical than moral courage.
It should be said that the BEF was very quick to learn and the next major attack, on the 14th July, less than two weeks after the first day, was conducted with a much greater concentration of artillery fire and with the infantry following a creeping barrage.
Major General J F N Birch CB, Haig’s senior Gunner argued that the artillery was spread too thin
There is a modern relevance of the battle of the Somme. This was a major high profile project into which much had been invested and expected. The resources available weren’t enough to deliver the hoped for results. At the heart of the plan were flaws that, could have been spotted and rectified but were not. The plan required subordinates to achieve “stretch targets”, “do more with less”, and “sell the party line” within an organisational culture that inhibited internal criticism.
The safety margin dilemma occurs frequently across all walks of life. If anything, the compensation culture makes it harder to choose to take risks. It is very hard to imagine the modern British Army willingly encroach on safety distances even if was the only way to win a battle.
We may not face machine guns and un-cut wire, but we often make important business and other decisions against a back ground of pressure from peers and superiors to agree to deliver uncertain commitments as part of a team effort. Many of us are under pressure to support decisions that have been made and face severe personal and career sanctions for whistle blowing. What is it that we can do to be more effective both as leaders in these situations and followers?
If you would like to visit the Somme and see the story of the artillery on the Somme join Gunner Tours on the Somme Centenary tour. info@gunnertours.com
The centenary of the battle of the Somme, which took place between June-and November 1916, has a special significance in Gunner history. This was the largest battle fought by the British army, costing 400,000 casualties. While public interest in the battle centres on the infantry who went 'over the top' on the first of July, the Gunner battle started a week earlier with the opening bombardment by the largest number of guns assembled.The Somme was essentially an artillery battle, with the guns the only weapons capable of clearing wire, destroying and neutralising defences and artillery. This was an awesome responsibility, and the success or failure of the infantry was down to the effectiveness of the fire plan. The story of how the Royal Artillery learned during the campaign is one of successful innovation, and a matter of pride to Gunners.It is also a human story. We will see where Gunner staff work made a difference; where Gunners went over the top with the infantry and where . Gunners worked to the point of exhaustion in the service of the guns.This tour will tell this story at the places where this largest artillery battle took place 100 years after the opening barrage was fired.
Notes:
(1) Brigadier-General Sir James E. Edmonds; Military Operations: France and Belgium, 1916, Volume I: Sir Douglas Haig’s Command to the 1st July: Battle of the Somme,, 1932
(2) Strong P and Marble S, Artillery in the Great War
(3) John Laffin;s polemic “Butchers and Bunglers of World War one” is the publication which is most associated with the term.
(4) Dixon N F, On The Psychology Of Military Incompetence, Basic Books, 1976
(5) Fourth Army Tactical Notes
Military history, Battlefield heritage and Touring