The story of the Nisei Japanese Americans in the Second World War is quite well known. The USA had a sizeable Japanese minority, whose treatment after Pearl Harbour remains controversial. This community produced a Japanese American units which served with distinction in Italy and France. While Britain had a less diverse population in the 1940s than in the C21st, Britain was home to people from around the world, including immigrants from the Axis powers and their descendants.
My interest in LCpl Suzuki started when a fellow member of the Kentish Town Sports Centre, asked me why someone with a Japanese name might be in the British War Cemetery in Normandy. He wasn’t sure whether this was a British, Canadian or even American cemetery
But he was right. There are two men named Suziki on www.cwgc.org The first is Donkeyman K Suzuki, born in Japan, who died on 1st March 1917, aged 34, when the SS Munificant was sunk without warning 3 miles NNW of Cap Gris Nez, and commemorated on the Tower Hill Memorial London.
The second was Lance Corporal Roy Suzuki, of the 3rd/4th County of London Yeomanry (Sharpshooters) Royal Armoured Corps, (3rd/4th CLY) buried in Bannerville-la-Campagne War Cemetery, sited close to a road that a lorry driver might use en route for the ferry at Ouistreham. Roy was the son of Jukichi and Mable Ruth Suzuki of Islington London. He died, aged 23 on 18th August 1944. Checking the cemetery records, Roy Suzuki, is one of ten members of 3rd/4th CLY who all died on that day buried in row B of Plot IV in the cemetery along with a Rifleman from 2nd Bn KRRC. The ten include two lieutenants and a sergeant. It seems quite likely that LCpl Suziki buried in grave B17 was killed in the same actions as LCpl Cornish in B16, Trooper Bishop in B18, and 2Lt Pritchard B15, possibly even the same tank.
The 3rd/4th CLY had only been formed a month earlier, on 20th July 1944 from the merger of the 3rd and 4th CLY, a reflection of the heavy casualties of suffered in the Normandy campaign. The 4th CLY had take particularly heavy casualties in June when it was on the receiving end of an attack by Tiger tanks led by Michael Wittman at Villers Bocage.
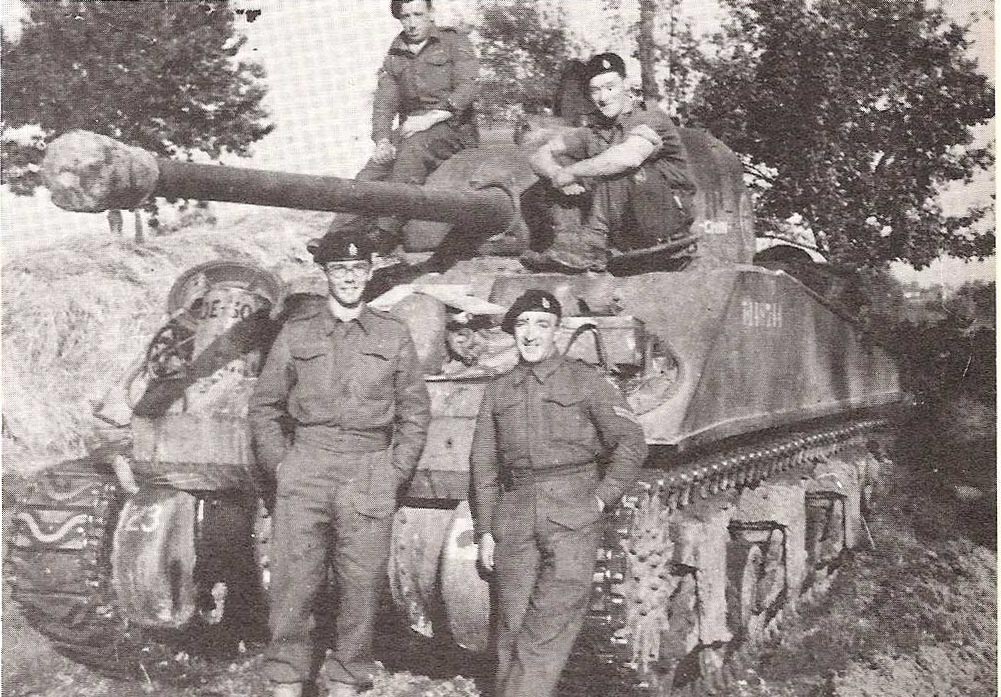
- C Sqn 3 CLY Firefly tank Normandy 1944
WHAT HAPPENED TO THE 3RD/4TH CLY ON 18TH AUGUST 1944?
18th August is close to the climax of the battle of Falaise Gap. At this time, the 3rd/4th CLY were part of the 4th Armoured Brigade, commanded by the 28 old Brigadier Michael Carver. 4th Armoured Brigade were attached to 53rd Infantry Division, part of XII Corps. XII Corps had been ordered to advance South from Falaise, protecting the right flank of the IInd Canadian Corps which was attacking South to close the Falaise pocket. (1) Michael Carver had persuaded the GOC 53 Division, who wanted to advance with a series of staged infantry brigade advances that at this stage of the battle it would be better for the armour to lead. (2) 4th Armoured Brigade would lead, supported by 71st Infantry Brigade, with their objective to press on down the Falaise- Argentan road to cut off the 19 German divisions in the Falaise pocket. Despite the Brigadier’s enthusiasm for armour to take the lead, the ground was described by one of the officers from 2nd KRRC as “damnably thick and close and anything but suitable for tanks. The German infantry are well armed with bazookas and enjoy knocking out tanks from ten yards range from thick hedgerows, orchards, lanes etc.”
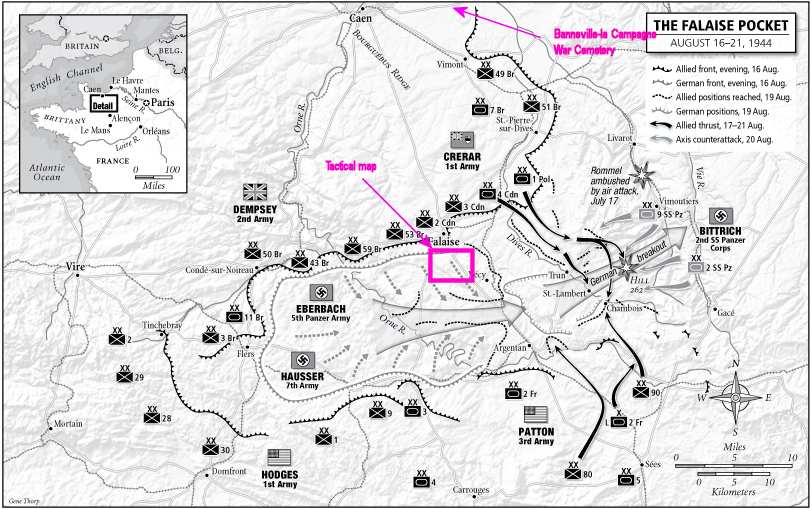
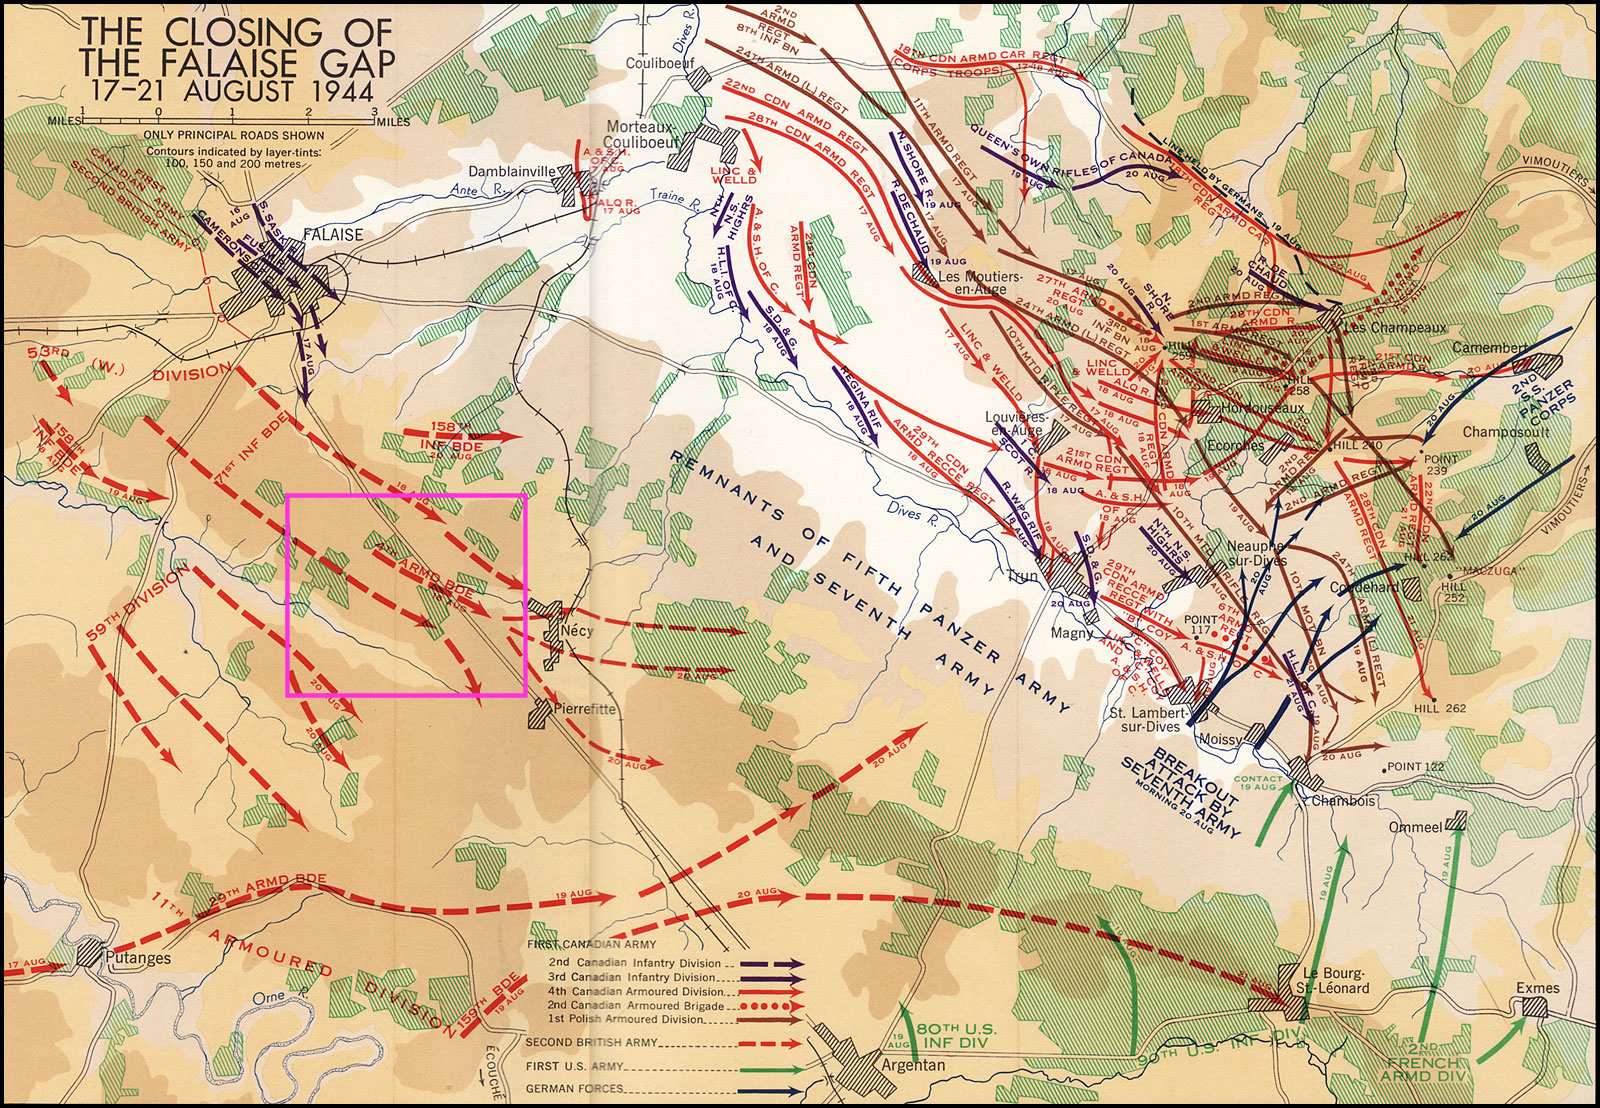
- Falaise Gap 16-21 Aug 1944 (Atkinson)
Between the 15th and 17th the Brigade advanced about five miles and by the 17th had captured the high ground South of Falaise. On the 18th the Sharpshooters took over as the leading Regiment in the Brigade.
- Fal
The excellent Sharpshooters website (3) gives the following extracts from the War Diary of the 3rd/4th County of London Yeomanry (Sharpshooters) August 1944
18/8/1944 B Sqn led the advance and found enemy infantry mining the road – these were quickly dispersed. The leading troop was then fired on by A/Tk guns but no hits scored, and another troop was sent round to the East but was also held up by A/Tk guns. The country was too close for deployment so smoke was put down and the leading tanks moved forward and fired HE. This was successful – one gun knocked out and one abandoned – and the advance continued. A Mark IV special was seen and knocked out but shortly afterwards the two leading tanks were hit by A/Tk fire. The driver of one tank succeeded in driving his badly damaged tank back out of range and was able to rescue his wounded crew. Arty fire was brought down on the suspected gun positions and another attempt was made to go forward but the leading tank was immediately hit. Many attempts were made to find a way round and A Coy 2/60 KRR was sent into the village ahead to try and locate the A/Tk guns and clear the area of the enemy. At 1800 A Sqn succeeded in finding a way round and took up position South of the village of ROUFIGNY. B Sqn were then able to go forward and sent a troop into the village to assist 2/60th whilst the remainder of the Regiment were together further North. During the day C Sqn had taken up a commanding position on high ground and accounted for several enemy vehicles attempting to escape.
During the
Casualties:-
2 officers killed and 8 ORs killed.
4 ORs missing.7 ORs wounded.
And on the following day
19/8/44 C Sqn took the lead and continued to advance to the high ground South of ROUFIGNY and overlooking the escape road. A/Tk fire was soon encountered and 2 tanks knocked out. The fire came from the area of FRENAY LE BUFFARD 160624 and this was subjected to arty concentrations and was heavily smoked whilst the advance continued. In the afternoon the Regiment was withdrawn before the final objective was reached. Considerable quantities of enemy transport etc. were accounted for both by the tanks and B Bty 4th RHA and a number of guns were destroyed in the village of ROUFIGNY by the 2/60th KRR.
Claims for 18th & 19th Aug:-
2 Mark IV special tanks
1 Beetle Tank
2 Mark IV SP
5 75mm A/Tk guns
1 Mark III SP
1 50mm A/Tk gun
1 Tank (unidentified)
2 Half tracked vehs
1 88mm A/Tk gun
2 A/Tk guns (unidentified)
1 French SP
Sundry lorries and cars
Casualties:- 1 OR wounded.
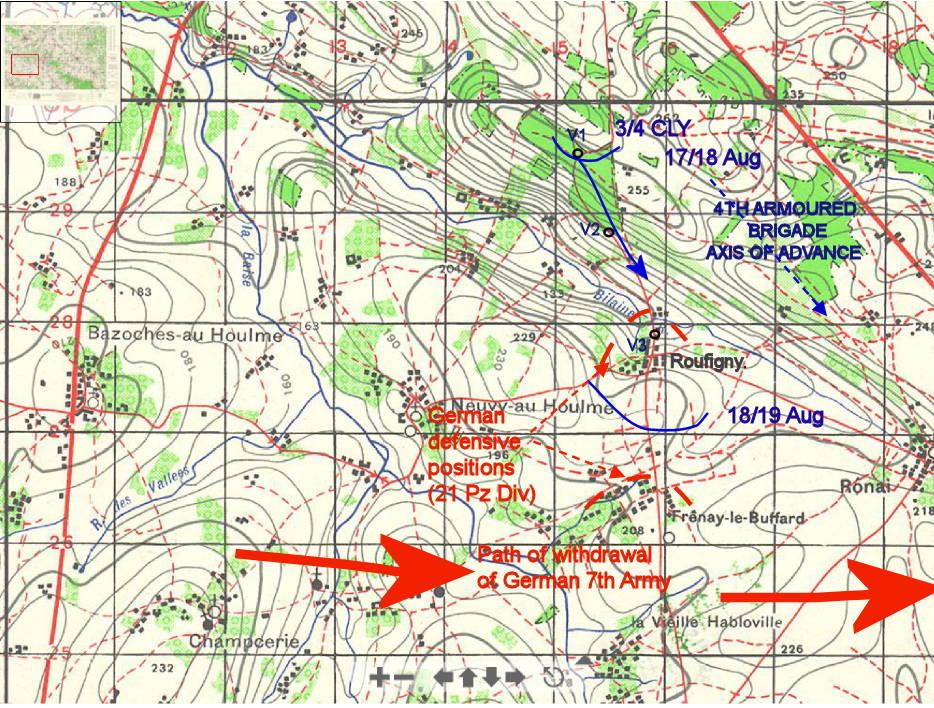
- 1:50,000 map showing movement of B Sqn 3rd/4th CLY 18th Aug 1944
-
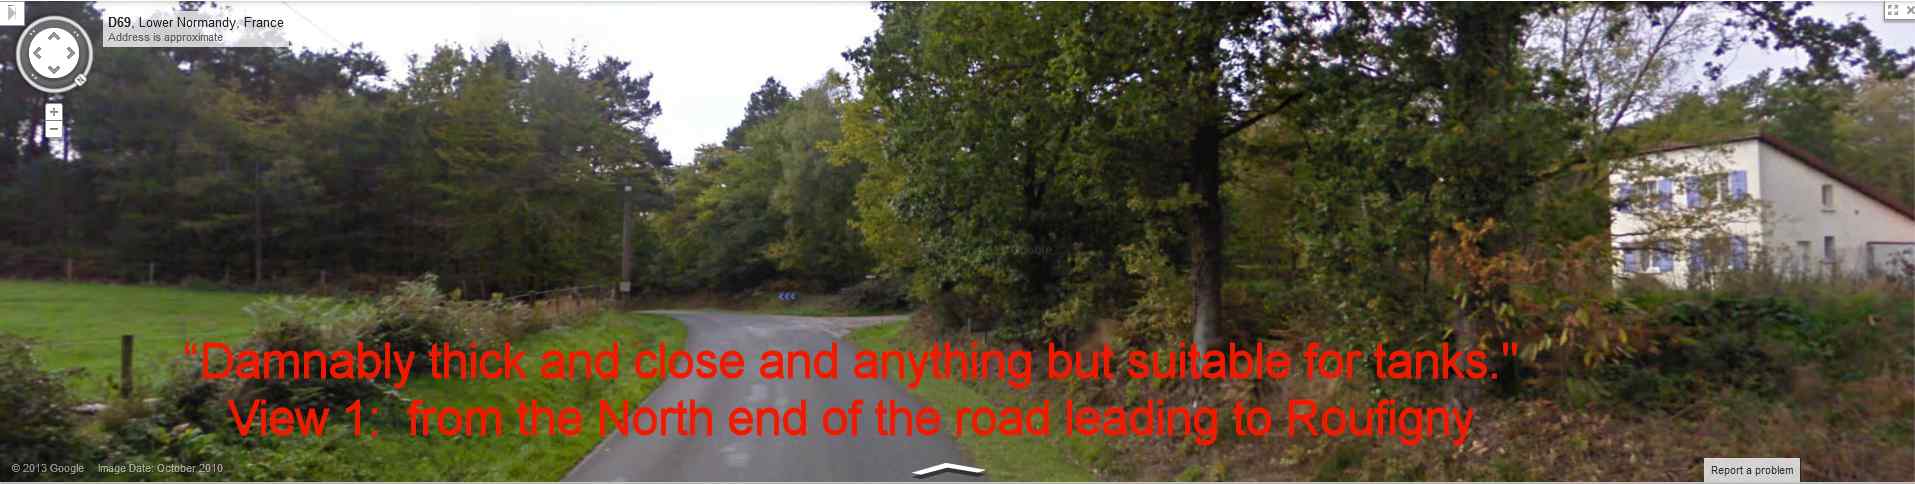
Viewpoint 1 (Google Streetview)
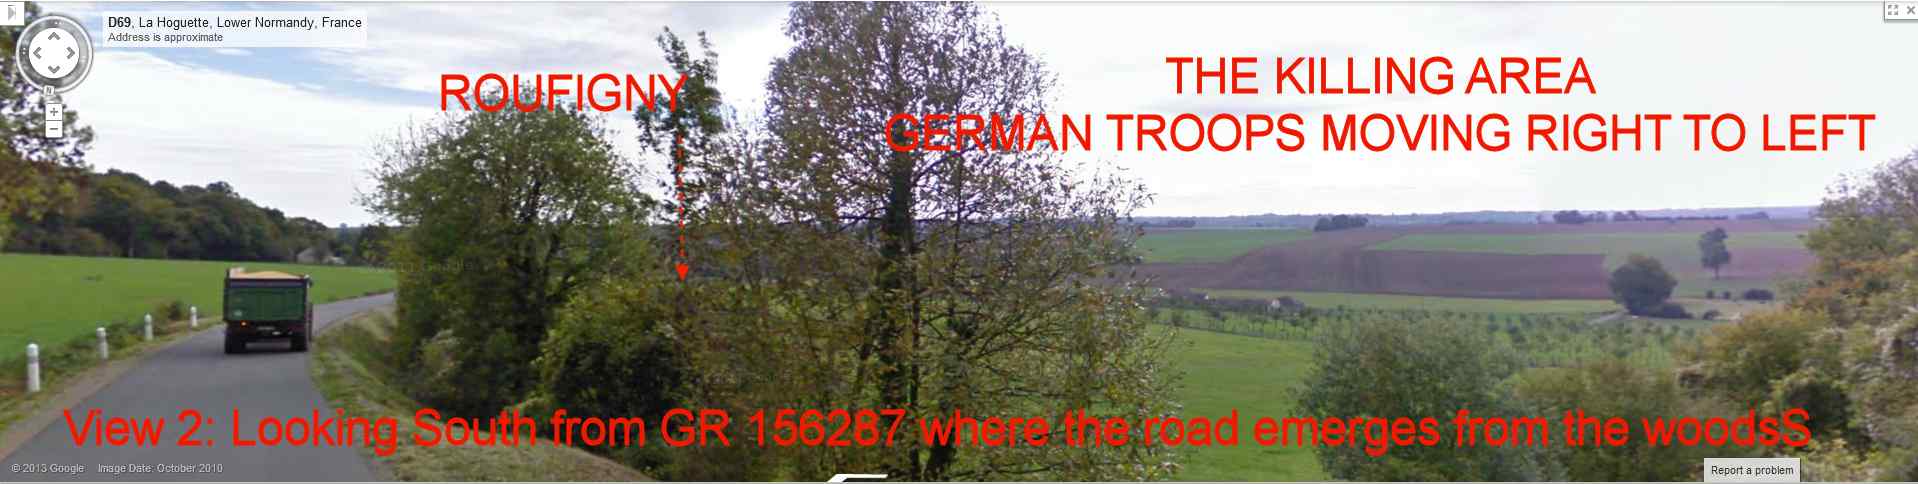
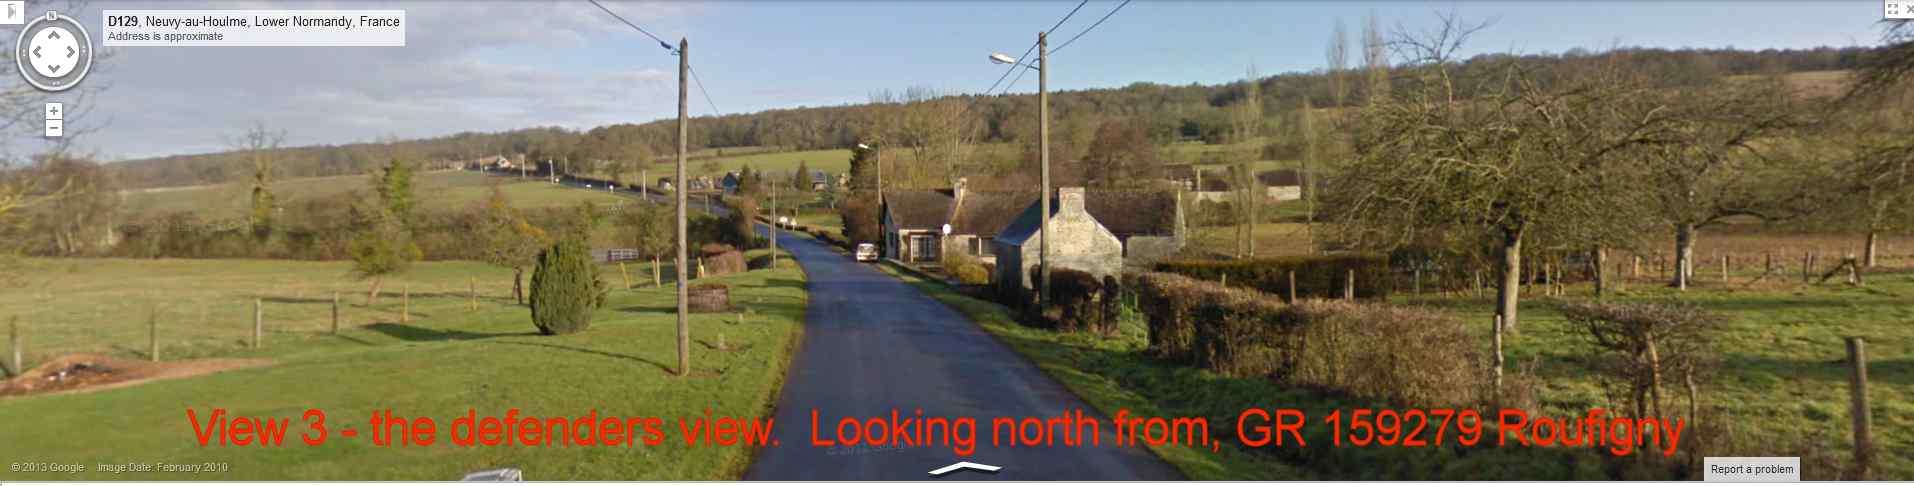
The ten men in row B of plot IV in Banneville-la-Campagne were killed in the frontal attack on Roufigny. This village was in a hollow down the escarpment, quite a tough task for an armoured unit. B Squadron, seem to have been unlucky on the 18th, losing ten dead and ten wounded from the five tanks knocked out, while C Sqn suffered one wounded from the two tanks knocked out on the 19th.. The mortality rate of casualties was around 25% for the campaign as a whole, so ten dead from 20 casualties may reflect some catastrophic events such as two tanks brewing and incinerating their crew – a horrific prospect.
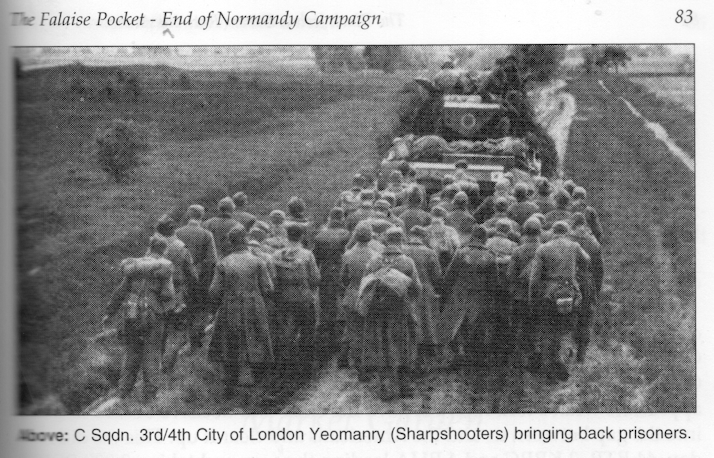
This operation was a success for 4th Armoured Brigade. Besides the CLY claims listed in the war diaries, the brigade captured 3,000 prisoners.
The War Diary of 4th Armoured Brigade’s gunners, 4 RHA is evidence of the artillery fire-power inflicted on the Germans. (4)
“Aug 18 The 2IC went at once to Bde and got the form that the Bde was to push down the road running SSE frm Falaise to join in a general beat up of enemy tpt retreating east. Canadians, Poles, French and Americans were also to take part. The Regiment came into action about two miles south of Falaise and immediately had some wonderful shooting. OP s were continually calling for regimental and higher targets. We also had an Air OP up who had very good observation indeed, and there was so much to shoot at that it was difficult for him to choose one target from another. The 2IC, who was at Tac 4 Armd Bde, also had two reps (one from a fd regiment and one from a medium regiment sitting with him and he managed to wear out two medium guns. At one time there were three shoots going over the regimental frequency at the same time.
Aug 19 Another good day with plenty of observed and predicted shooting
Regt fired 800 rpg during these two days.”
The role that the British Army played in the Falaise Pocket is often ignored as the battle tends to focus on the impact of the air forces and they the controversy about whether the British did enough to prevent more Germans escaping. Roy Suzuki and his comrades in row B Plot IV are a testimony to the keenness of Carver to push on, the willingness and competence of the Germans to defend the flanks of the pocket and the difficulties of removing determined well armed men in good defensive terrain. They are also a reminder that arrows on tactical maps translate into handfuls of weary men faced with moving forwards towards a series of ambushes.
I’d like to know more about Roy Suzuki. I don’t know when he joined the army and whether there were any obstacles placed on the children of Japanese as there were the Germans and Italians. Maybe he joined up before Pearl Harbour. When I mentioned the Japanese British to Gordon Corrigan yesterday at the Battlefields Trust lunchtime lecture yesterday he told me that he know of at least one other. This man served in the Dorset Regiment he was the son of a Japanese musician who was travelling and working in Britain at the outbreak of war. He joined up when everyone else did. How many other Japanese or Anglo Japanese served in the British forces in the Second World War?
References
1. 12 Corps G War Diary August 1944 Appendix B HS/WD/NWE/159/1/H quoted in: Cabinet Papers: Liberation Campaign In North West Europe Phase 4 The Break Out And The Advance To The Crossing Of The Seine 16 June -29 August 1944
2. Patrick Delaforce: Monty’s Marauders
3. http://www.sharpshooters.org.uk/news/item.aspx?id=27
4. 4 RHA War Diary August 1944
5. http://www.mapmanusa.com/images/book-maps/rick-atkinson-guns-at-last-light-falaise-pocket.jpg
More about battlefield tours to Normandy here
![]()